The Book’d by WooNinjas Addon is a dynamic extension that adds robust booking and appointment functionality to your WooCommerce store. Ideal for businesses such as salons, clinics, rental services, and event organisers, it allows customers to seamlessly schedule appointments, book time slots, or reserve products directly through your website.
With flexible configuration options, you can offer day-by-day bookings, set buffer times between appointments, and define availability rules to suit your needs. The addon also supports real-time availability updates. Fully integrated with the WooCommerce ecosystem, this addon simplifies booking management while enhancing the customer experience.
Video Tutorial
Watch the tutorial video below for a quick walkthrough of the add-on’s features and setup process.
For detailed instructions, please continue reading the full documentation. If you still have any questions, feel free to submit a support ticket.
- Video Tutorial
- Installation
- Activate Your License Key
- How To Create/Edit A Hotel Booking Type
- How To Create/Edit An “Appointment / Consultation” Booking Type
- How To Create/Edit A Rental Booking Type
- How To Create/Edit An “Event” Booking Type
- How To Create And Add A Resource, Service, Or People Role To A Bookable Product Type
- Integrations
- Booking Reports
- Event Attendees
- How to Cancel/Reschedule Bookings
- How to Enable/Disable Booking Emails
- Widgets
- FAQ’s
- Changelogs
Installation
- Install and activate the WooCommerce plugin.
- Install and activate the “Book’d by WooNinjas” Add-on.
- There will be a new tab created in the WooCommerce Settings sub-menu by the name “Booking Settings” and a new sub-menu by the name “Booking Reports” in WooCommerce.

Book’d by WooNinjas – Main Tab
Activate Your License Key
The license key can be configured from the License sub-tab, found on the “Booking Settings” tab. The license key will be sent to the email address you provide when you purchase the add-on.
Insert your license key in the field and then click on Activate.
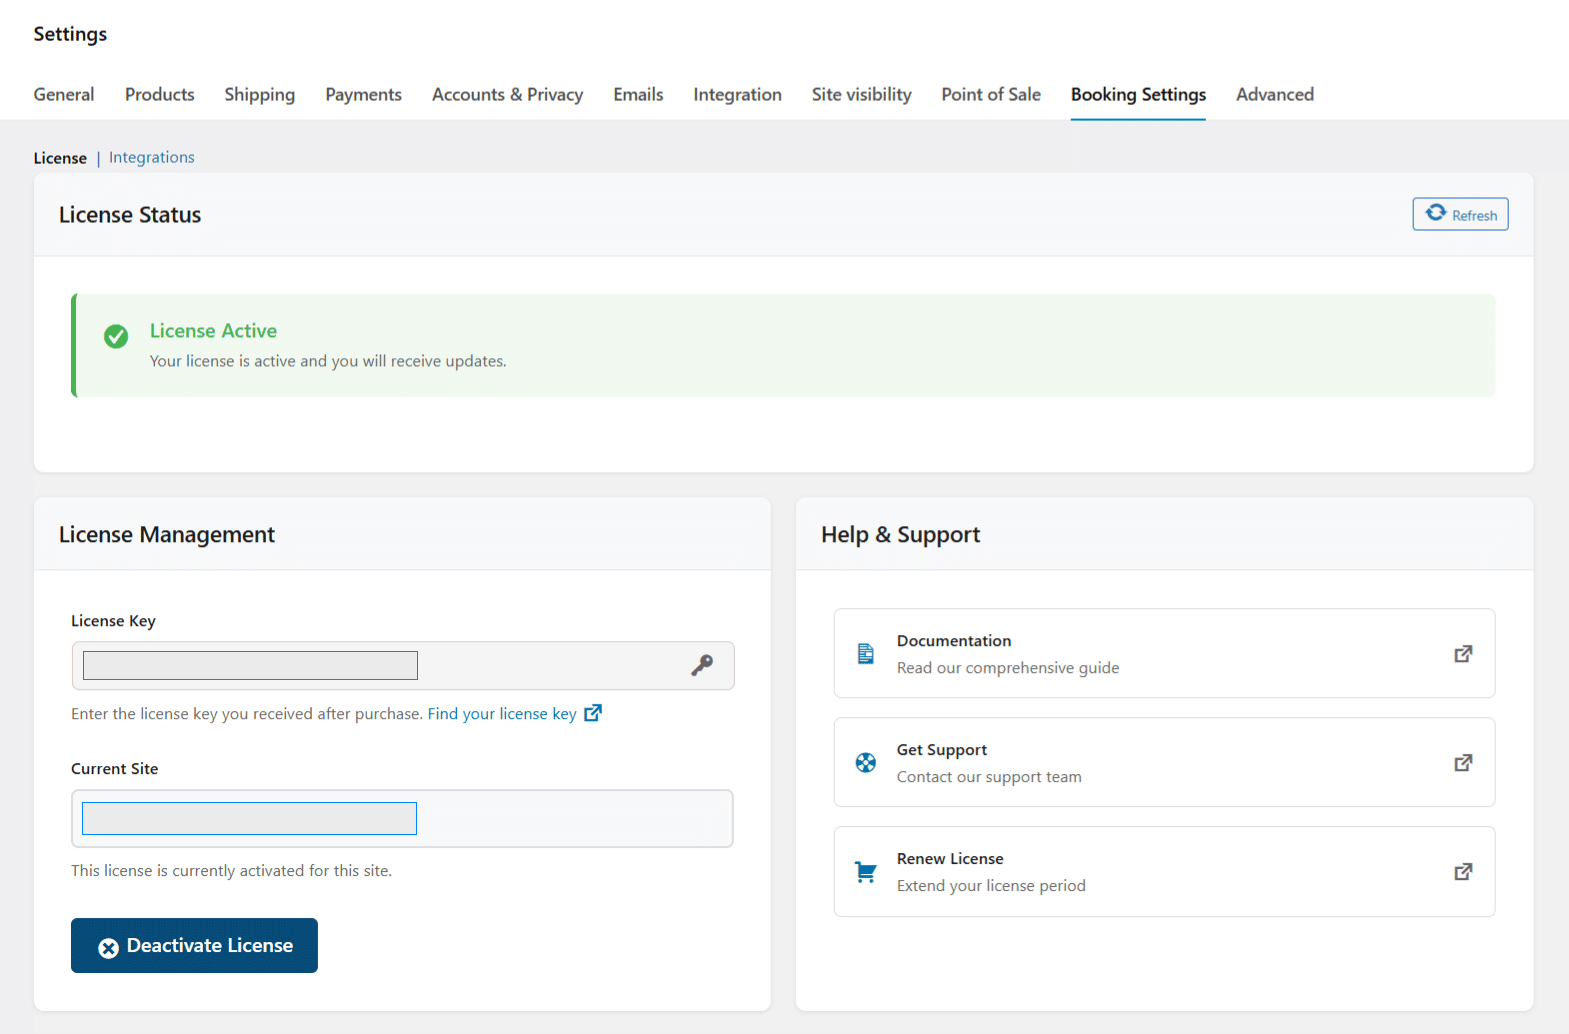
Book’d by WooNinjas – License Configuration
How To Create/Edit A Hotel Booking Type
To create/edit a hotel booking type, the steps are as follows:
1- Enter/Edit the product title on the product edit page.
2- In the “Booking Options → Settings” tab, select the “Booking Type” option as “Hotel”.
3- Enter/Edit the following information:
- Booking Title / Service Name (This field is optional)
- Quick Set Date Range (This helps you quickly configure availability for long-term hotel bookings. The start date is set to today, and the end date is calculated based on the selected years.)
- Start Date
- End Date
- Booking Duration
- Check-in Time
- Check-out Time
- Minimum Stay Duration (Minimum number of days for hotel bookings. Leave empty for no minimum restrictions.)
- Maximum Stay Duration (Maximum number of days for hotel bookings. Leave empty for no maximum restrictions)
- Show (Adult) Count (Min, Max fields)
Check to show this field on the booking form. You can rename the label. - Show (Child) Count (Min, Max fields)
Check to show this field on the booking form. You can rename the label. - Adult Count fields (Min, Max fields)
- Child Count fields (Min, Max fields)
- Assigned Resource/Staff (This field is optional)
- Auto-cancel pending/failed orders after 24 hours (This field is optional)
- Cancellation threshold (hours)
Here you can provide how many hours after which a booking of a respective customer should be cancelled. After the respective time has passed, the WooCommerce Orders of the respective product which have statuses pending or failed will automatically be cancelled, and their respective dates will again become available for the customers to book.
- Cancellation threshold (hours)
- Show timezone on booking times (This field is optional)
Here, you can select whether you want customers to see the website’s timezone on the product page on the “Appointment Date” and “Available Time Slots” options. - Physical Location (In the Location tab)
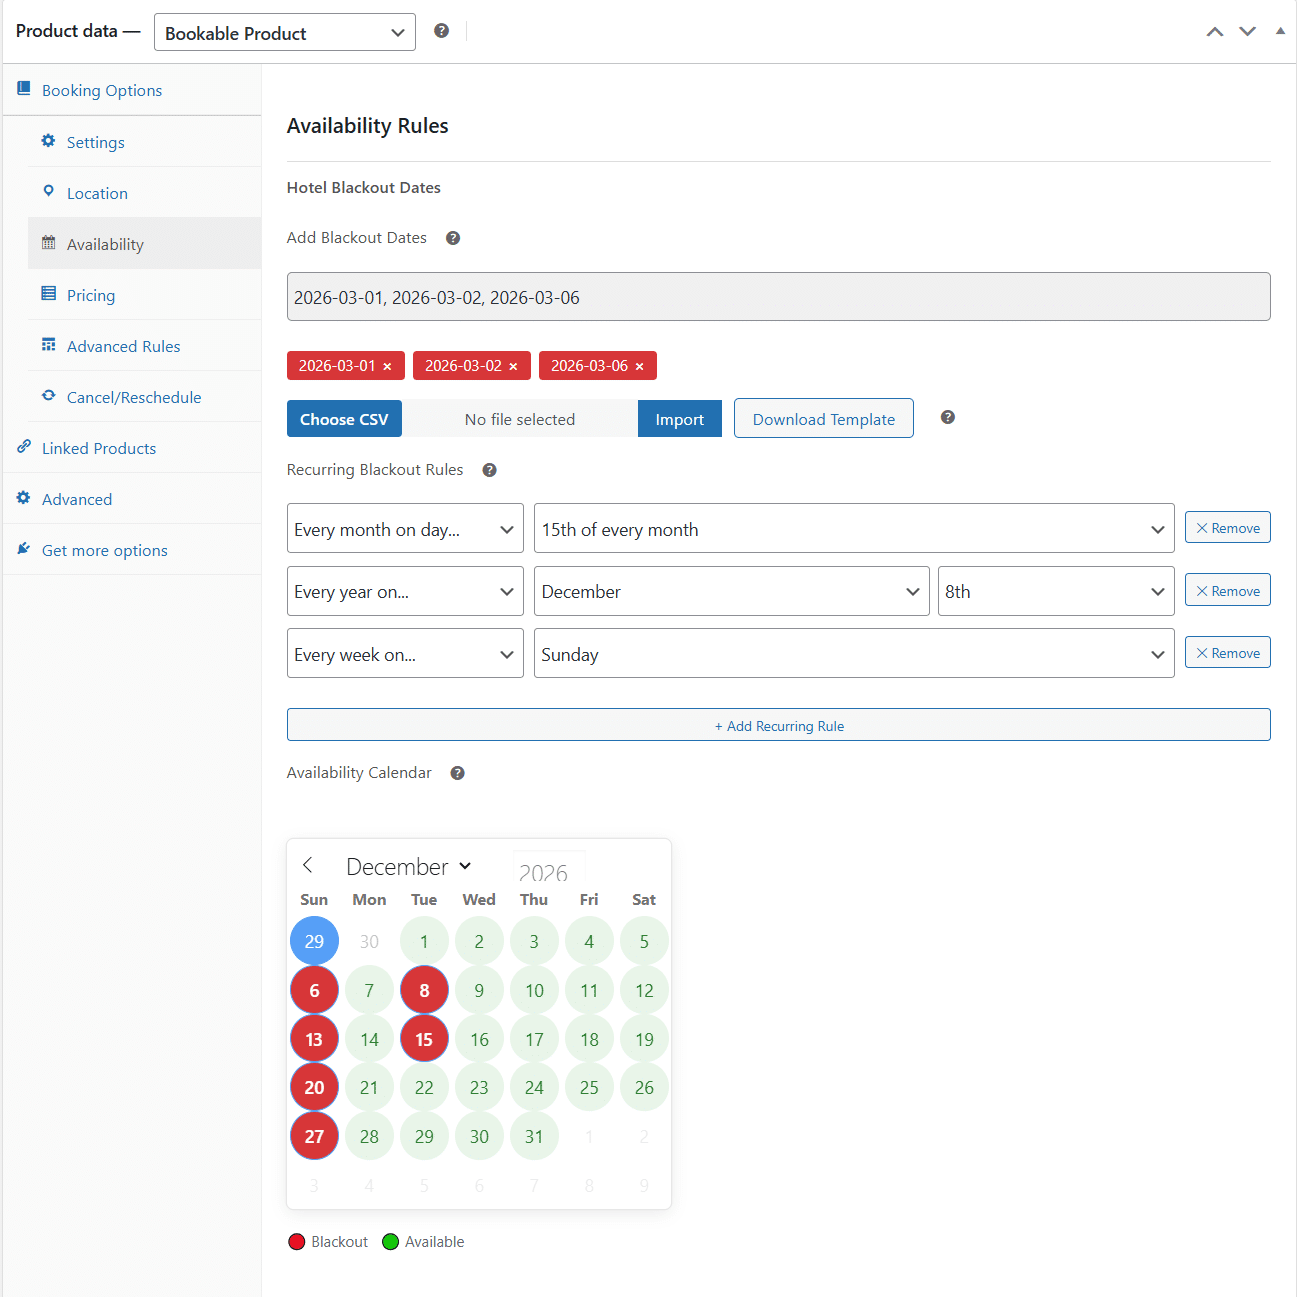
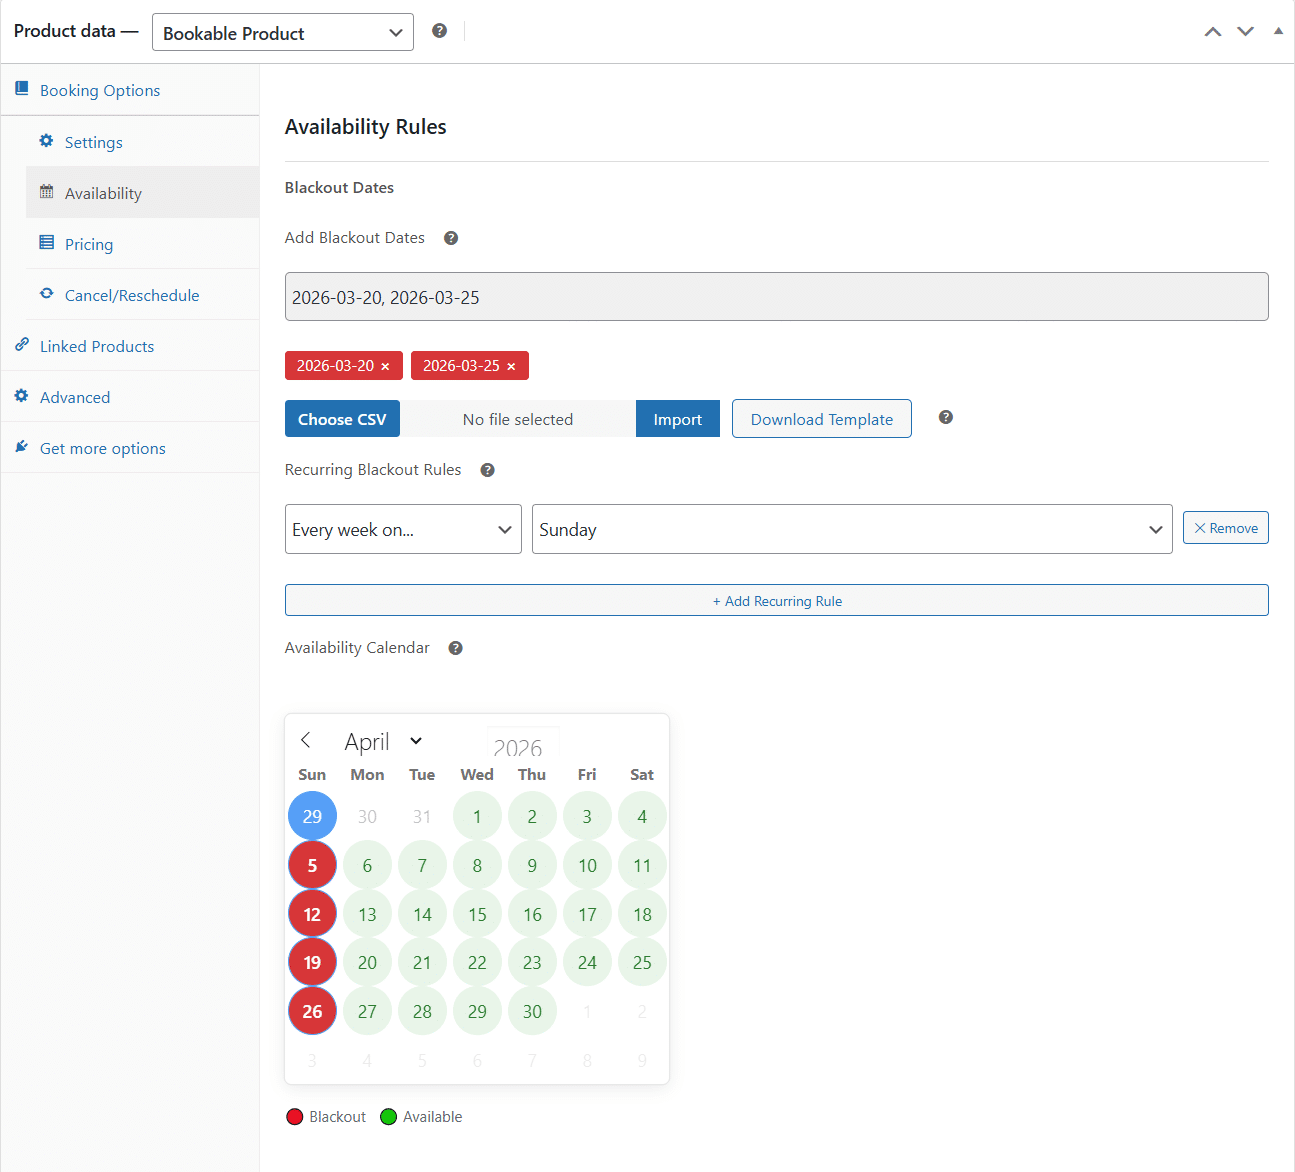
- Add Blackout Dates
This field is optional. Here you can select individual dates on which the bookings cannot be made. You can also provide multiple blackout dates using a CSV File and clicking the “Import” button. You can download the template file using the “Download Template” button. Make sure to press the “Publish/Update” button on the product edit after making any changes. - Recurring Blackout Rules
This field is optional. Here, you can provide a blackout date with a fixed pattern using the following options:- Every week on (The respective day on every week will not be available for booking)
- Every month on day (The respective date on every month will not be available for booking)
- Every year on (The respective date of the respective month of every year will not be available for booking)
- Availability Calendar
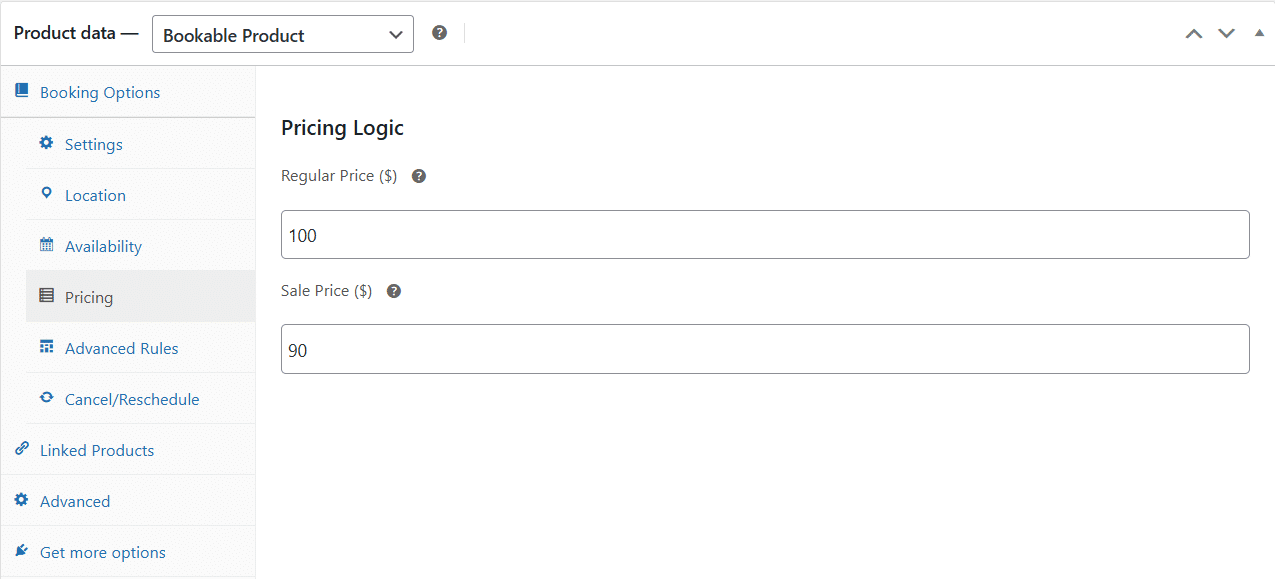
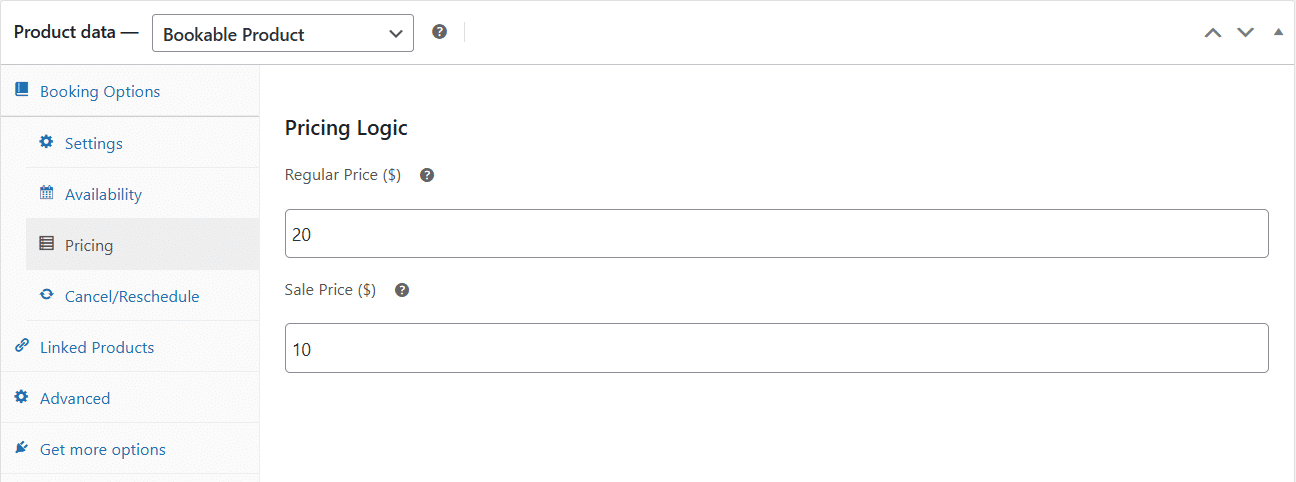
Here, you can view the frontend calendar that the users will see on the frontend of the product page. - Regular Price (In the Pricing tab)
- Sale Price (In the Pricing tab, this field is optional)
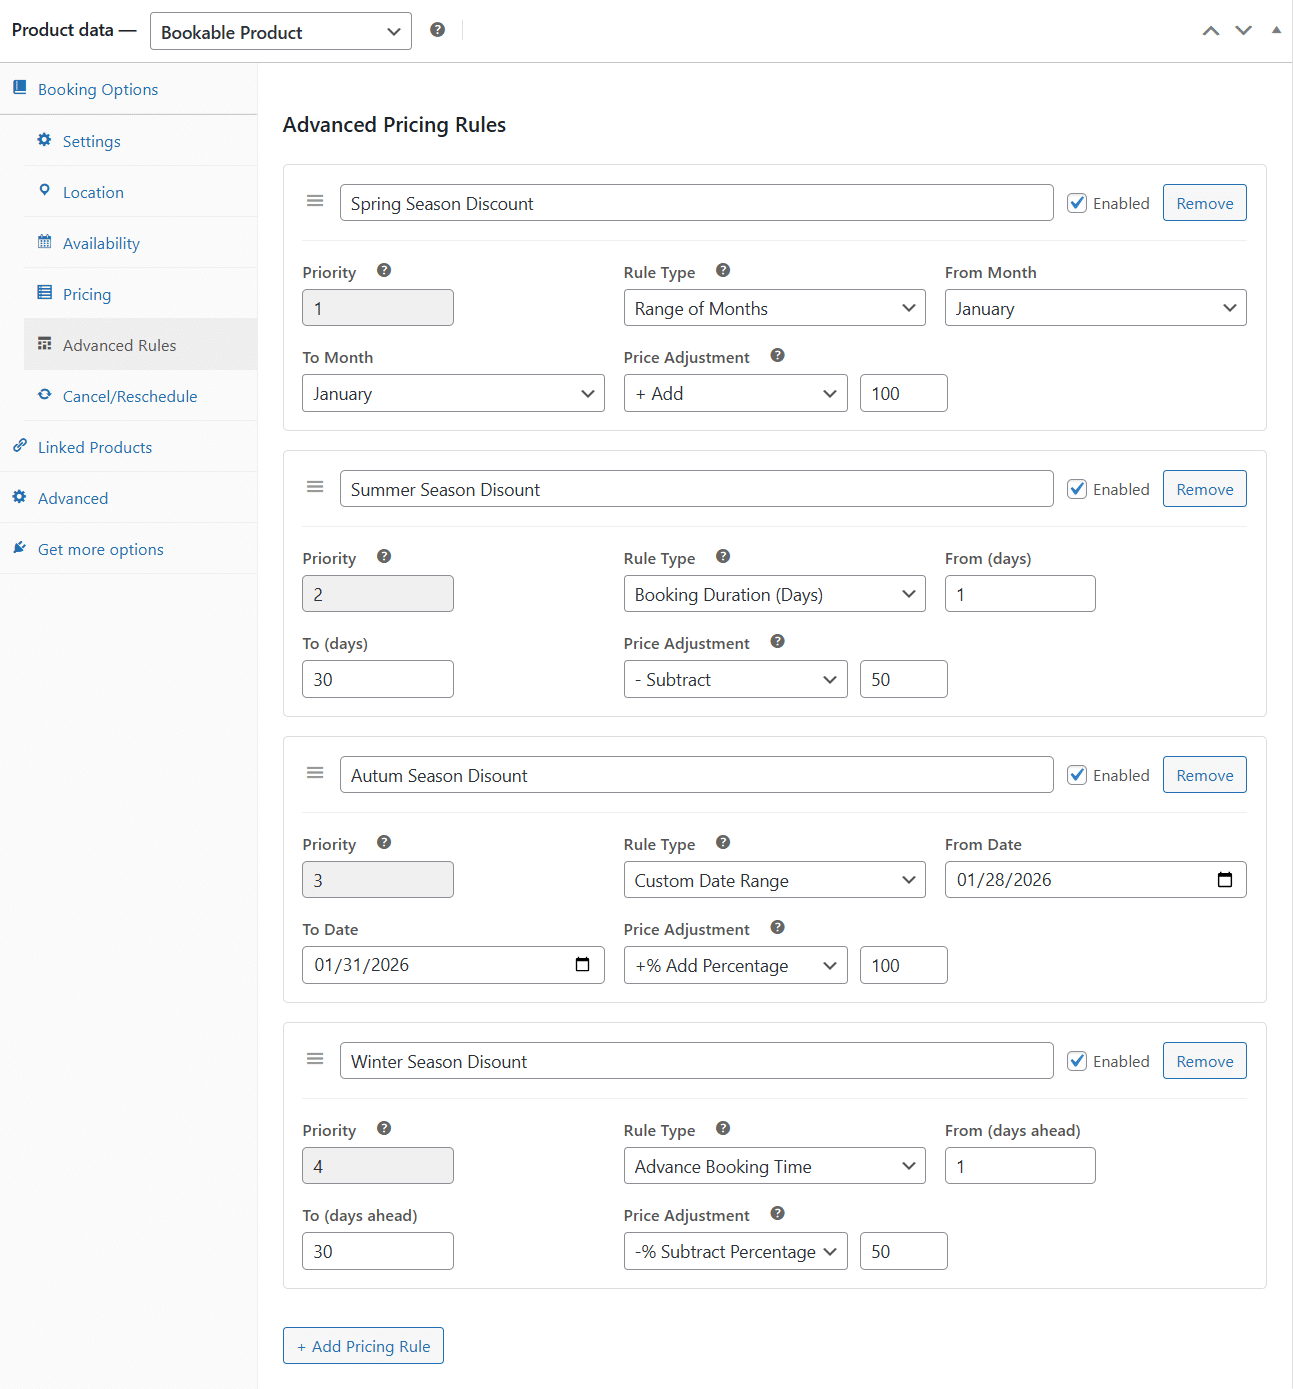
In the advanced rules tab, you can provide rules to increase/decrease the final price of the booking duration. The steps to create pricing rules are as follows:
- Provide a Rule Name: Give your rule a descriptive name for easy reference.
- Enable the Rule:
Check the box → Rule applies immediately while calculating the price.
Uncheck the box → Rule applies on the frontend as the customer selects the duration. - Rule Order: Rules are applied from lowest to highest number. Make sure the order reflects how you want the rules to be processed.
Select the rule type. You can select from the following options:
- Range of Months: Apply during specific months. Example: Selecting January to January means you want to apply the respective rule for the current year’s January month only.
- Booking Duration (Days): Apply based on the number of days booked (booking duration).
- Custom Date Range: Apply between specific dates.
- Advance Booking Time: Apply based on how far in advance a booking is made.
Select the “Price Adjustment” and the amount. You can select from the following options:
- + Add:
Fixed amount is added and applied on a per-day basis (multiplied by booking duration). For a 1-day booking, if the total price is $100 and you add $20, the new total becomes $120 because 100 plus 20 equals 120. For a 2-day booking, if the total price is $100 and you add $20 for each day, the new total becomes $140 because 100 plus 20 times 2 equals 140. - – Subtract:
Fixed amount is subtracted and applied on a per-day basis (multiplied by booking duration). For a 1-day booking, if the total price is $100 and you subtract $20, the new total is $80. For a 2-day booking, if the total price is $100 and you subtract $20 per day, the new total is $60. - +% Add Percentage:
Percentage addition (+%) is applied to the Total price once. Example: If the total price of a product’s duration is $100 and 20% is applied, then the new total price of the duration will come out to be $120. Since $100x 0.2=$20 and $100 + $20=$120. - -% Subtract Percentage:
Percentage subtraction (-%) is applied to the Total price once. Example: If the total price of a product’s duration is $100 and 20% is applied, then the new total price of the duration will come out to be $80. Since $100x 0.2=$20 and $100 – $20=$80.
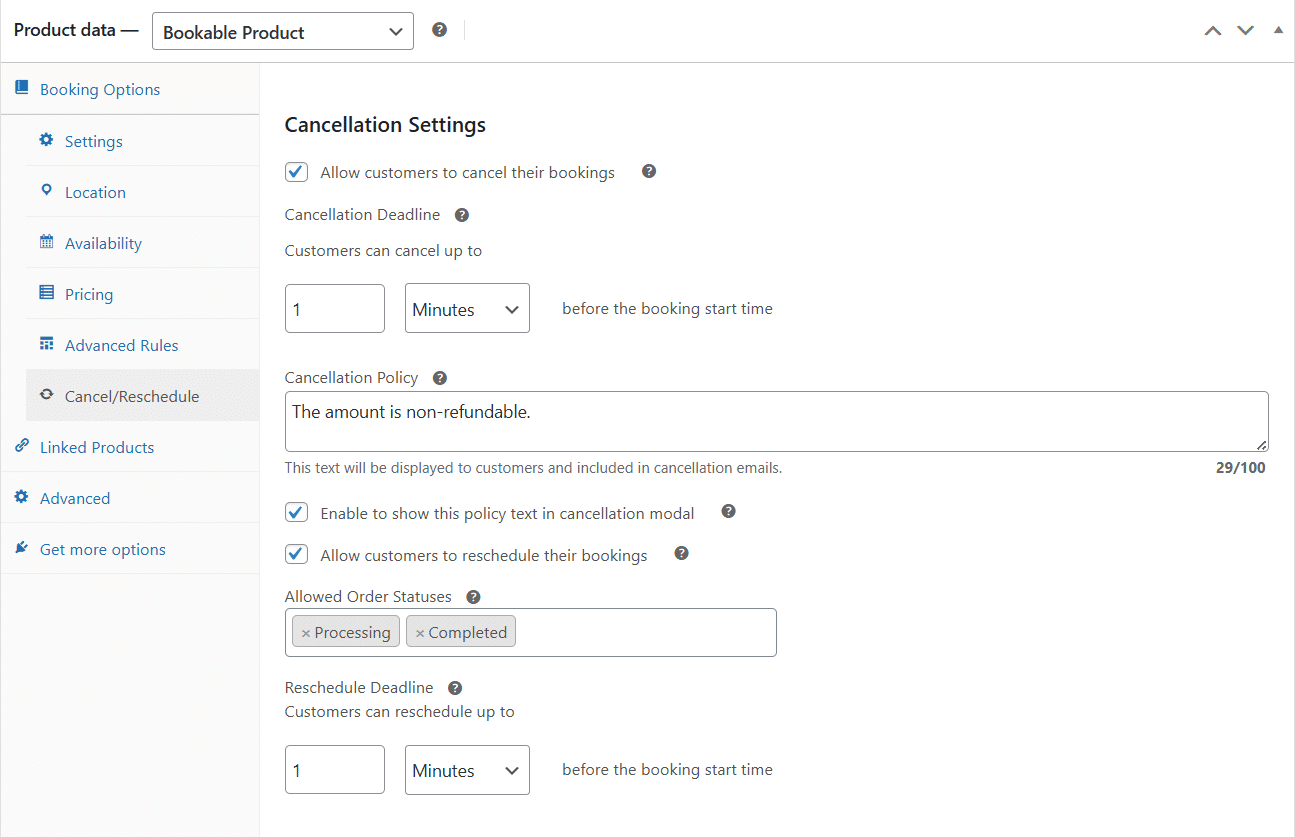
Allow Customers To Cancel Their Bookings (This Is Optional)
Cancellation Deadline
Here, you can set the time before the start date when customers will be able to cancel their bookings. Suppose your booking start date is 17 January 2026 and the product’s cancellation deadline is set to 1 day. It means the customer can cancel their booking till 15 January 2026, after which the “Cancel” button will no longer be visible to the customer in their WooCommerce Customer Dashboard (“Bookings” tab).
Cancellation Policy
This is the text which will be sent to the customers and administrators in their WooCommerce emails, “Booking Cancelled” and “Admin Booking Cancelled”, when the customer cancels their individual booking. This text will also be visible to the customers in their booking cancellation pop-up in their WooCommerce Customer Dashboard (“Bookings” tab) if the administrator has enabled the “Enable to show this policy text in cancellation modal” option in the product’s edit page.
Enable showing this policy text in the cancellation modal. If this checkbox is checked, customers will see the “Cancellation Policy” text in their booking cancellation pop-up in their WooCommerce Customer Dashboard (“Bookings” tab).
Allow Customers To Reschedule Their Bookings (This Is Optional)
Allowed Order Statuses
Here, you can select the WooCommerce Orders’ statuses for which the “Reschedule” button will be displayed. The “Reschedule” button will not be visible to the customers for the WooCommerce orders whose statuses are not selected.
Reschedule Deadline
Here, you can set the time before the start date when customers will be able to reschedule their bookings. Suppose your booking start date is 17 January 2026 and the product’s reschedule date is set to 1 day. It means the customer can reschedule their booking till 15 January 2026, after which the “Reschedule” button will no longer be visible to the customer in their WooCommerce Customer Dashboard (“Bookings” tab).
4- Publish/Edit the product by clicking the “Publish / Update” button.
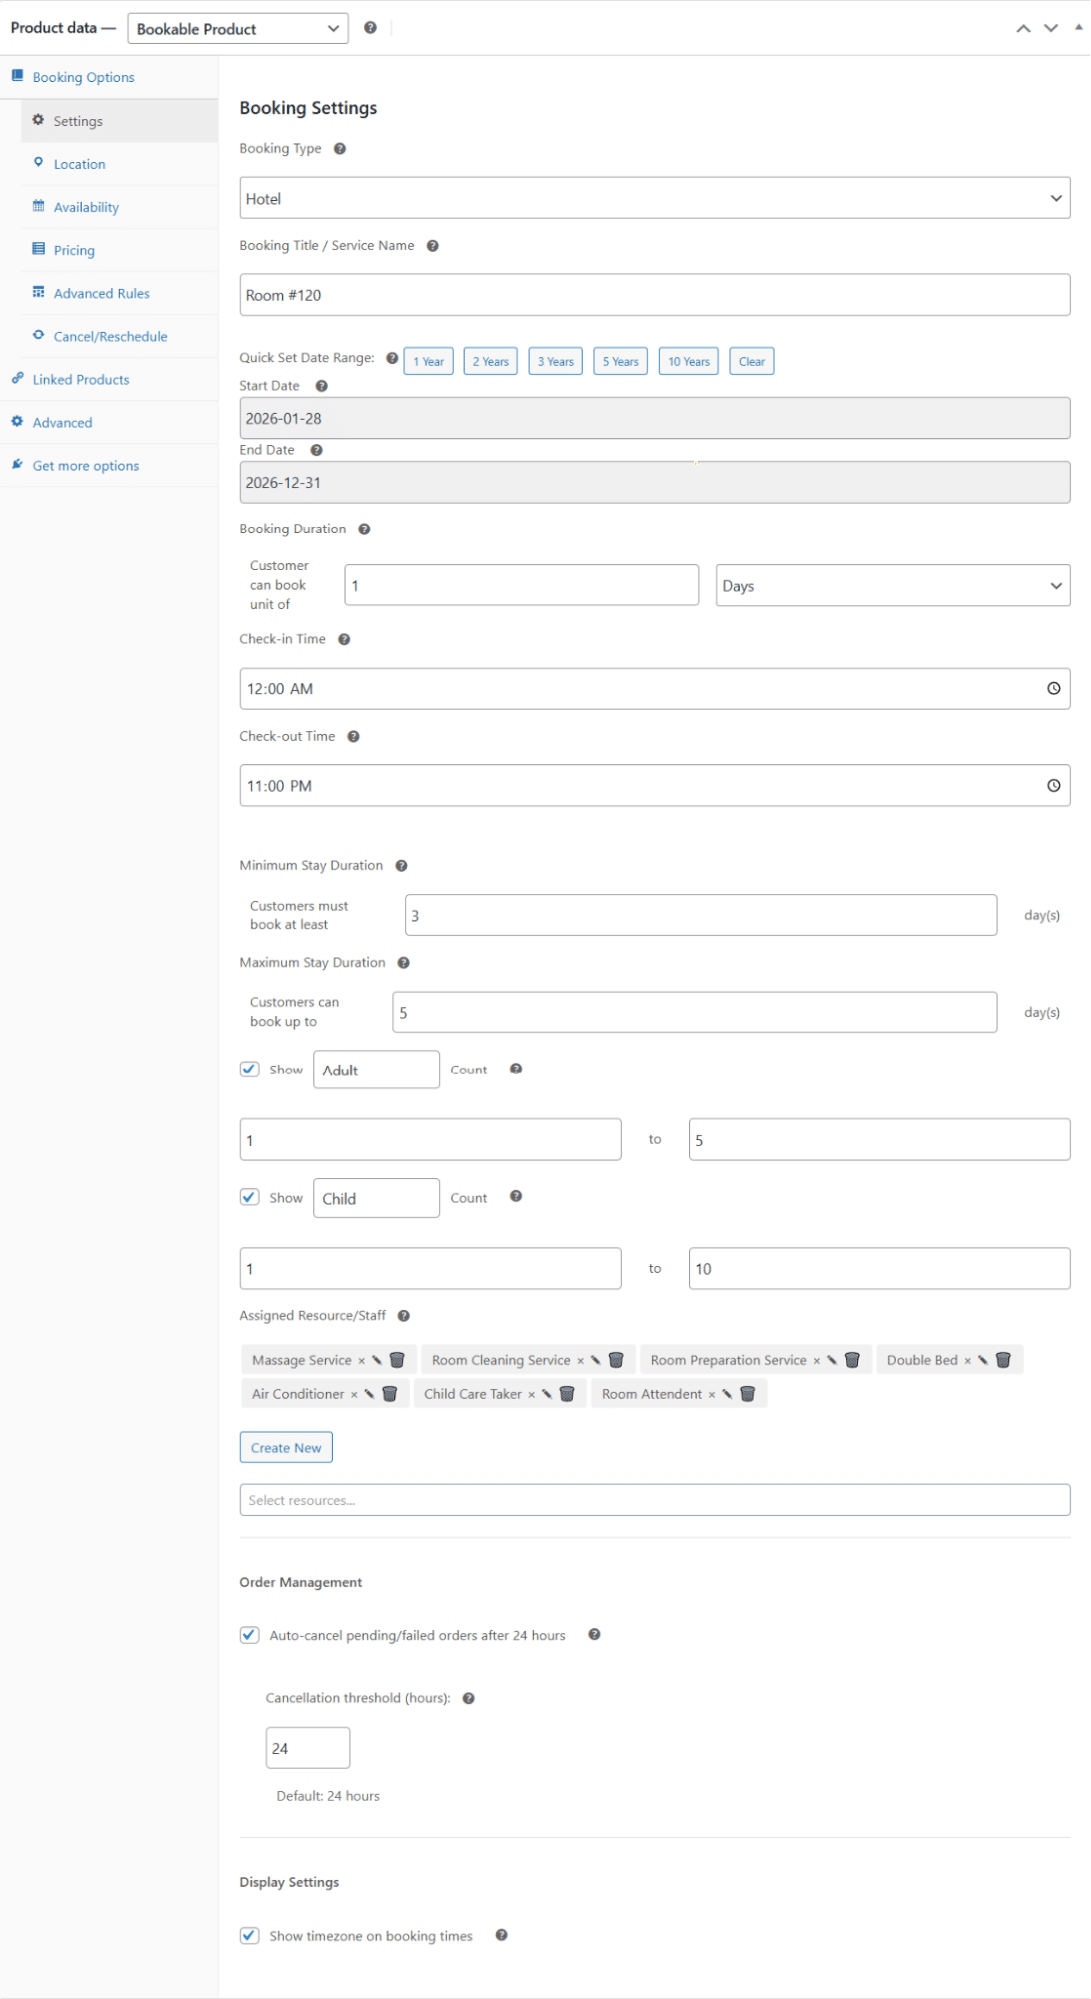
Book’d by WooNinjas – Hotel Settings tab
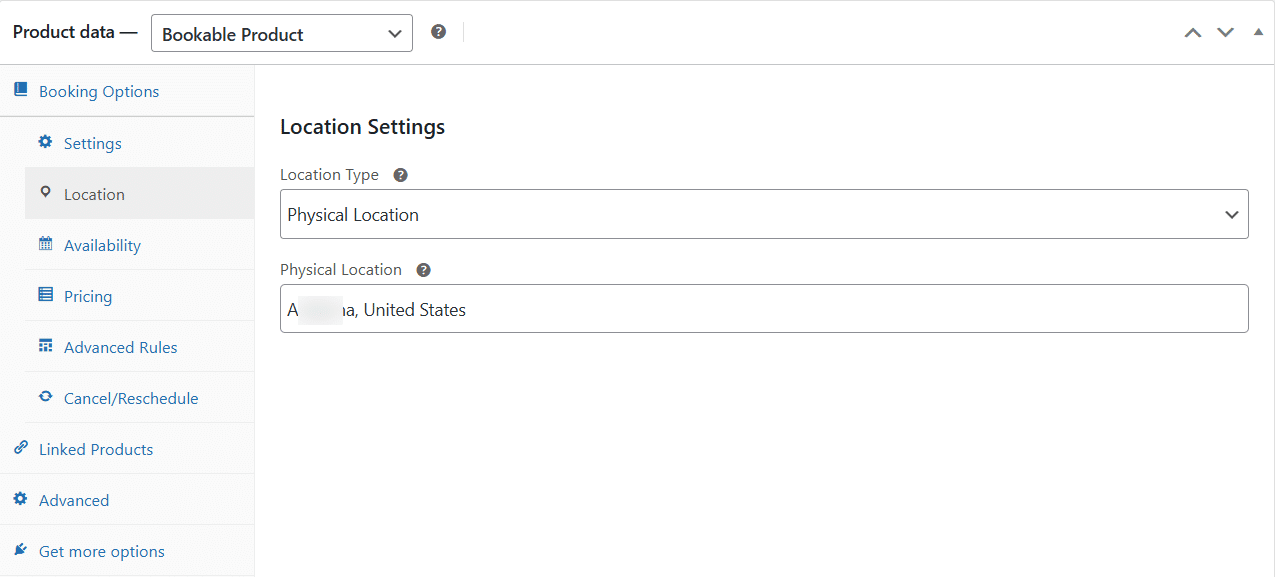
Book’d by WooNinjas – Hotel Location tab
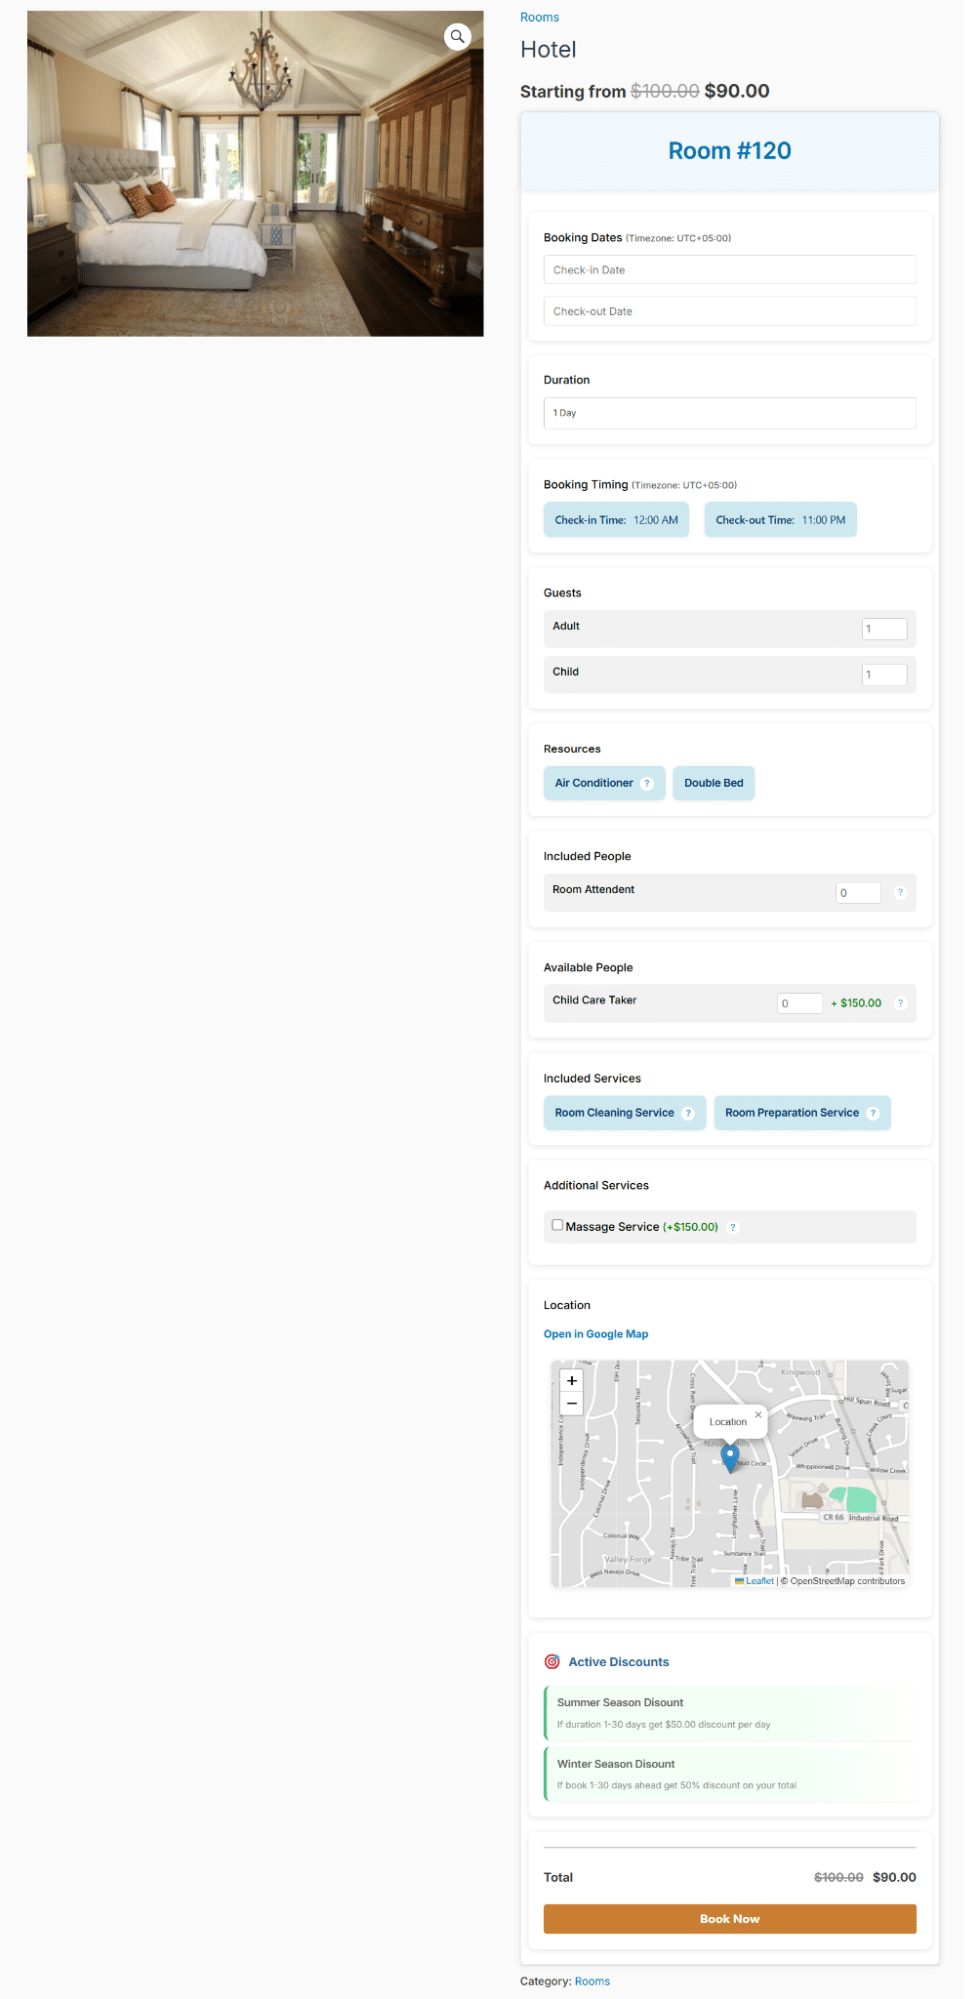
Book’d by WooNinjas – Hotel product page
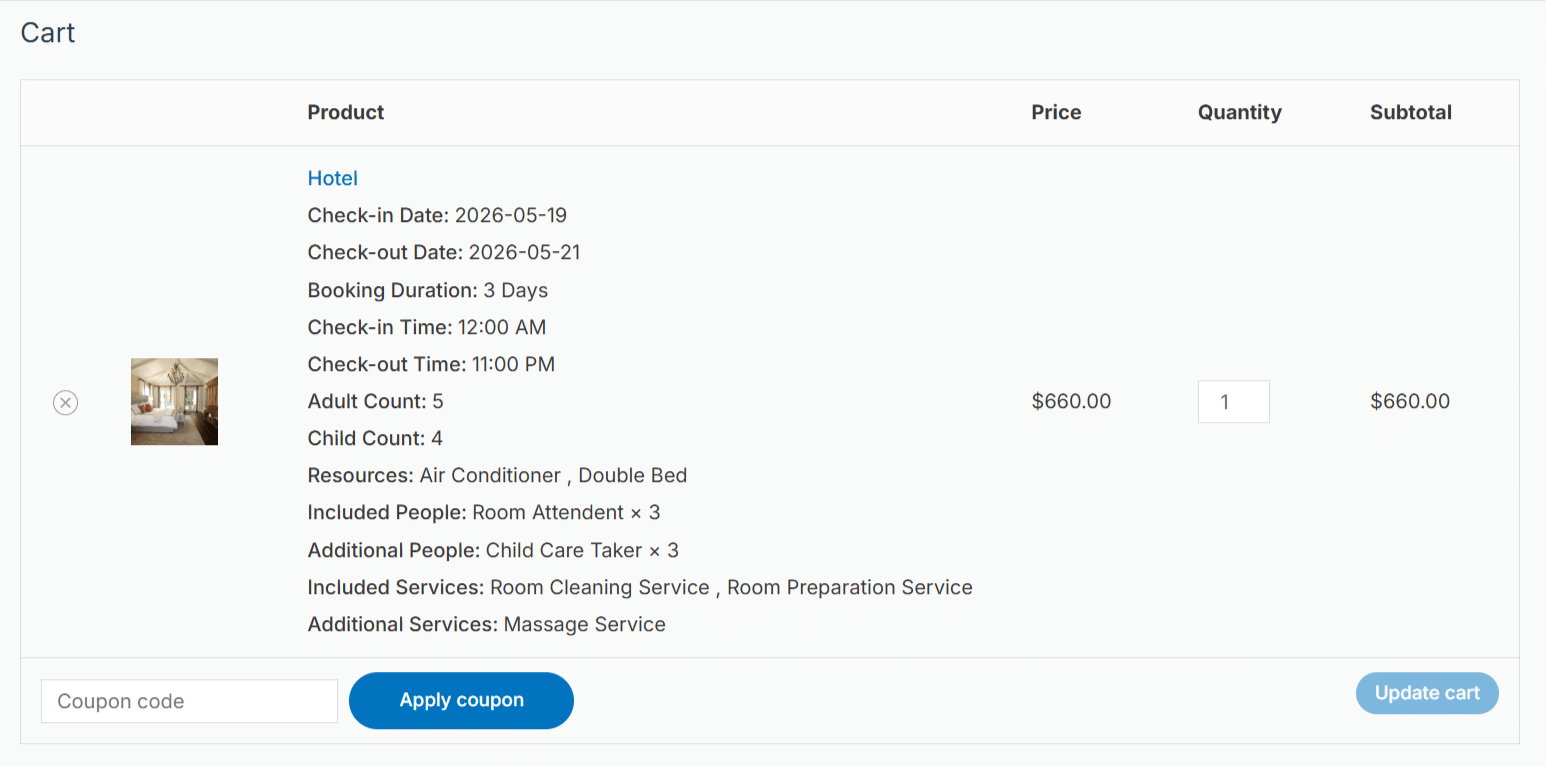
Book’d by WooNinjas – Hotel product cart page
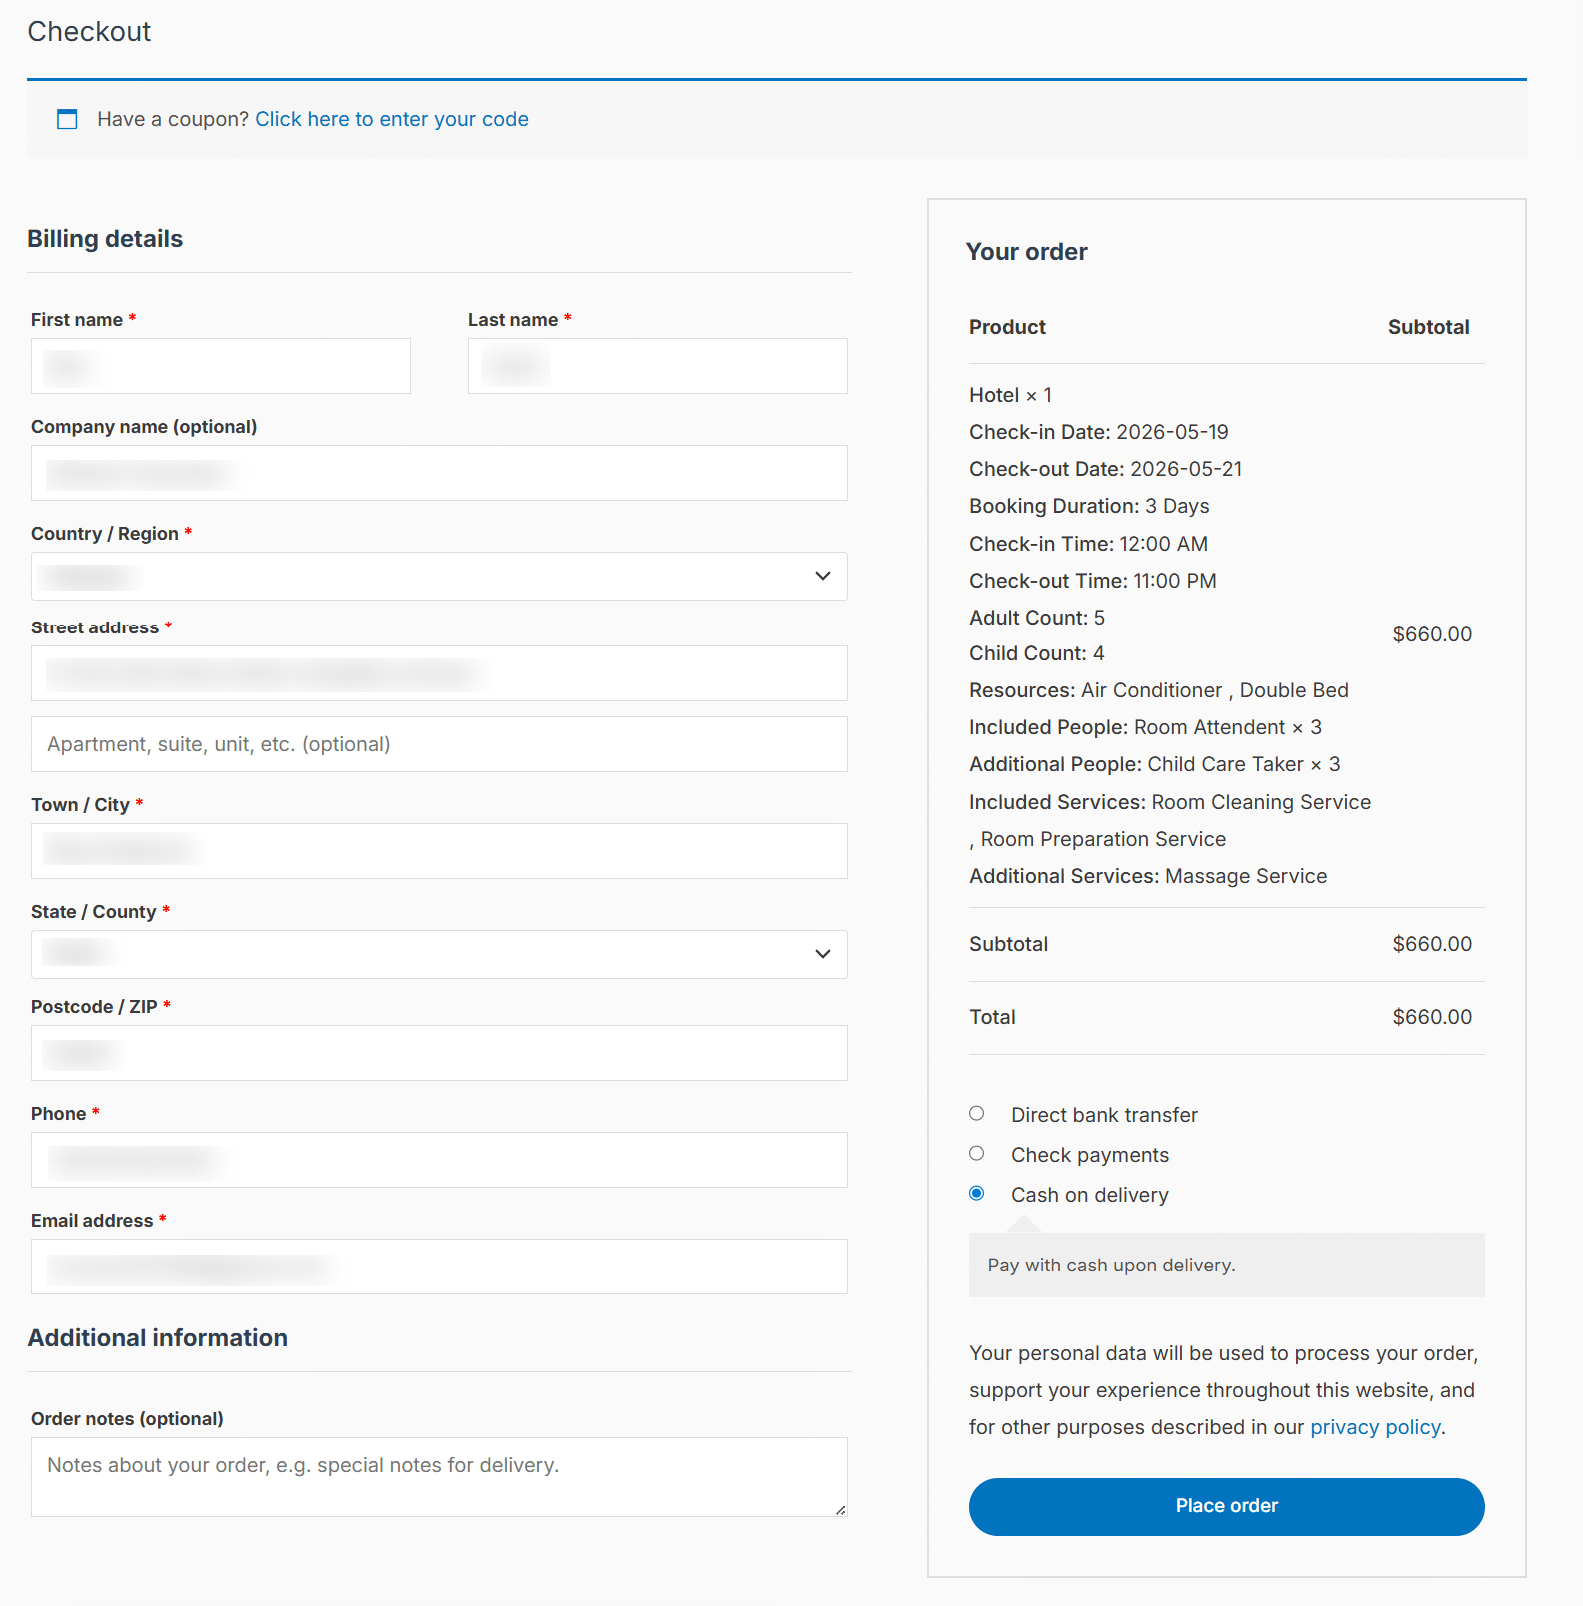
Book’d by WooNinjas – Hotel product checkout page
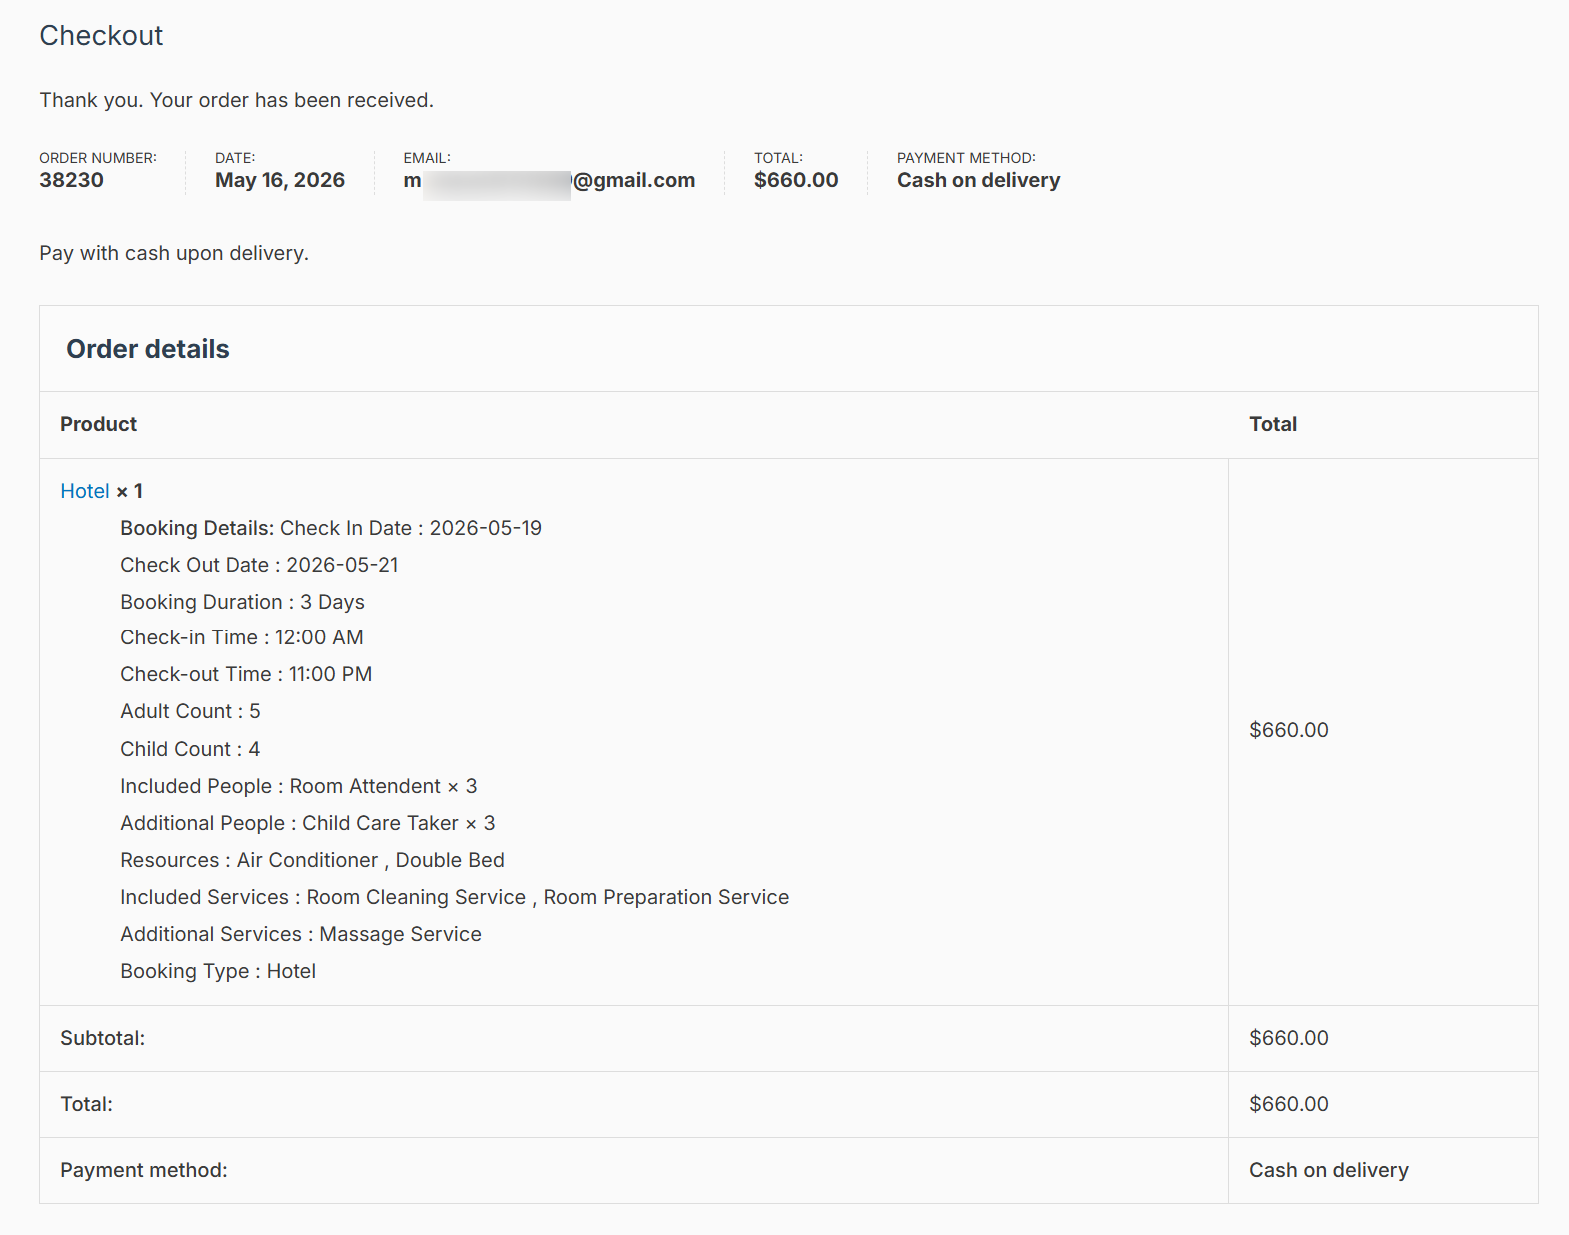
Book’d by WooNinjas – Hotel product order received page
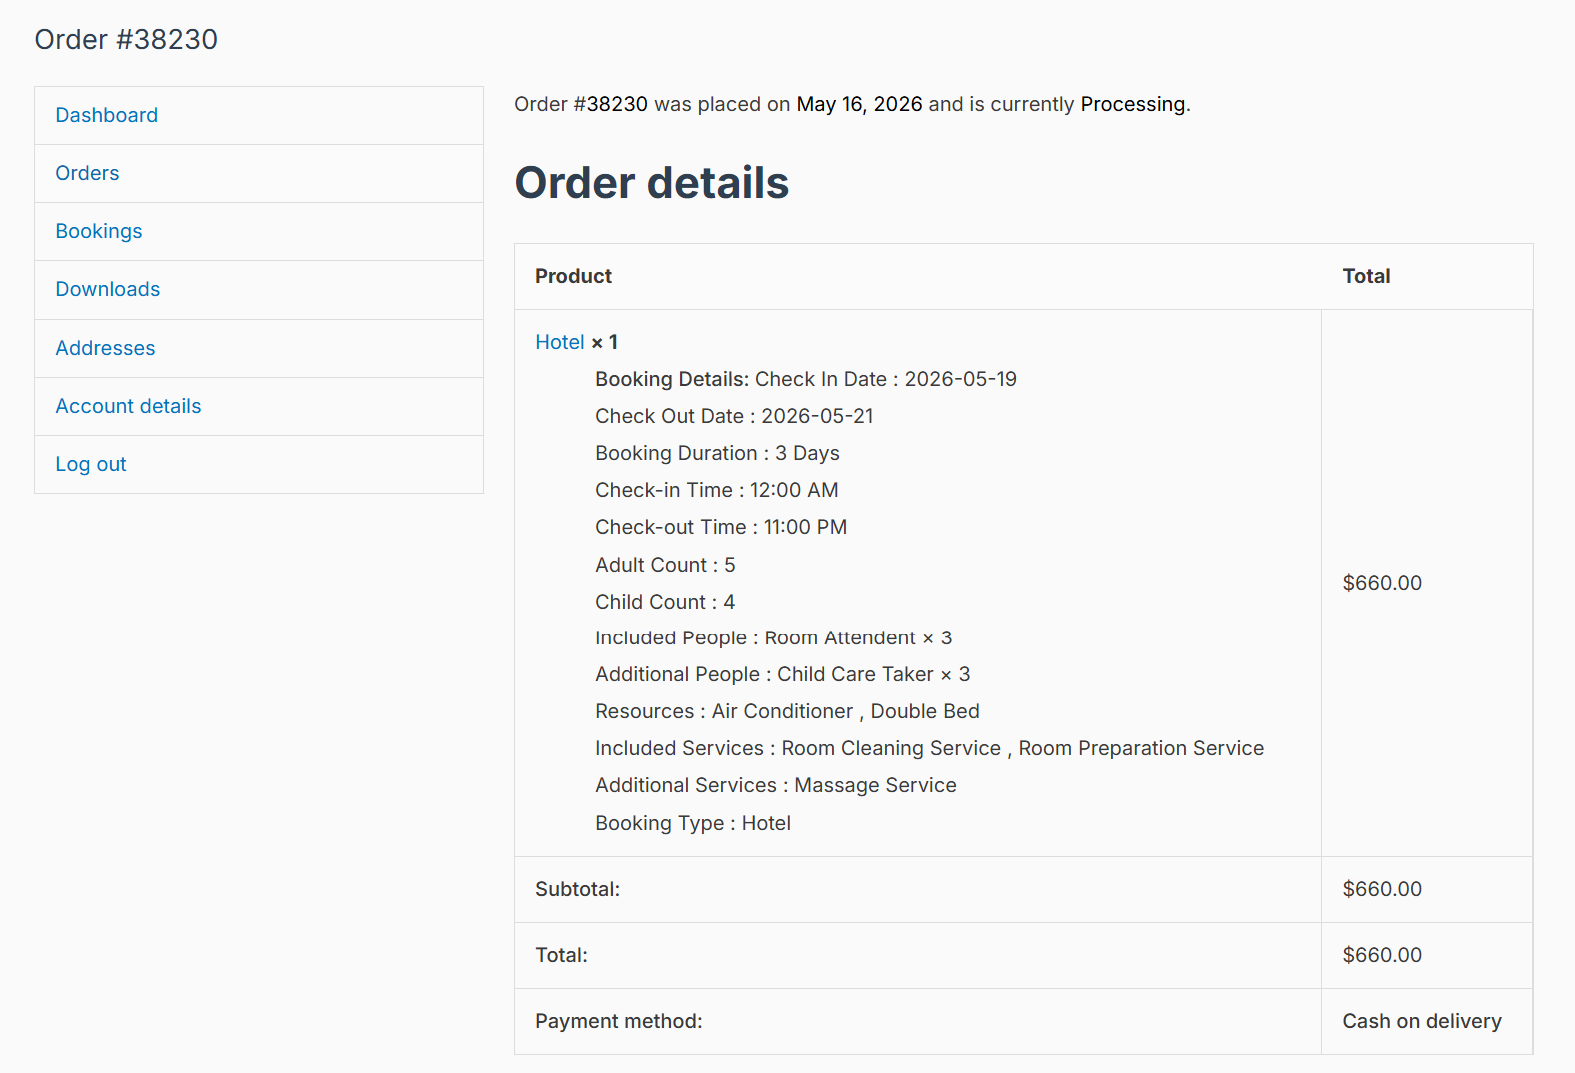
Book’d by WooNinjas – Hotel product order details page (Customer Dashboard)
How To Create/Edit An “Appointment / Consultation” Booking Type
To create/edit an “Appointment / Consultation ” booking type, the steps are as follows:
1- Enter/Edit the product title on the product edit page.
2- In the “Booking Options → Settings” tab, select the “Booking Type” option as “Hotel”.
3- Enter/Edit the following information:
- Booking Title / Service Name (This field is optional)
- Start Date
- End Date
- Booking Duration
- Buffer Time
- Show (Attendees) Count (Min, Max fields, this field is optional)
Check to show this field on the booking form. You can rename the label. - Attendees Count (Min, Max fields, this field is optional)
- Assigned Resource/Staff (This field is optional)
- Auto-cancel pending/failed orders after 24 hours (This field is optional)
- Cancellation threshold (hours)
Here you can provide how many hours after which a booking of a respective customer should be cancelled. After the respective time has passed, the WooCommerce Orders of the respective product which have statuses pending or failed will automatically be cancelled, and their respective dates will again become available for the customers to book.
- Cancellation threshold (hours)
- Show timezone on booking times (This field is optional)
Here, you can select whether you want customers to see the website’s timezone on the product page on the “Appointment Date” and “Available Time Slots” options. - Location Type (In the Location tab, it can be set to both physical or virtual)
- Physical Location (In the Location tab)
- Virtual Platform (In the Location tab)
- Link Generation Type (In the Location tab)
- Virtual Meeting Link (In the Location tab)
- Available Days (In the Availability tab)
- Available Time Range (In the Availability tab)
- Blackout Dates (In the Availability tab, this field is optional)
- Regular Price (In the Pricing tab)
- Sale Price (In the Pricing tab, this field is optional)
- Allow customers to cancel their bookings (This is optional)
- Cancellation Deadline
Here, you can set the time before the start date when customers will be able to cancel their bookings. Suppose your booking start date is 17 January 2026 and the product’s cancellation deadline is set to 1 day. It means the customer can cancel their booking till 15 January 2026, after which the “Cancel” button will no longer be visible to the customer in their WooCommerce Customer Dashboard (“Bookings” tab). - Cancellation Policy
This is the text which will be sent to the customers and administrators in their WooCommerce emails, “Booking Cancelled” and “Admin Booking Cancelled”, when the customer cancels their individual booking. This text will also be visible to the customers in their booking cancellation pop-up in their WooCommerce Customer Dashboard (“Bookings” tab) if the administrator has enabled the “Enable to show this policy text in cancellation modal” option in the product’s edit page. - Enable to show this policy text in cancellation modal
If this checkbox is checked, customers will see the “Cancellation Policy” text in their booking cancellation pop-up in their WooCommerce Customer Dashboard (“Bookings” tab).
- Cancellation Deadline
- Allow customers to reschedule their bookings (This is optional)
- Allowed Order Statuses
Here, you can select the WooCommerce Orders’ statuses for which the “Reschedule” button will be displayed. The “Reschedule” button will not be visible to the customers for the WooCommerce orders whose statuses are not selected. - Reschedule Deadline
Here, you can set the time before the start date when customers will be able to reschedule their bookings. Suppose your booking start date is 17 January 2026 and the product’s reschedule date is set to 1 day. It means the customer can reschedule their booking till 15 January 2026, after which the “Reschedule” button will no longer be visible to the customer in their WooCommerce Customer Dashboard (“Bookings” tab).
- Allowed Order Statuses
4- Publish/Edit the product by clicking the “Publish / Update” button.
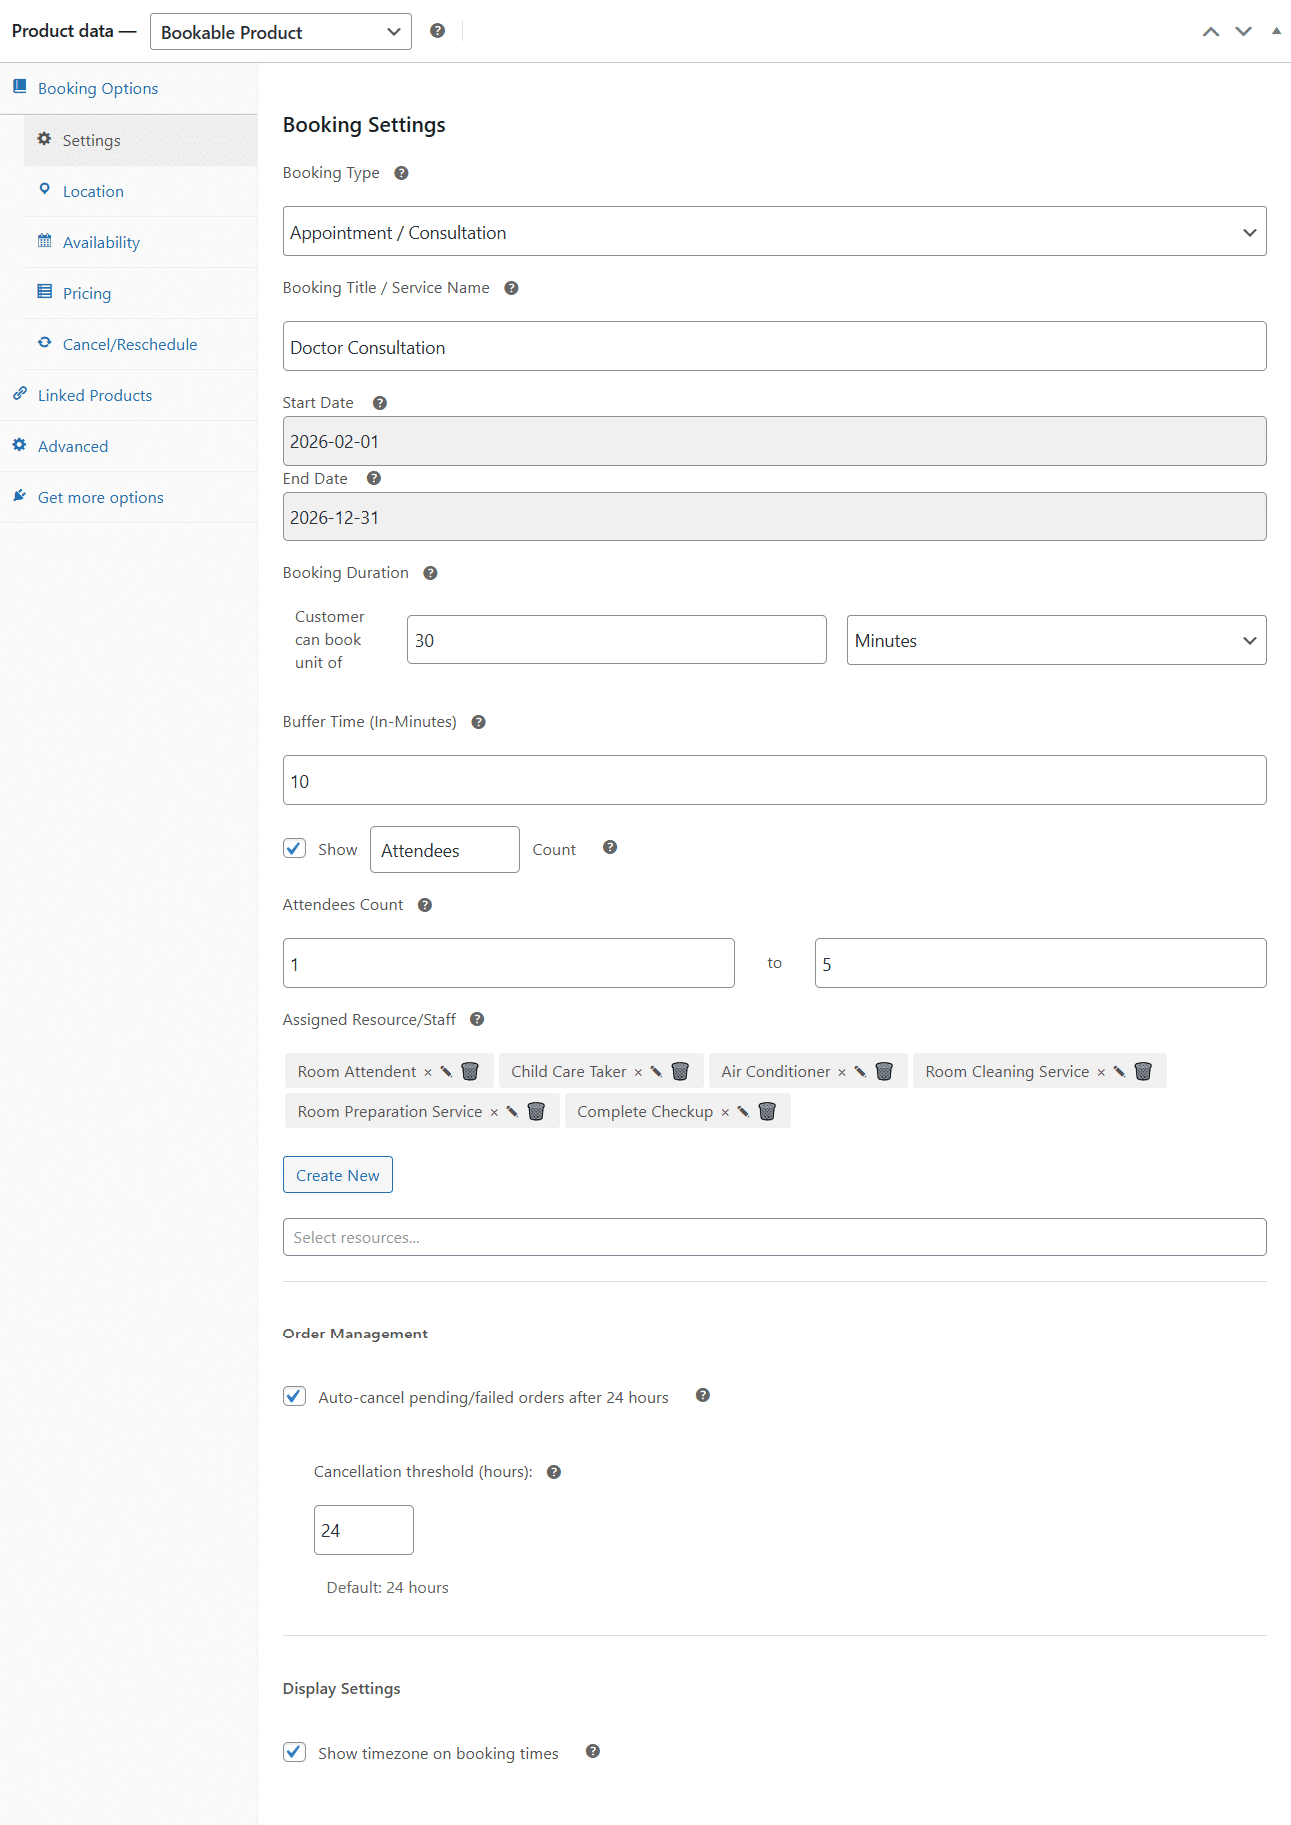
Book’d by WooNinjas – Appointment Settings tab
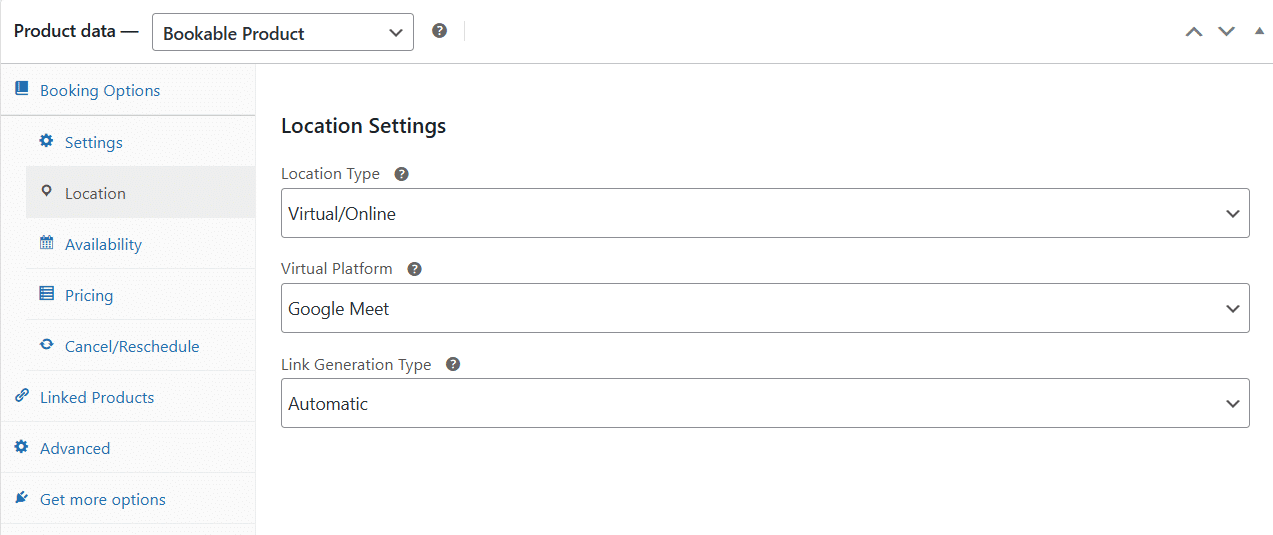
Book’d by WooNinjas – Appointment Location tab
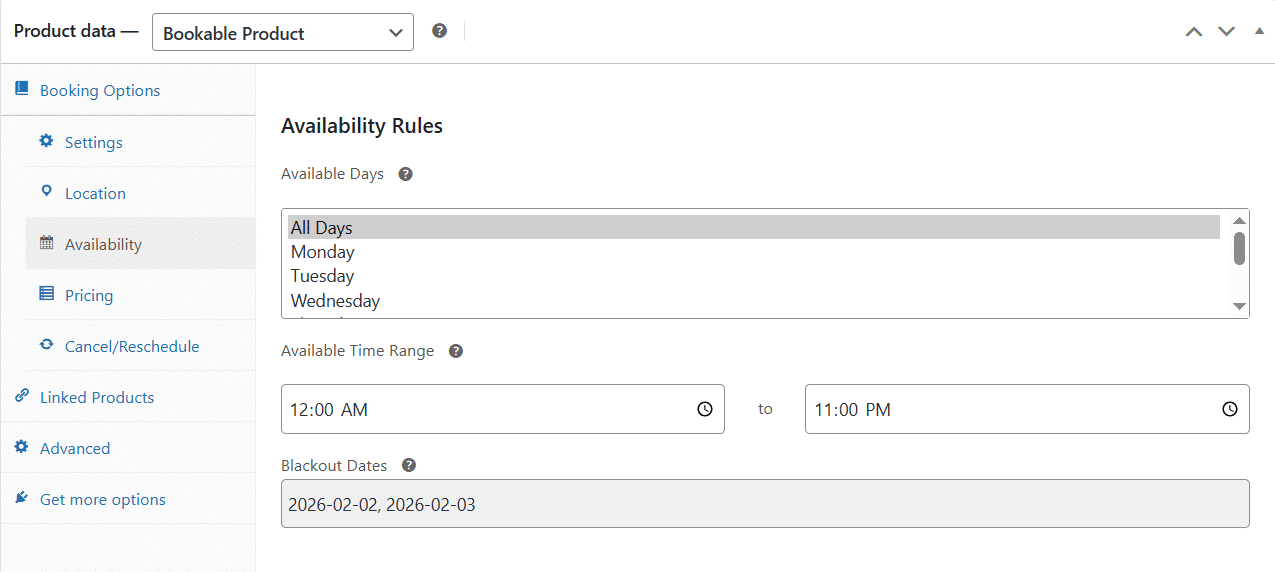
Book’d by WooNinjas – Appointment Availability tab
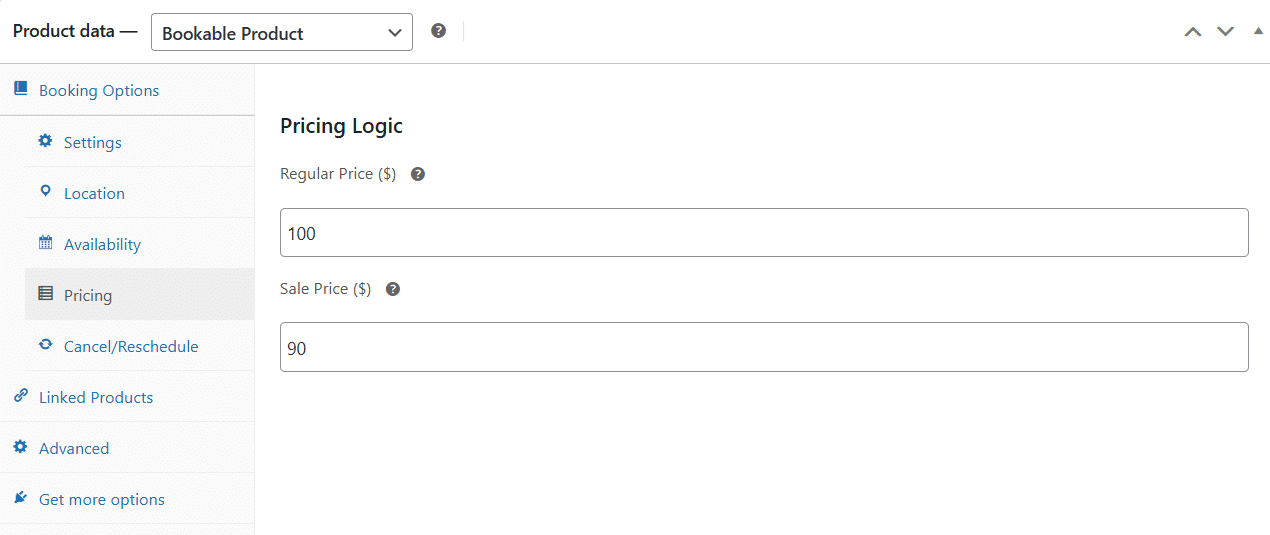
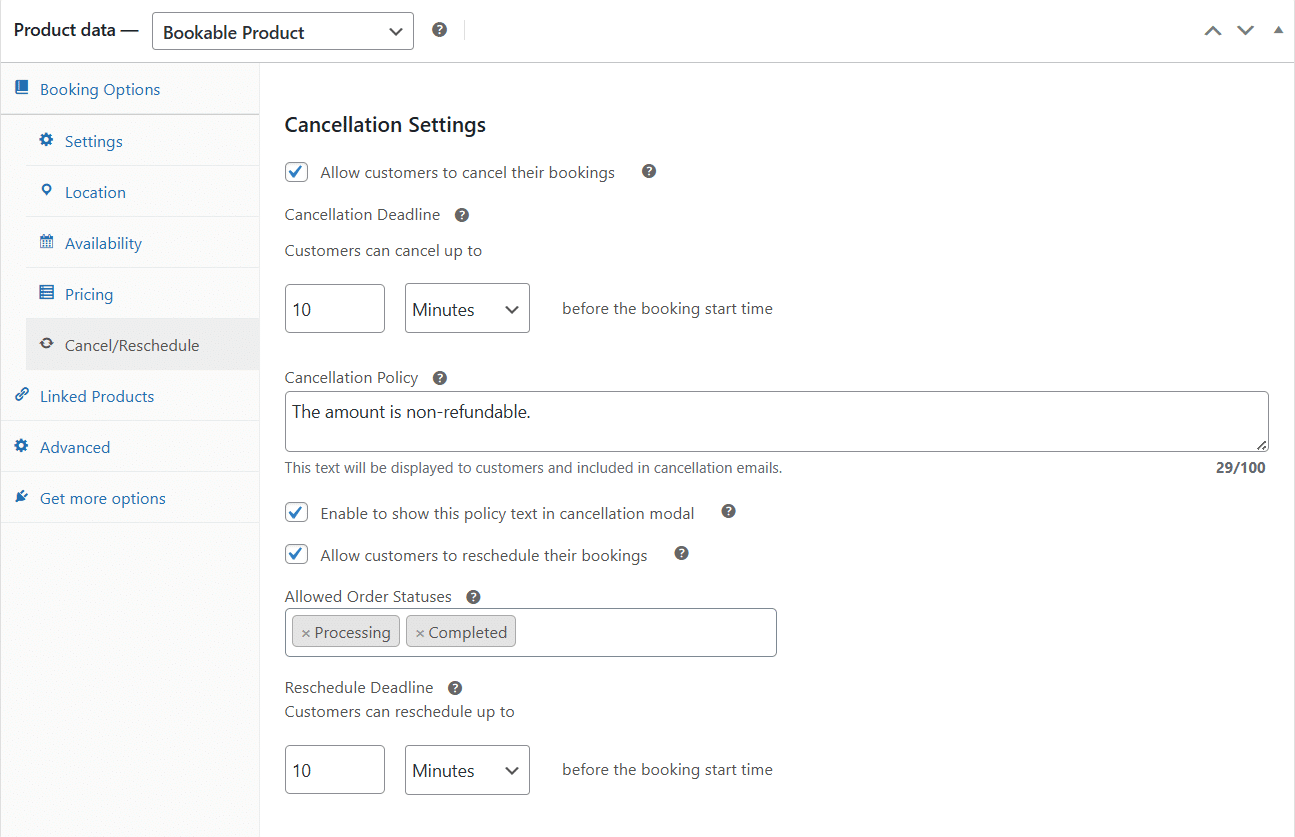
Book’d by WooNinjas – Appointment Cancel/Reschedule tab
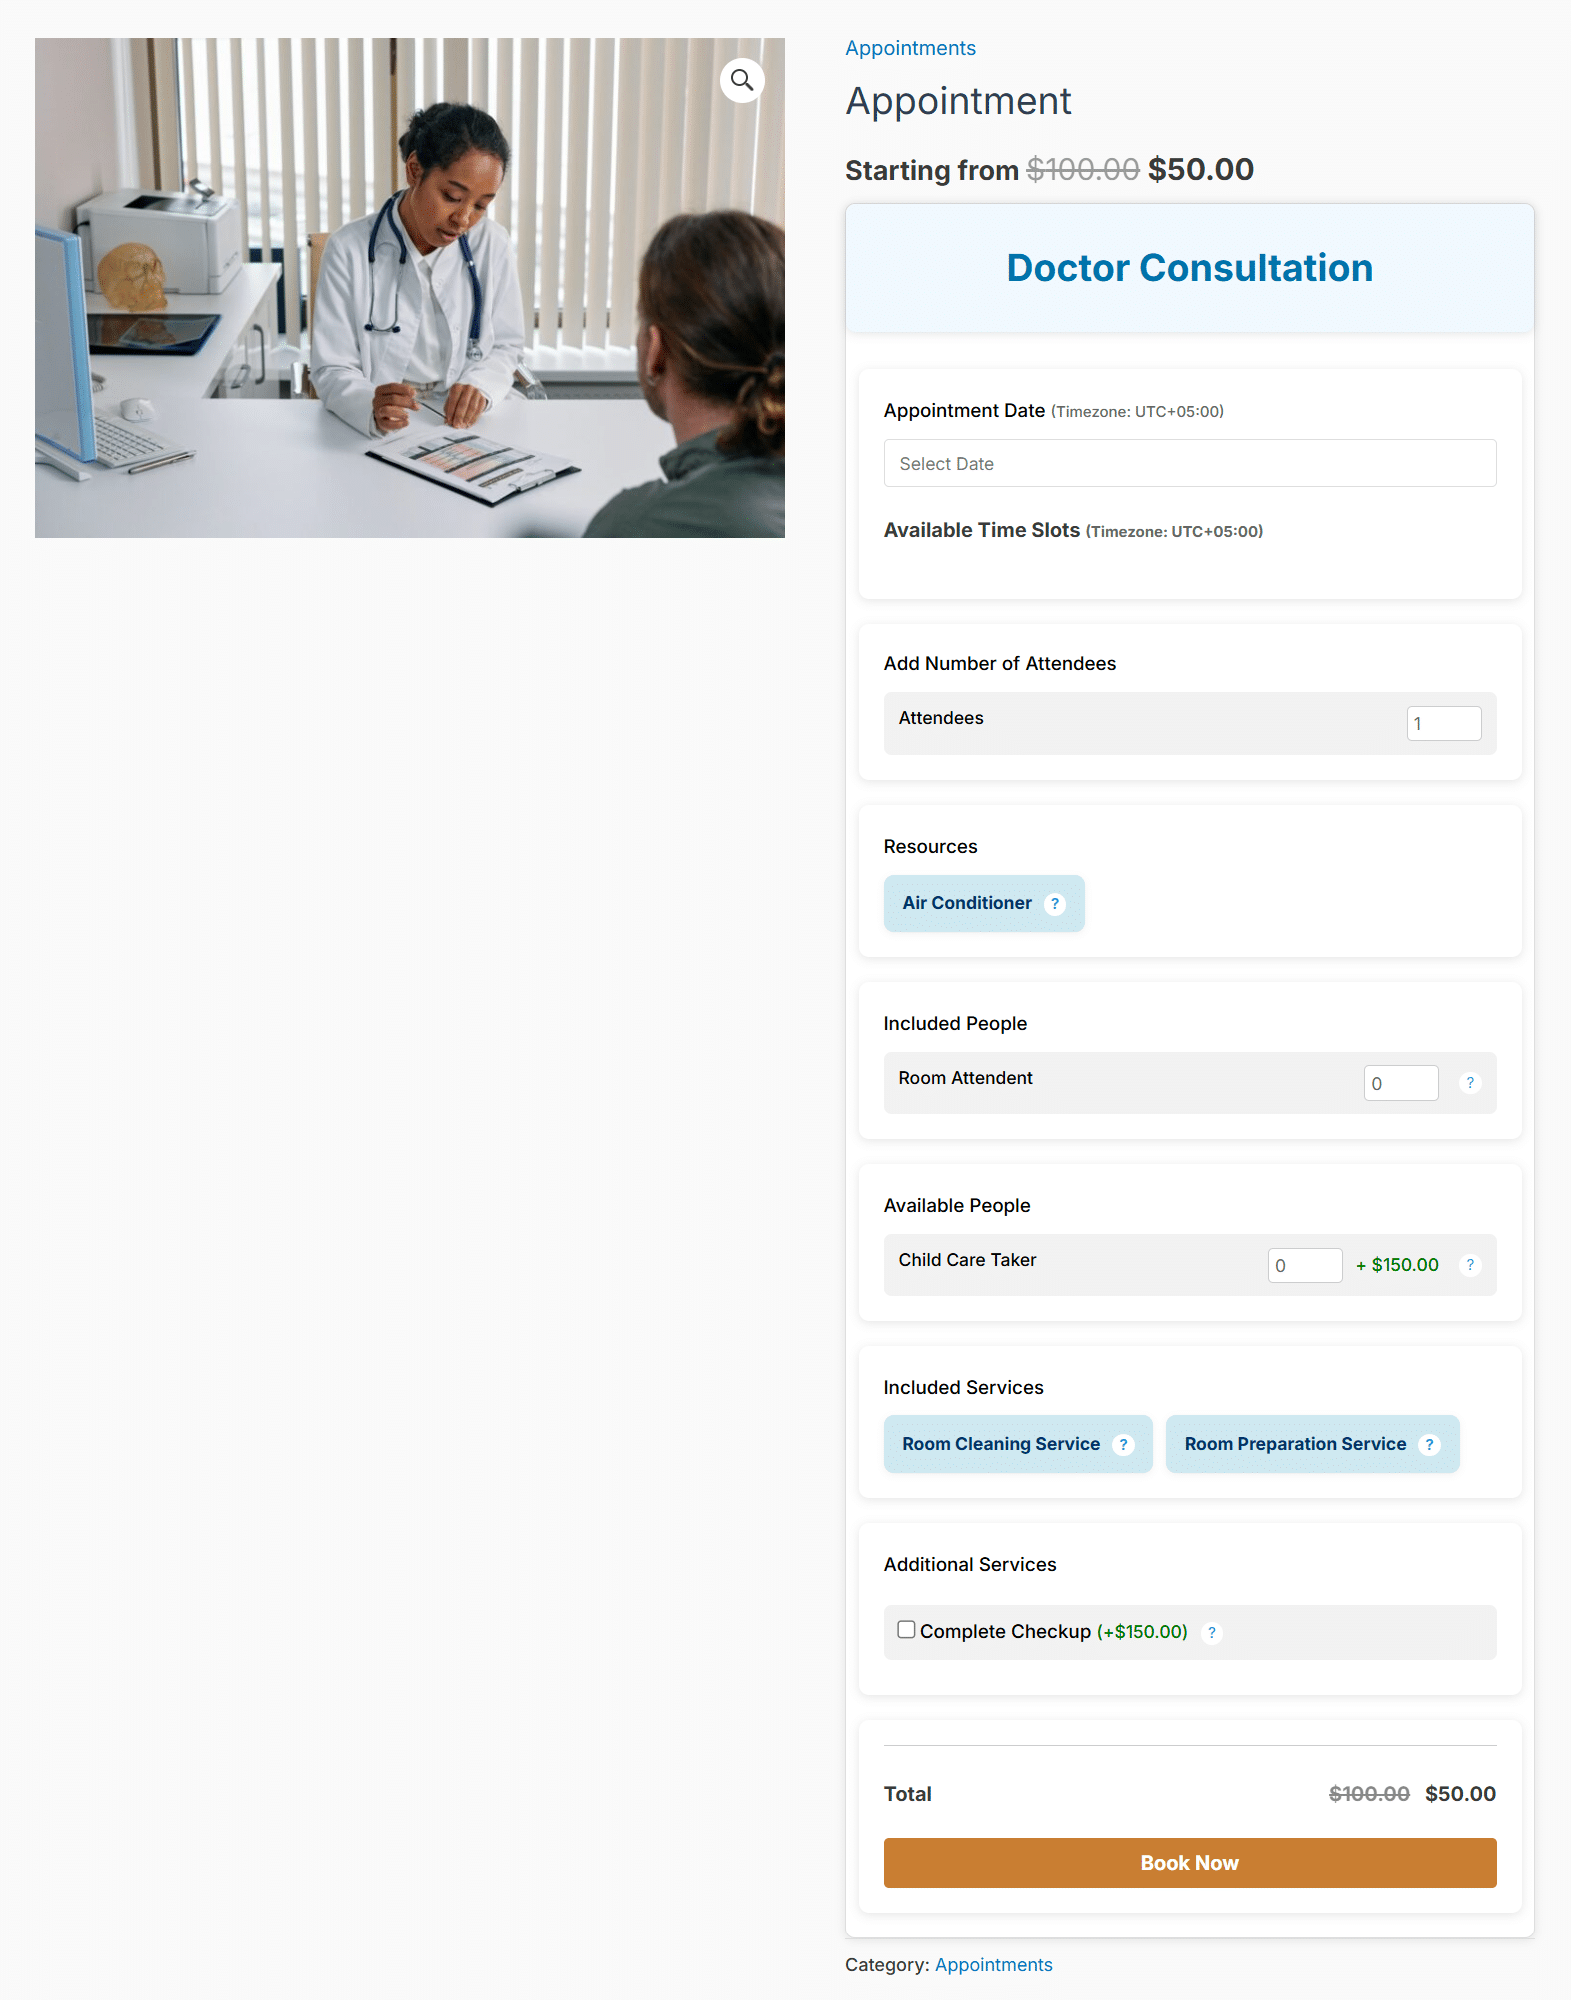
Book’d by WooNinjas – Appointment product page
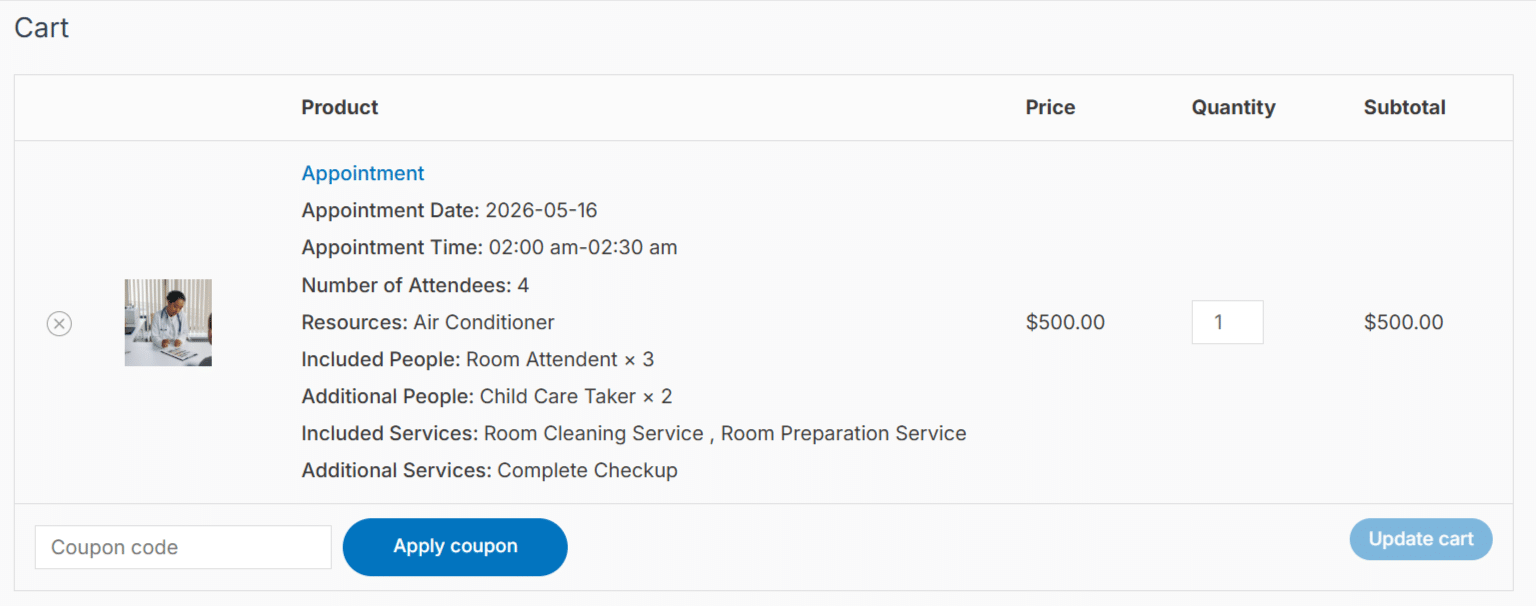
Book’d by WooNinjas – Appointment product cart page
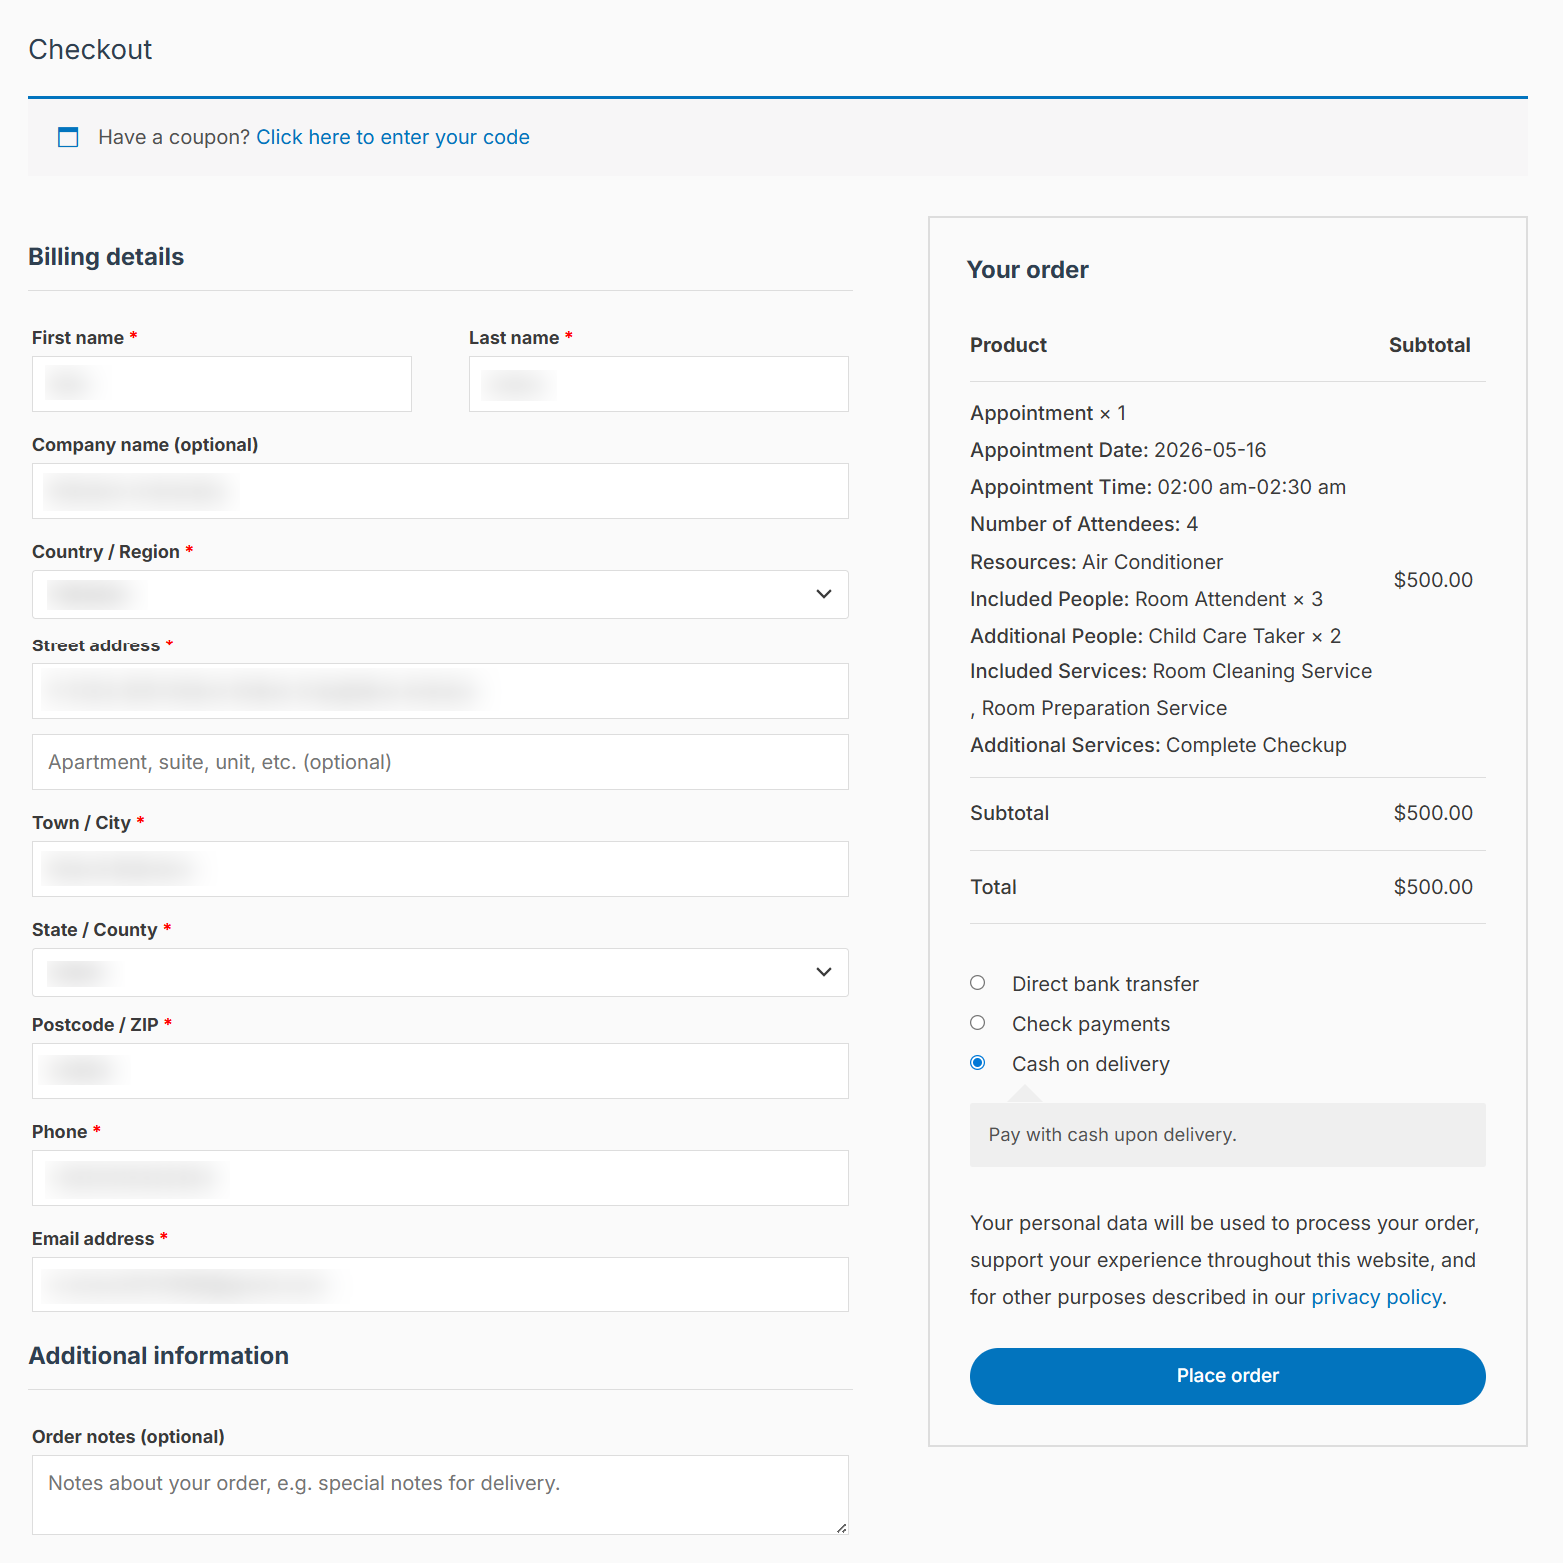
Book’d by WooNinjas – Appointment product checkout page
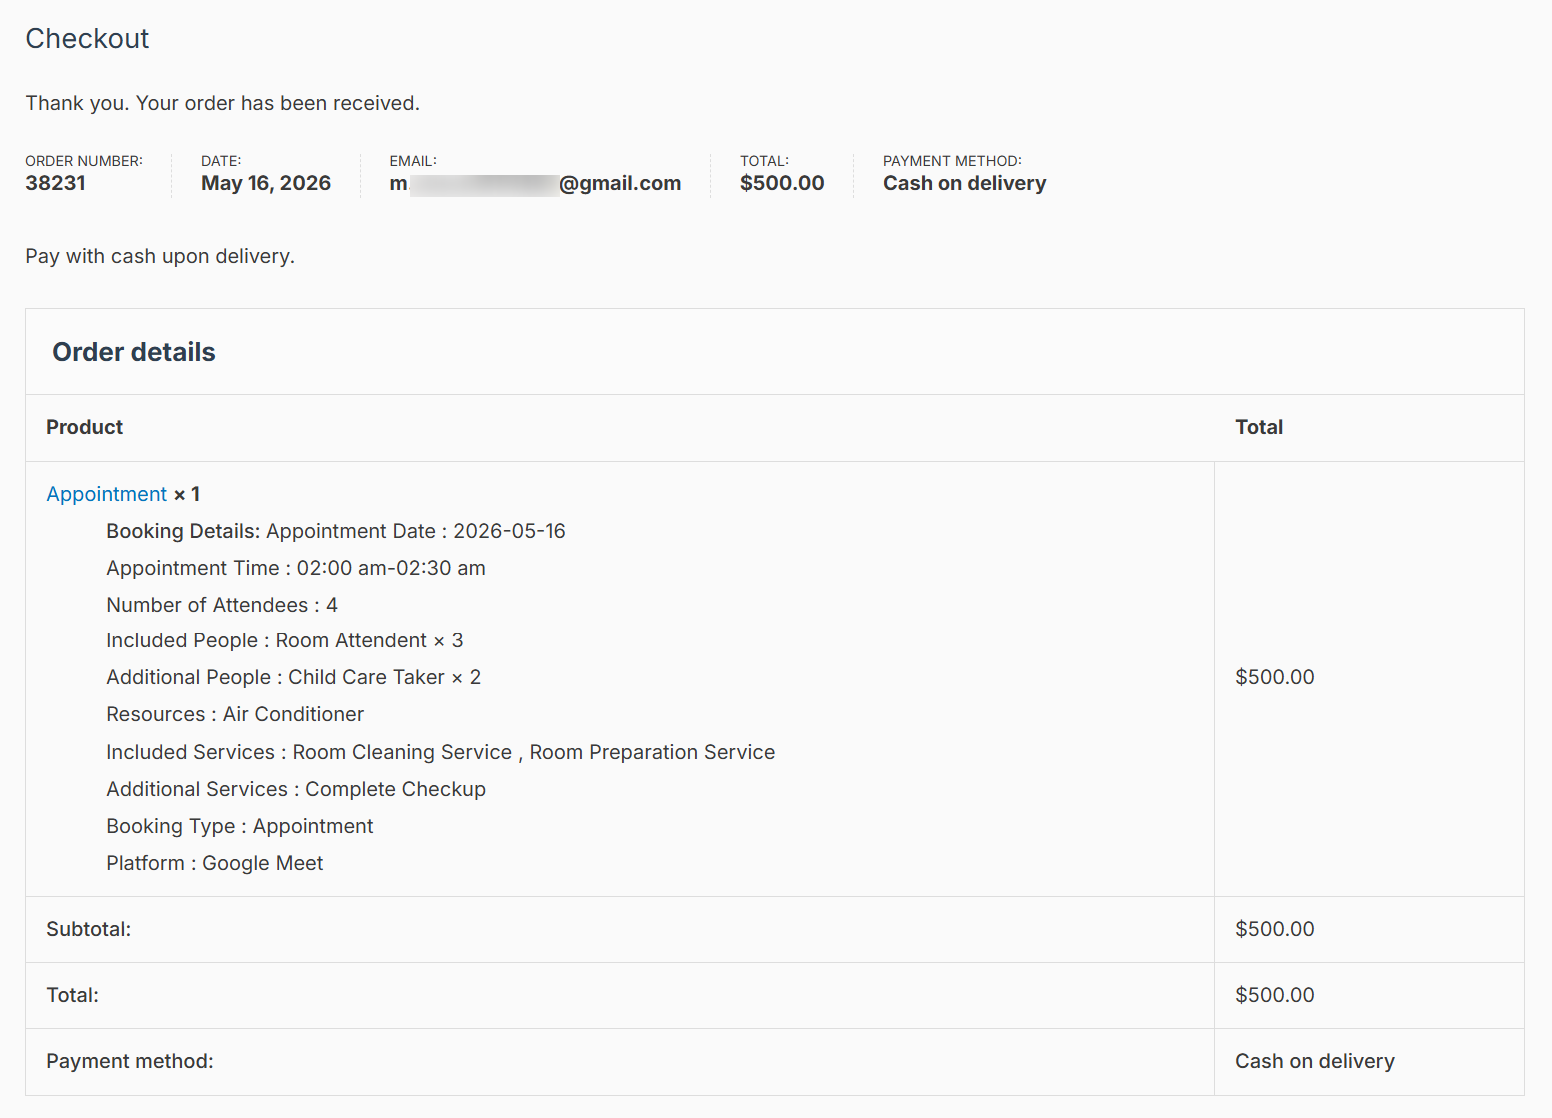
Book’d by WooNinjas – Appointment product order received page
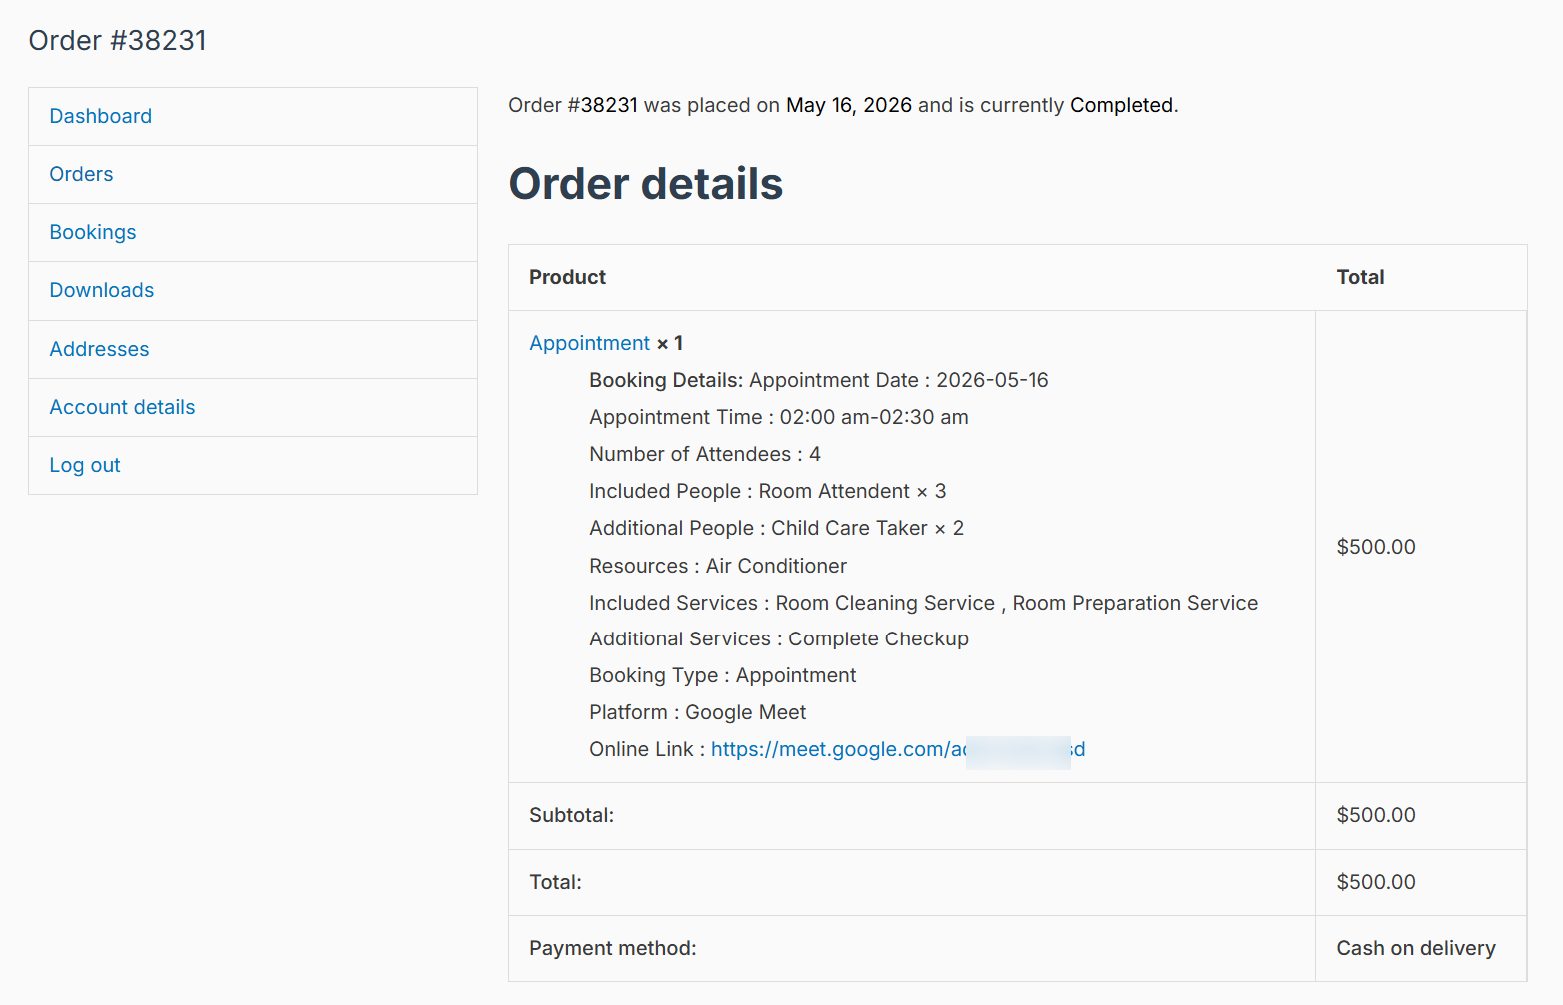
Book’d by WooNinjas – Appointment product order details page (Customer Dashboard)
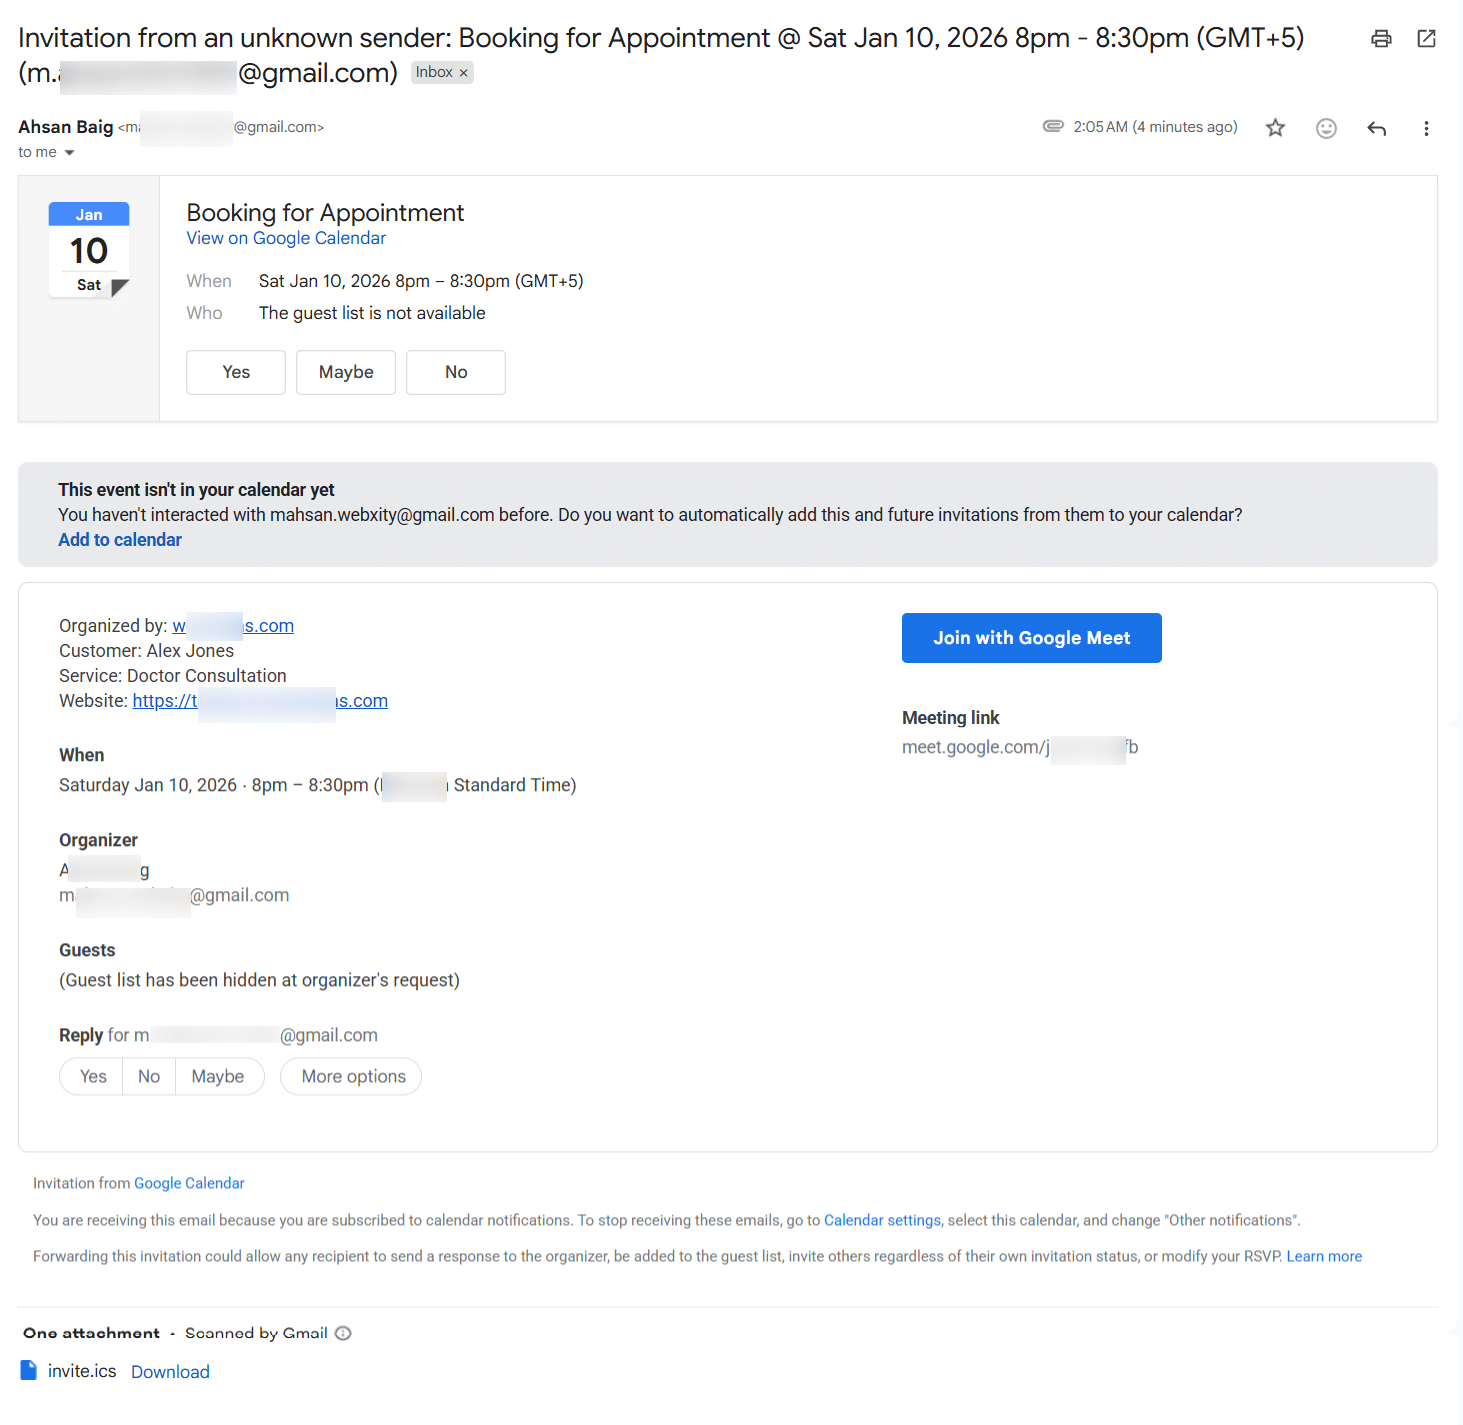
If Google Calendar and Google Meet are integrated and emails are enabled to be sent, then the customers will receive an email when a Zoom manual, Zoom automatic, Google manual, and Google automatic link is assigned to a customer’s order.
How To Create/Edit A Rental Booking Type
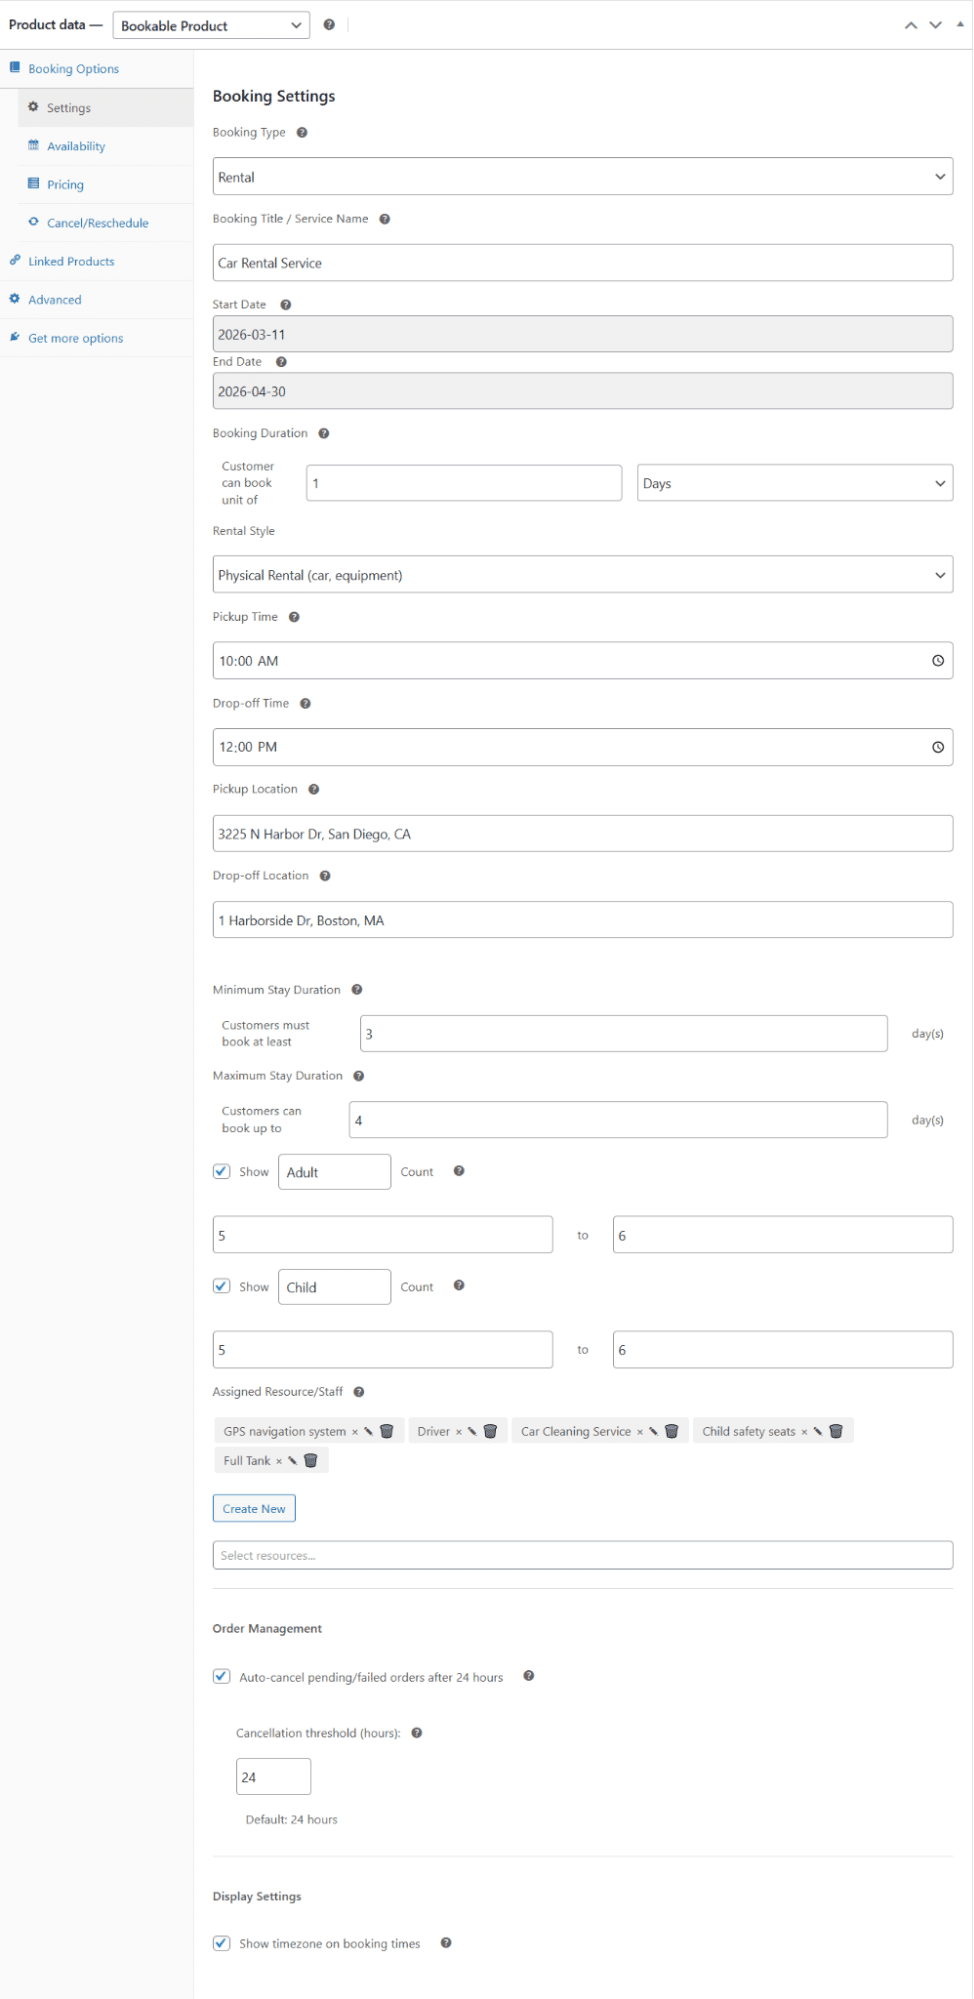
To create/edit a rental booking type, the steps are as follows:
1- Enter/Edit the product title on the product edit page.
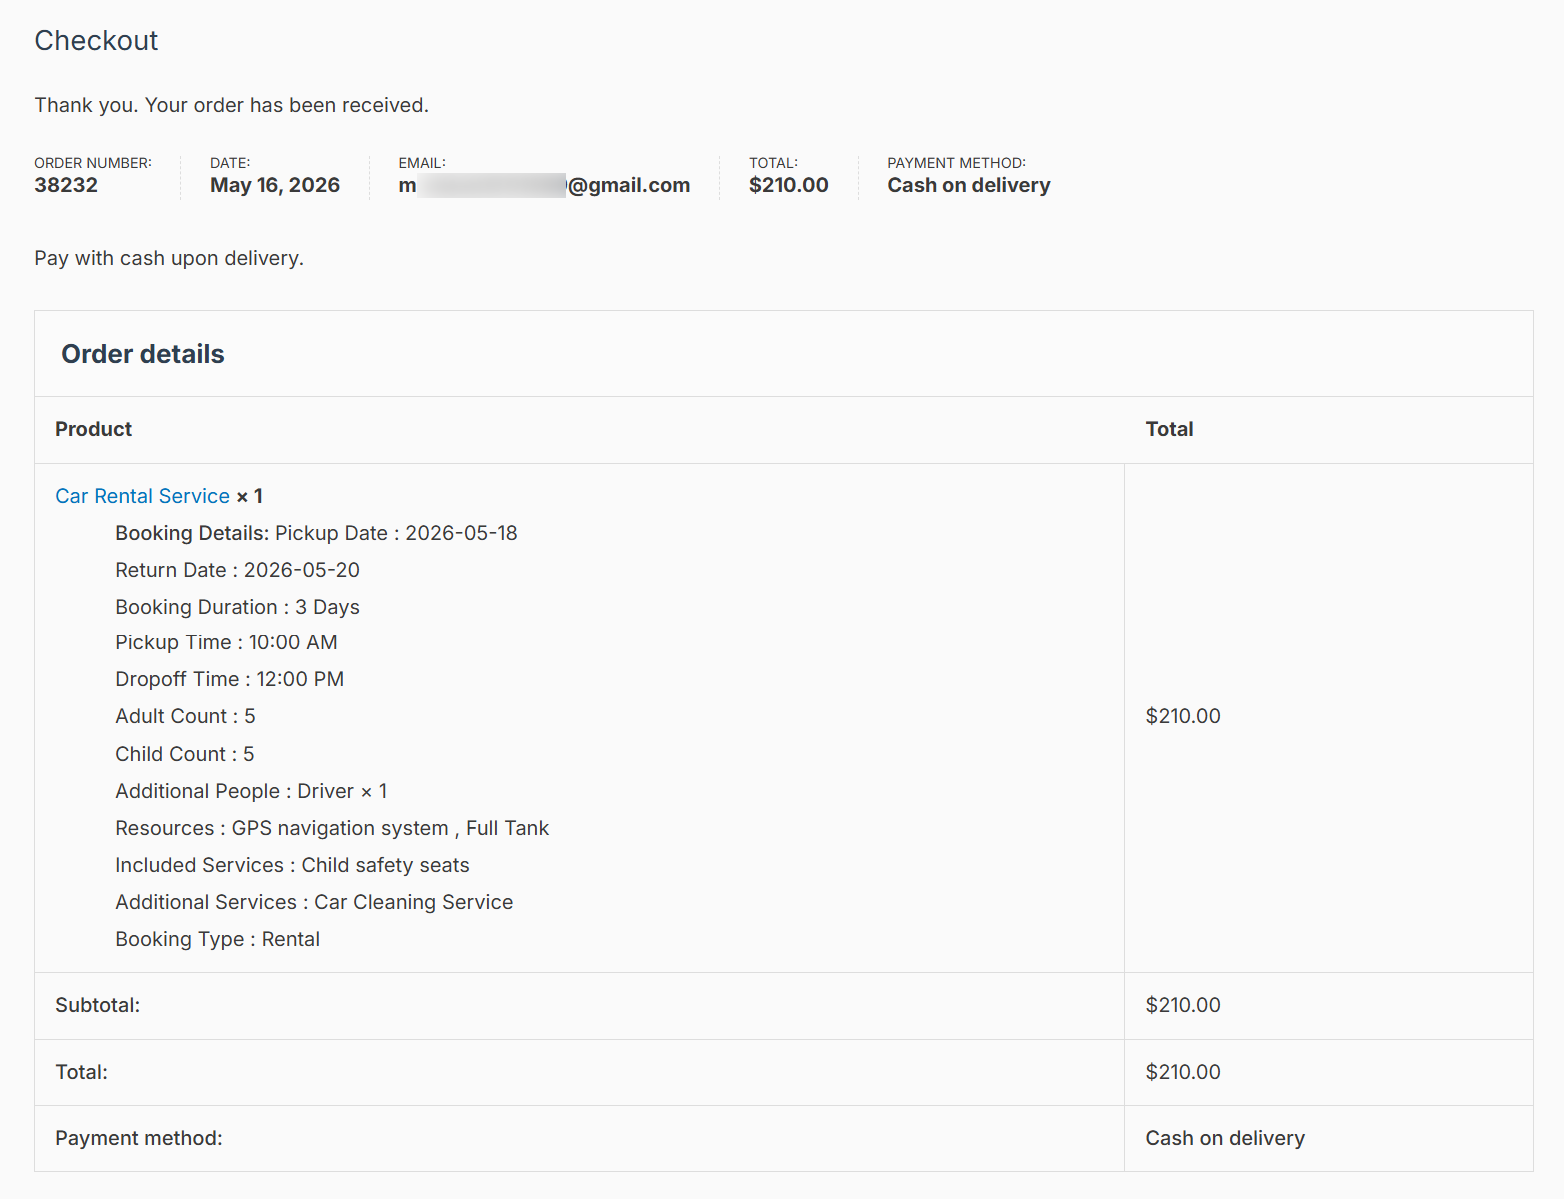
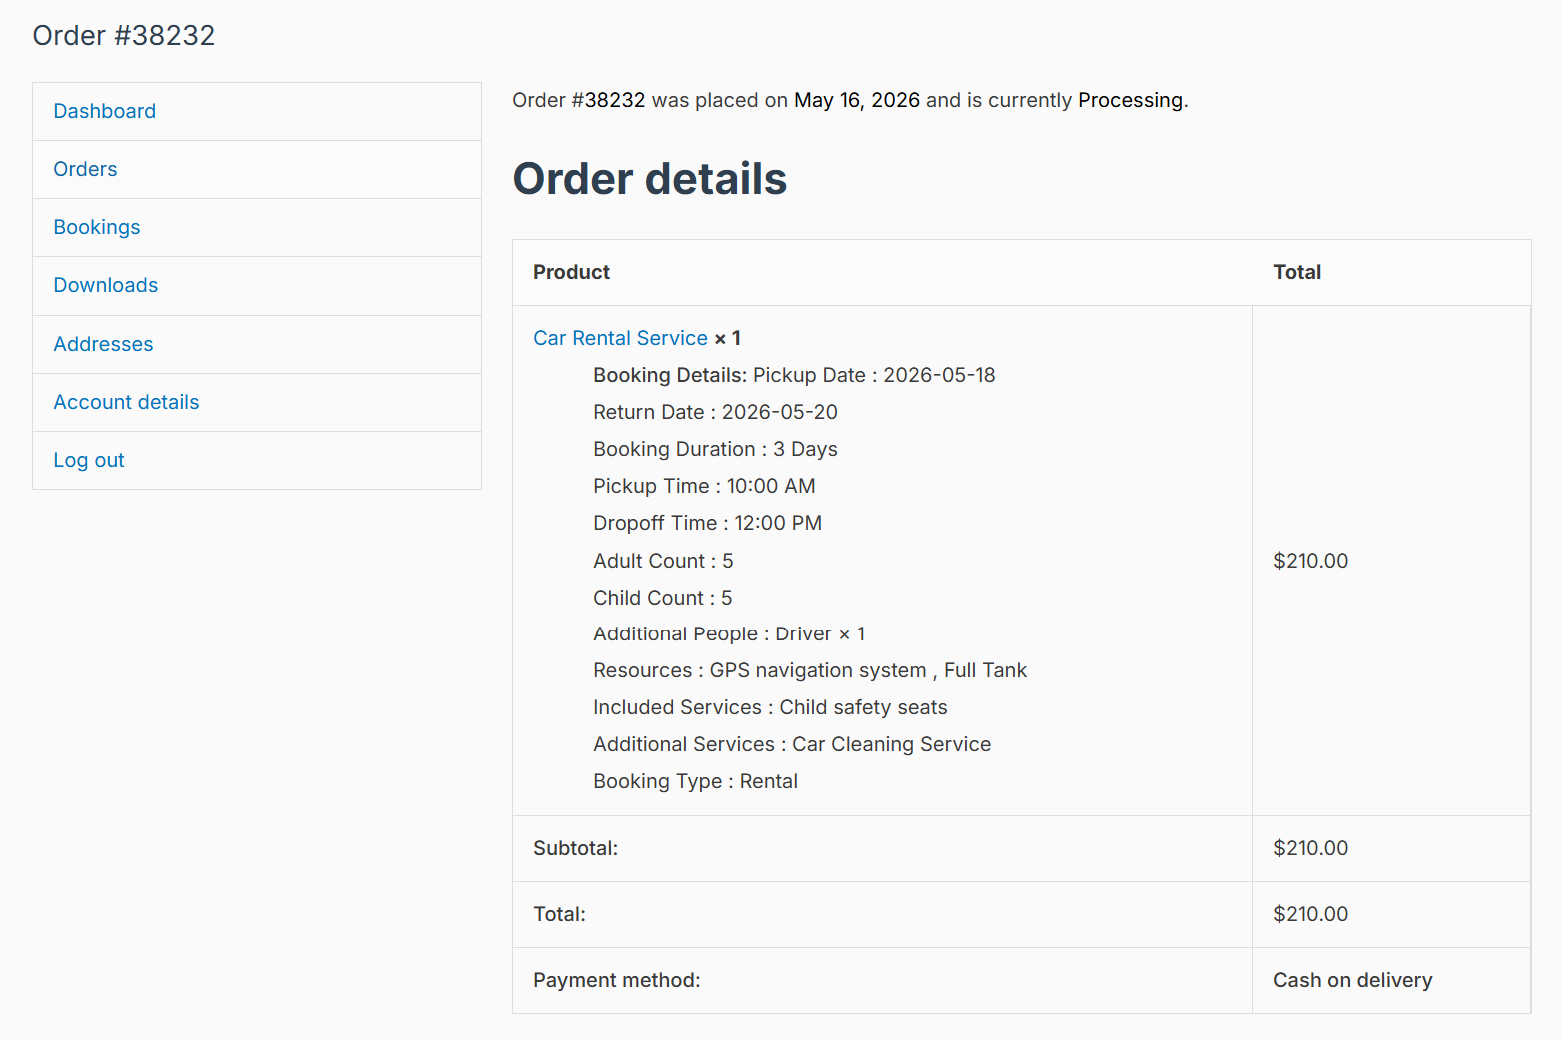
2- In the “Booking Options → Settings” tab, select the “Booking Type” option as “Rental”.
3- Enter/Edit the following information:
- Booking Title / Service Name (This field is optional)
- Start Date
- End Date
- Booking Duration
- Rental Style
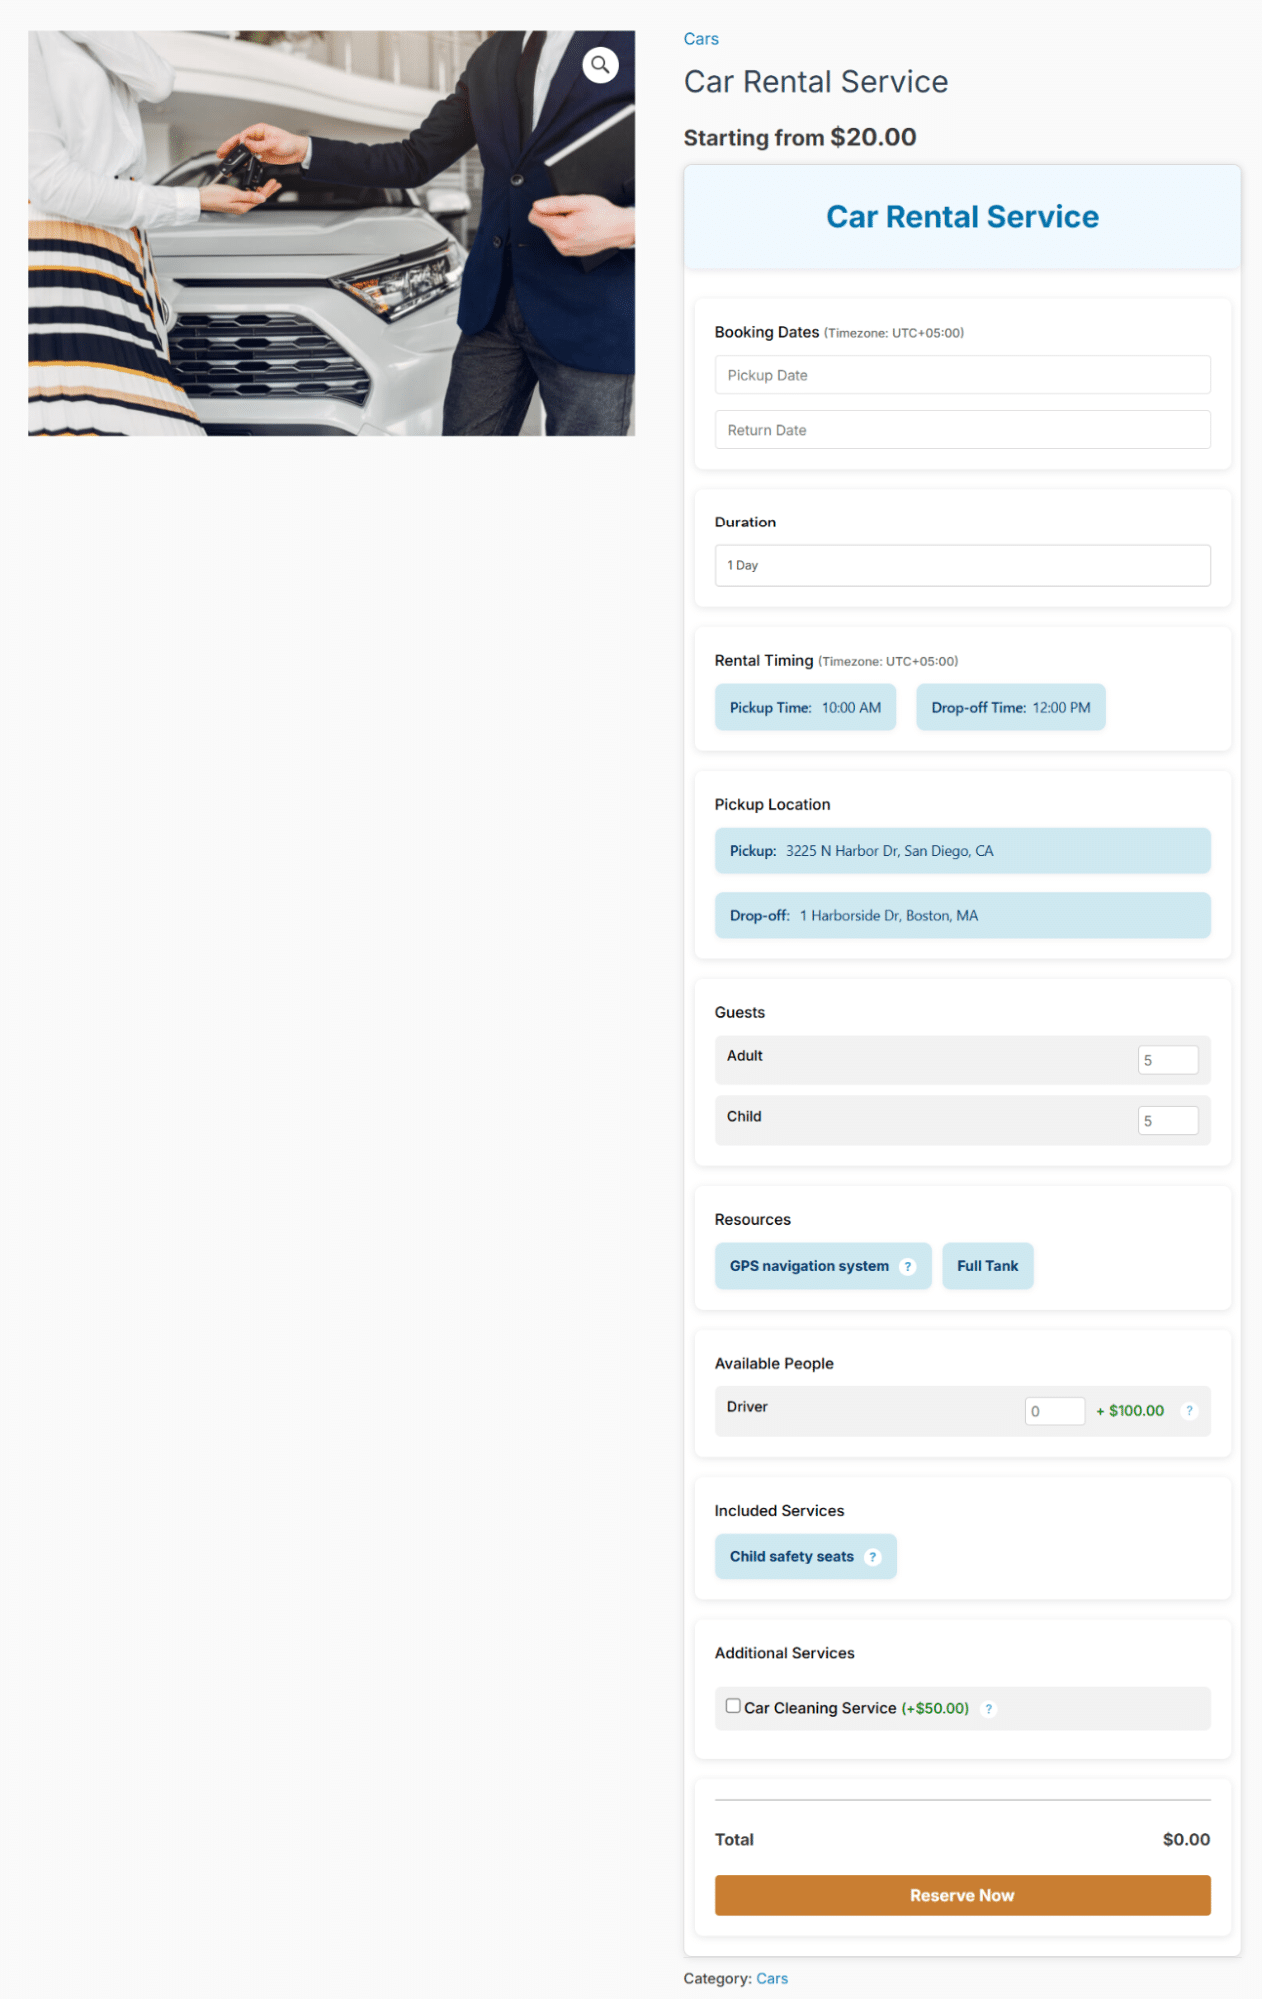
If the “Physical Rental (car, equipment)” option is selected, then the following fields will be visible/required to be filled (Pickup Time, Drop-off Time, Pickup Location, Drop-off Location, Adult Count and Child Count).
Similarly, if the “Course / Training” option is selected, then the following fields will not be visible/required to be filled (Pickup Time, Drop-off Time, Pickup Location, Drop-off Location, Adult Count and Child Count). - Pickup Time
- Drop-off Time
- Pickup Location
- Drop-off Location
- Minimum Stay Duration (Minimum number of days for hotel bookings. Leave empty for no minimum restrictions.)
- Maximum Stay Duration (Maximum number of days for hotel bookings. Leave empty for no maximum restrictions)
- Show (Adult) Count (Min, Max fields)
Check to show this field on the booking form. You can rename the label. - Show (Child) Count (Min, Max fields)
Check to show this field on the booking form. You can rename the label. - Assigned Resource/Staff (This field is optional)
- Auto-cancel pending/failed orders after 24 hours (This field is optional)
- Cancellation threshold (hours)
Here you can provide how many hours after which a booking of a respective customer should be cancelled. After the respective time has passed, the WooCommerce Orders of the respective product which have statuses pending or failed will automatically be cancelled, and their respective dates will again become available for the customers to book.
- Cancellation threshold (hours)
- Show timezone on booking times (This field is optional)
Here, you can select whether you want customers to see the website’s timezone on the product page on the “Appointment Date” and “Available Time Slots” options. - Add Blackout Dates
This field is optional. Here you can select individual dates on which the bookings cannot be made. You can also provide multiple blackout dates using a CSV File and clicking the “Import” button. You can download the template file using the “Download Template” button. Make sure to press the “Publish/Update” button on the product edit after making any changes. - Recurring Blackout Rules
This field is optional. Here, you can provide a blackout date with a fixed pattern using the following options:Every week on (The respective day on every week will not be available for booking)Recurring Blackout Rules
This field is optional. Here, you can provide a blackout date with a fixed pattern using the following options:- Every week on (The respective day on every week will not be available for booking)
- Every month on day (The respective date on every month will not be available for booking)
- Every year on (The respective date of the respective month of every year will not be available for booking)
- Availability Calendar
Here, you can view the frontend calendar that the users will see on the frontend of the product page. - Regular Price (In the Pricing tab)
- Sale Price (In the Pricing tab, this field is optional)
Allow Customers To Cancel Their Bookings (This Is Optional)
Cancellation Deadline
Here, you can set the time before the start date when customers will be able to cancel their bookings. Suppose your booking start date is 17 January 2026 and the product’s cancellation deadline is set to 1 day. It means the customer can cancel their booking till 15 January 2026, after which the “Cancel” button will no longer be visible to the customer in their WooCommerce Customer Dashboard (“Bookings” tab).
Cancellation Policy
This is the text which will be sent to the customers and administrators in their WooCommerce emails, “Booking Cancelled” and “Admin Booking Cancelled”, when the customer cancels their individual booking. This text will also be visible to the customers in their booking cancellation pop-up in their WooCommerce Customer Dashboard (“Bookings” tab) if the administrator has enabled the “Enable to show this policy text in cancellation modal” option in the product’s edit page.
Enable showing this policy text in the cancellation modal. If this checkbox is checked, customers will see the “Cancellation Policy” text in their booking cancellation pop-up in their WooCommerce Customer Dashboard (“Bookings” tab).
Allow Customers To Reschedule Their Bookings (This Is Optional)
Allowed Order Statuses
Here, you can select the WooCommerce Orders’ statuses for which the “Reschedule” button will be displayed. The “Reschedule” button will not be visible to the customers for the WooCommerce orders whose statuses are not selected.
Reschedule Deadline
Here, you can set the time before the start date when customers will be able to reschedule their bookings. Suppose your booking start date is 17 January 2026 and the product’s reschedule date is set to 1 day. It means the customer can reschedule their booking till 15 January 2026, after which the “Reschedule” button will no longer be visible to the customer in their WooCommerce Customer Dashboard (“Bookings” tab).
4- Publish/Edit the product by clicking the “Publish / Update” button.


How To Create/Edit An “Event” Booking Type
To create/edit an “Event” booking type, the steps are as follows:
1- Enter/Edit the product title on the product edit page.
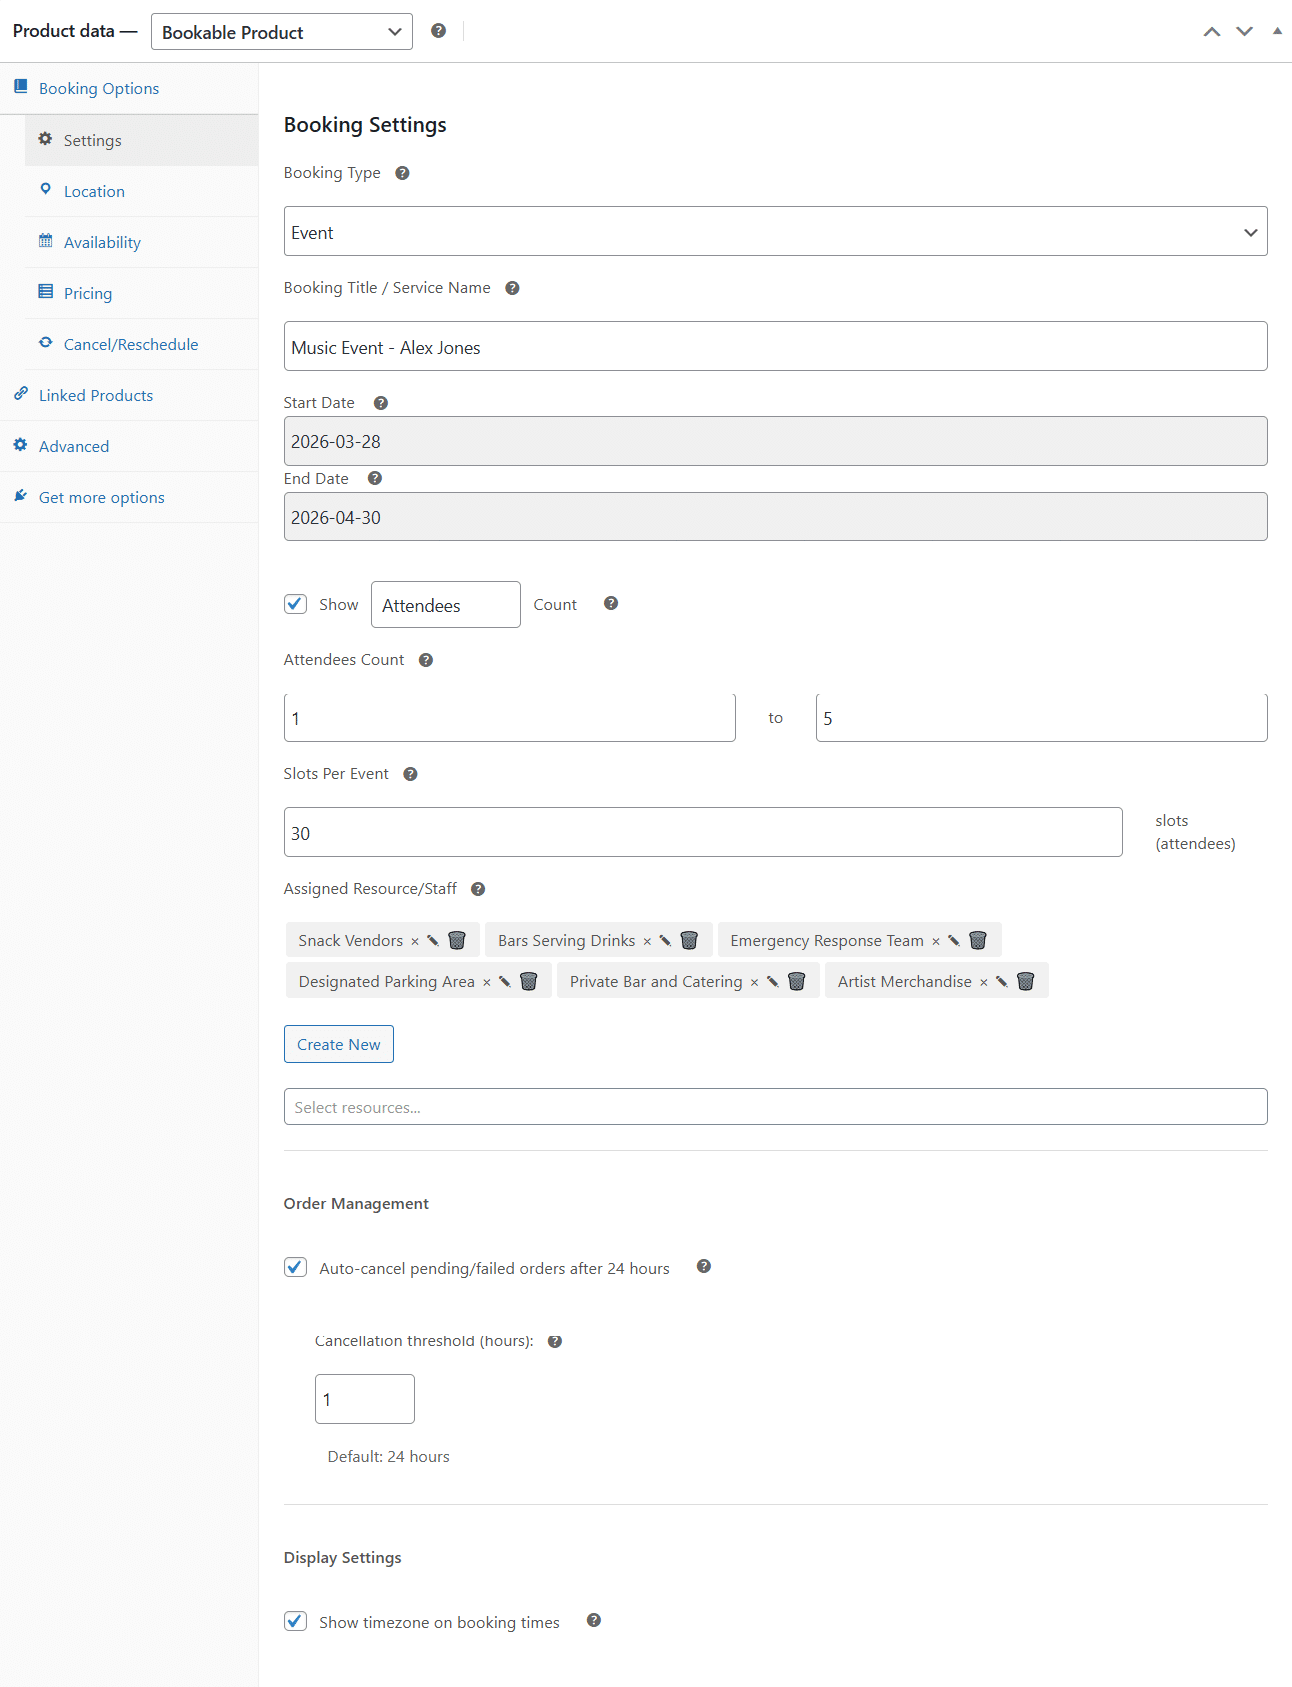
2- In the “Booking Options → Settings” tab, select the “Booking Type” option as “Event”.
3- Enter/Edit the following information:
- Booking Title / Service Name (This field is optional)
- Start Date
- End Date
- Show (Attendees) Count (Min, Max fields, this field is optional)
Check to show this field on the booking form. You can rename the label. for the event for the respective day) - Assigned Resource/Staff (This field is optional)
- Auto-cancel pending/failed orders after 24 hours (This field is optional)
- Cancellation threshold (hours)
Here you can provide how many hours after which a booking of a respective customer should be cancelled. After the respective time has passed, the WooCommerce Orders of the respective product which have statuses pending or failed will automatically be cancelled, and their respective dates will again become available for the customers to book.
- Cancellation threshold (hours)
- Show timezone on booking times (This field is optional)
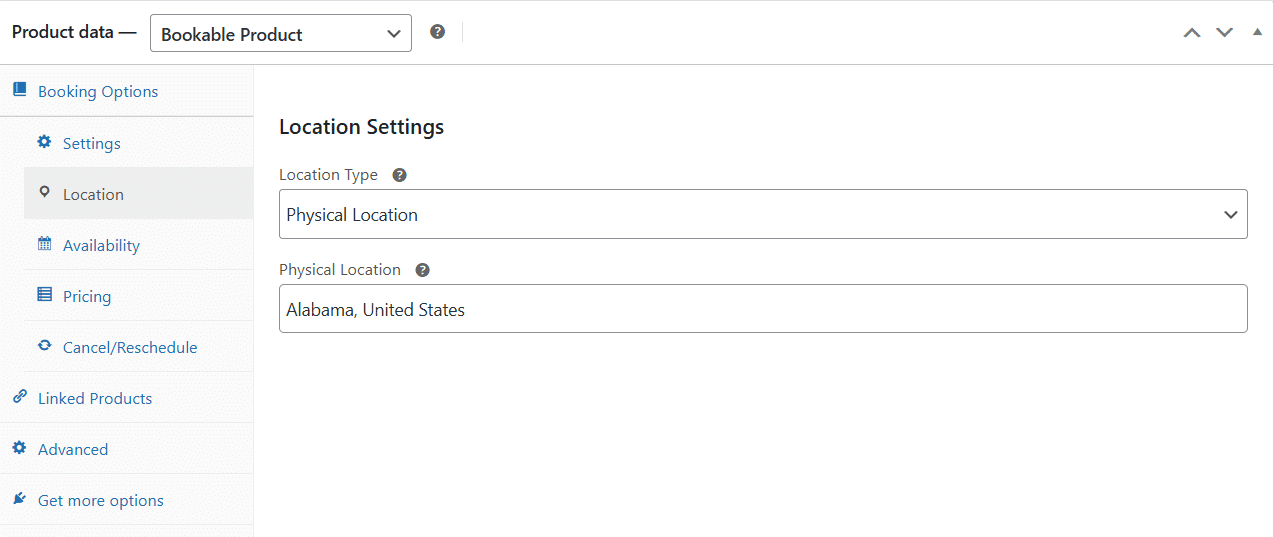
Here, you can select whether you want customers to see the website’s timezone on the product page on the “Appointment Date” and “Available Time Slots” options. - Location Type (In the Location tab, it can be set to both physical or virtual)
- Physical Location (In the Location tab)
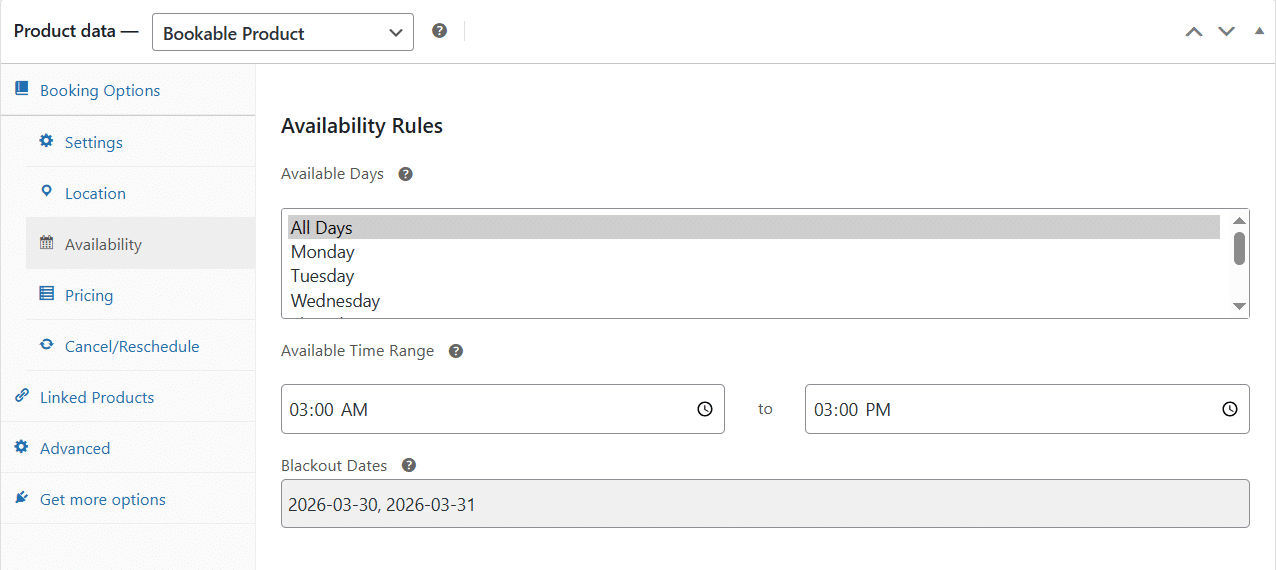
- Available Days (In the Availability tab)
- Available Time Range (In the Availability tab)
- Blackout Dates (In the Availability tab, this field is optional)
- Regular Price (In the Pricing tab)
- Sale Price (In the Pricing tab, this field is optional)
- Allow customers to cancel their bookings (This is optional)
- Cancellation Deadline
Here, you can set the time before the start date when customers will be able to cancel their bookings. Suppose your booking start date is 17 January 2026 and the product’s cancellation deadline is set to 1 day. It means the customer can cancel their booking till 15 January 2026, after which the “Cancel” button will no longer be visible to the customer in their WooCommerce Customer Dashboard (“Bookings” tab). - Cancellation Policy
This is the text which will be sent to the customers and administrators in their WooCommerce emails, “Booking Cancelled” and “Admin Booking Cancelled”, when the customer cancels their individual booking. This text will also be visible to the customers in their booking cancellation pop-up in their WooCommerce Customer Dashboard (“Bookings” tab) if the administrator has enabled the “Enable to show this policy text in cancellation modal” option in the product’s edit page. - Enable showing this policy text in the cancellation modal
If this checkbox is checked, customers will see the “Cancellation Policy” text in their booking cancellation pop-up in their WooCommerce Customer Dashboard (“Bookings” tab).
- Cancellation Deadline
- Allow customers to reschedule their bookings (This is optional)
- Allowed Order Statuses
Here, you can select the WooCommerce Orders’ statuses for which the “Reschedule” button will be displayed. The “Reschedule” button will not be visible to the customers for the WooCommerce orders whose statuses are not selected. - Reschedule Deadline
Here, you can set the time before the start date when customers will be able to reschedule their bookings. Suppose your booking start date is 17 January 2026 and the product’s reschedule date is set to 1 day. It means the customer can reschedule their booking till 15 January 2026, after which the “Reschedule” button will no longer be visible to the customer in their WooCommerce Customer Dashboard (“Bookings” tab).
- Allowed Order Statuses
4- Publish/Edit the product by clicking the “Publish / Update” button.
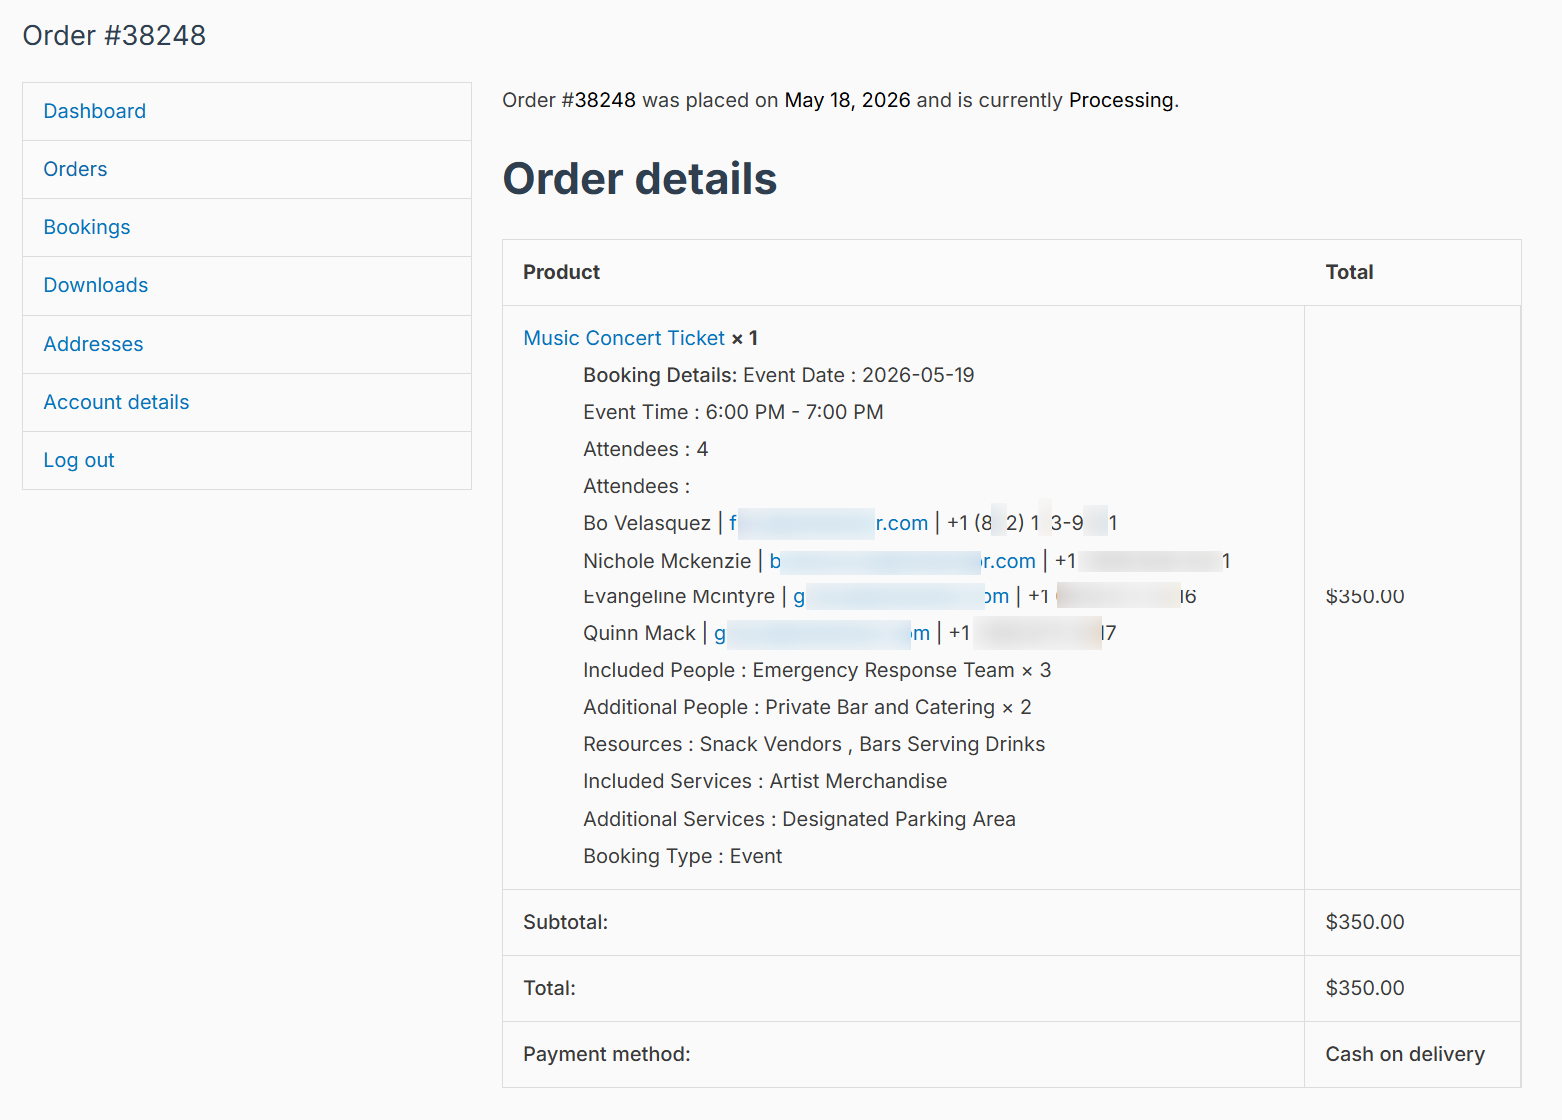
Note: The number of slots available will be deducted right after a customer has clicked the “Book Event” button and will be restored if the customer removes the product from the cart page.
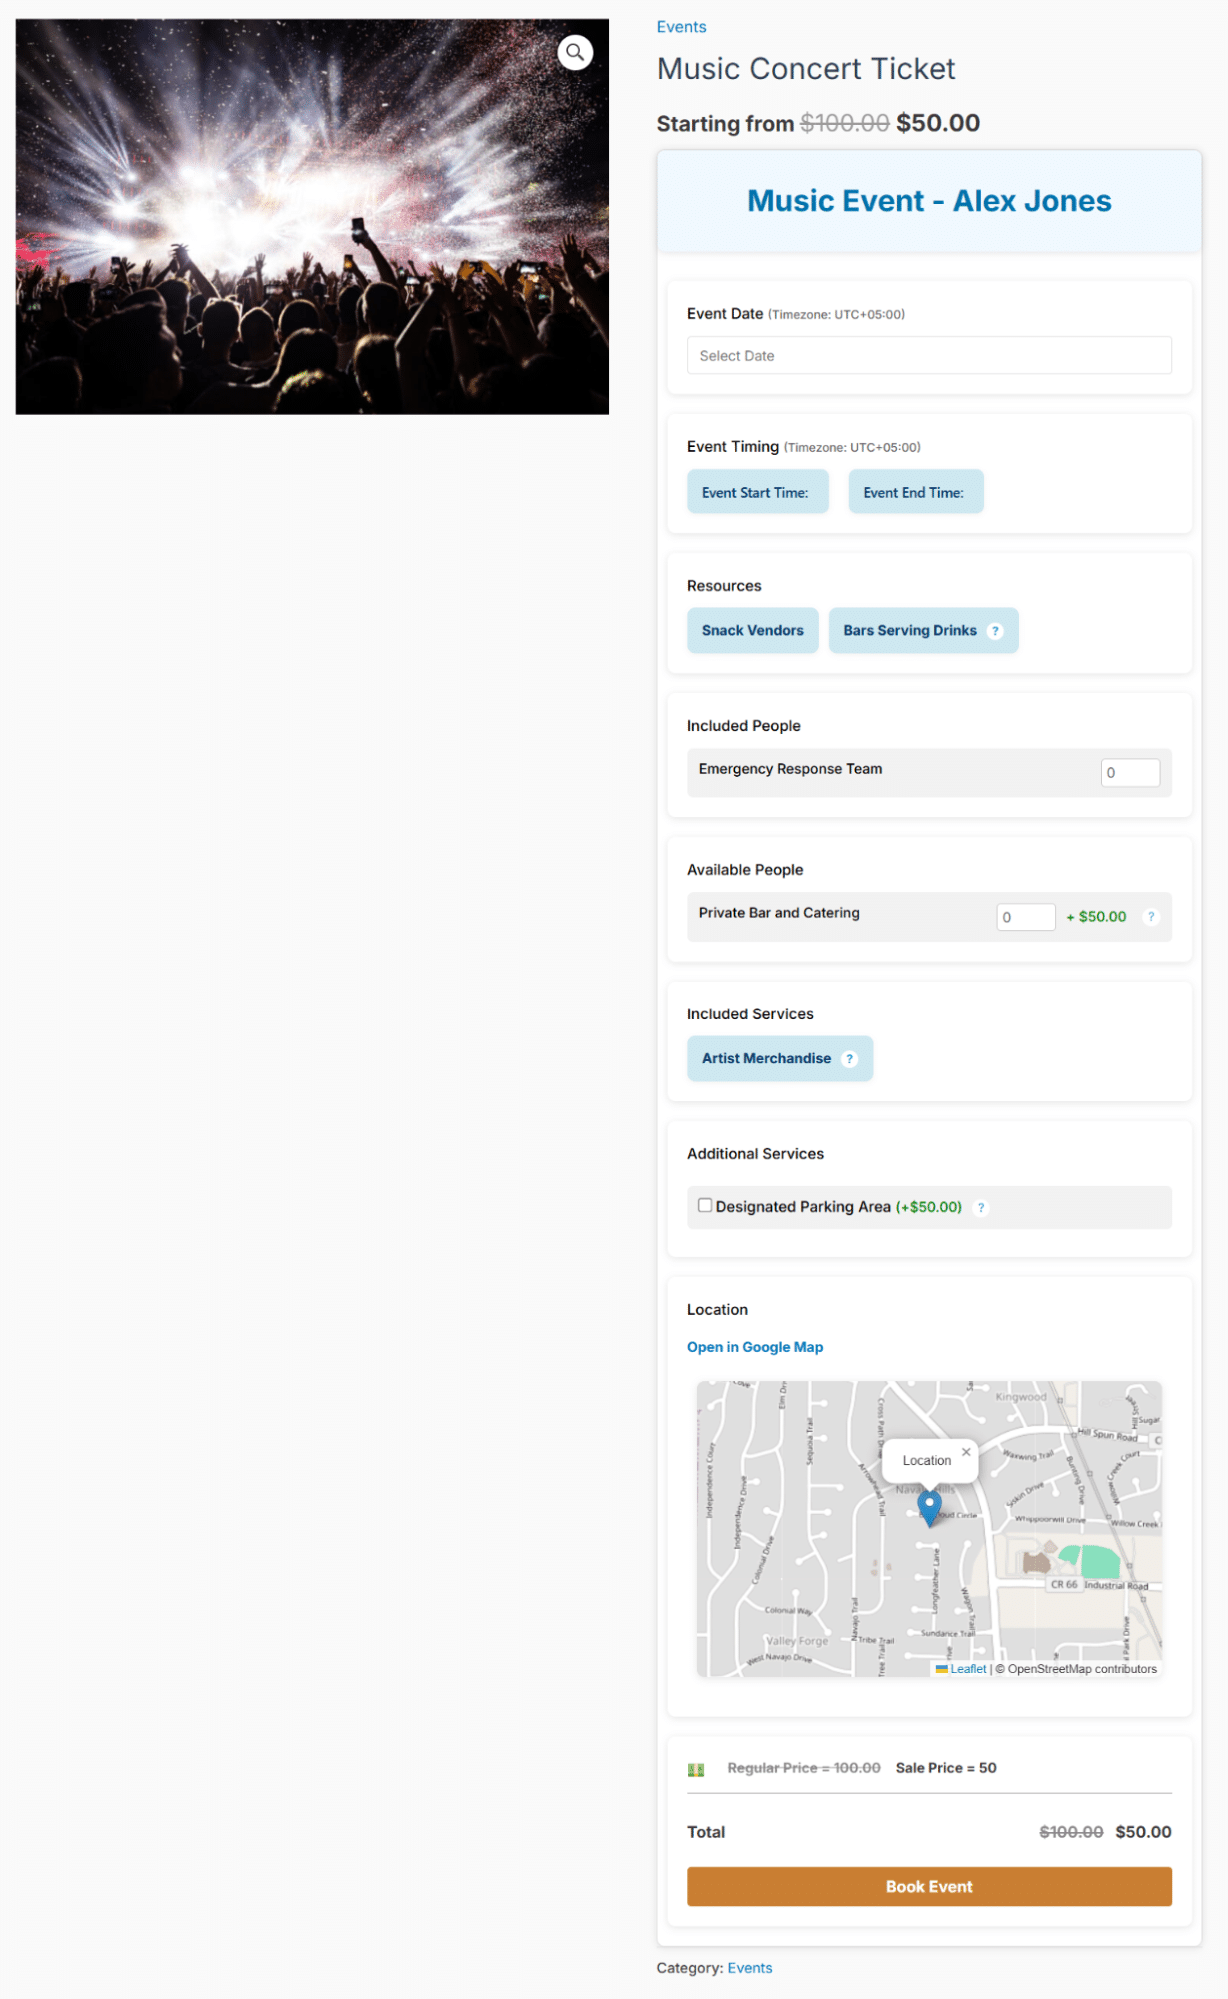
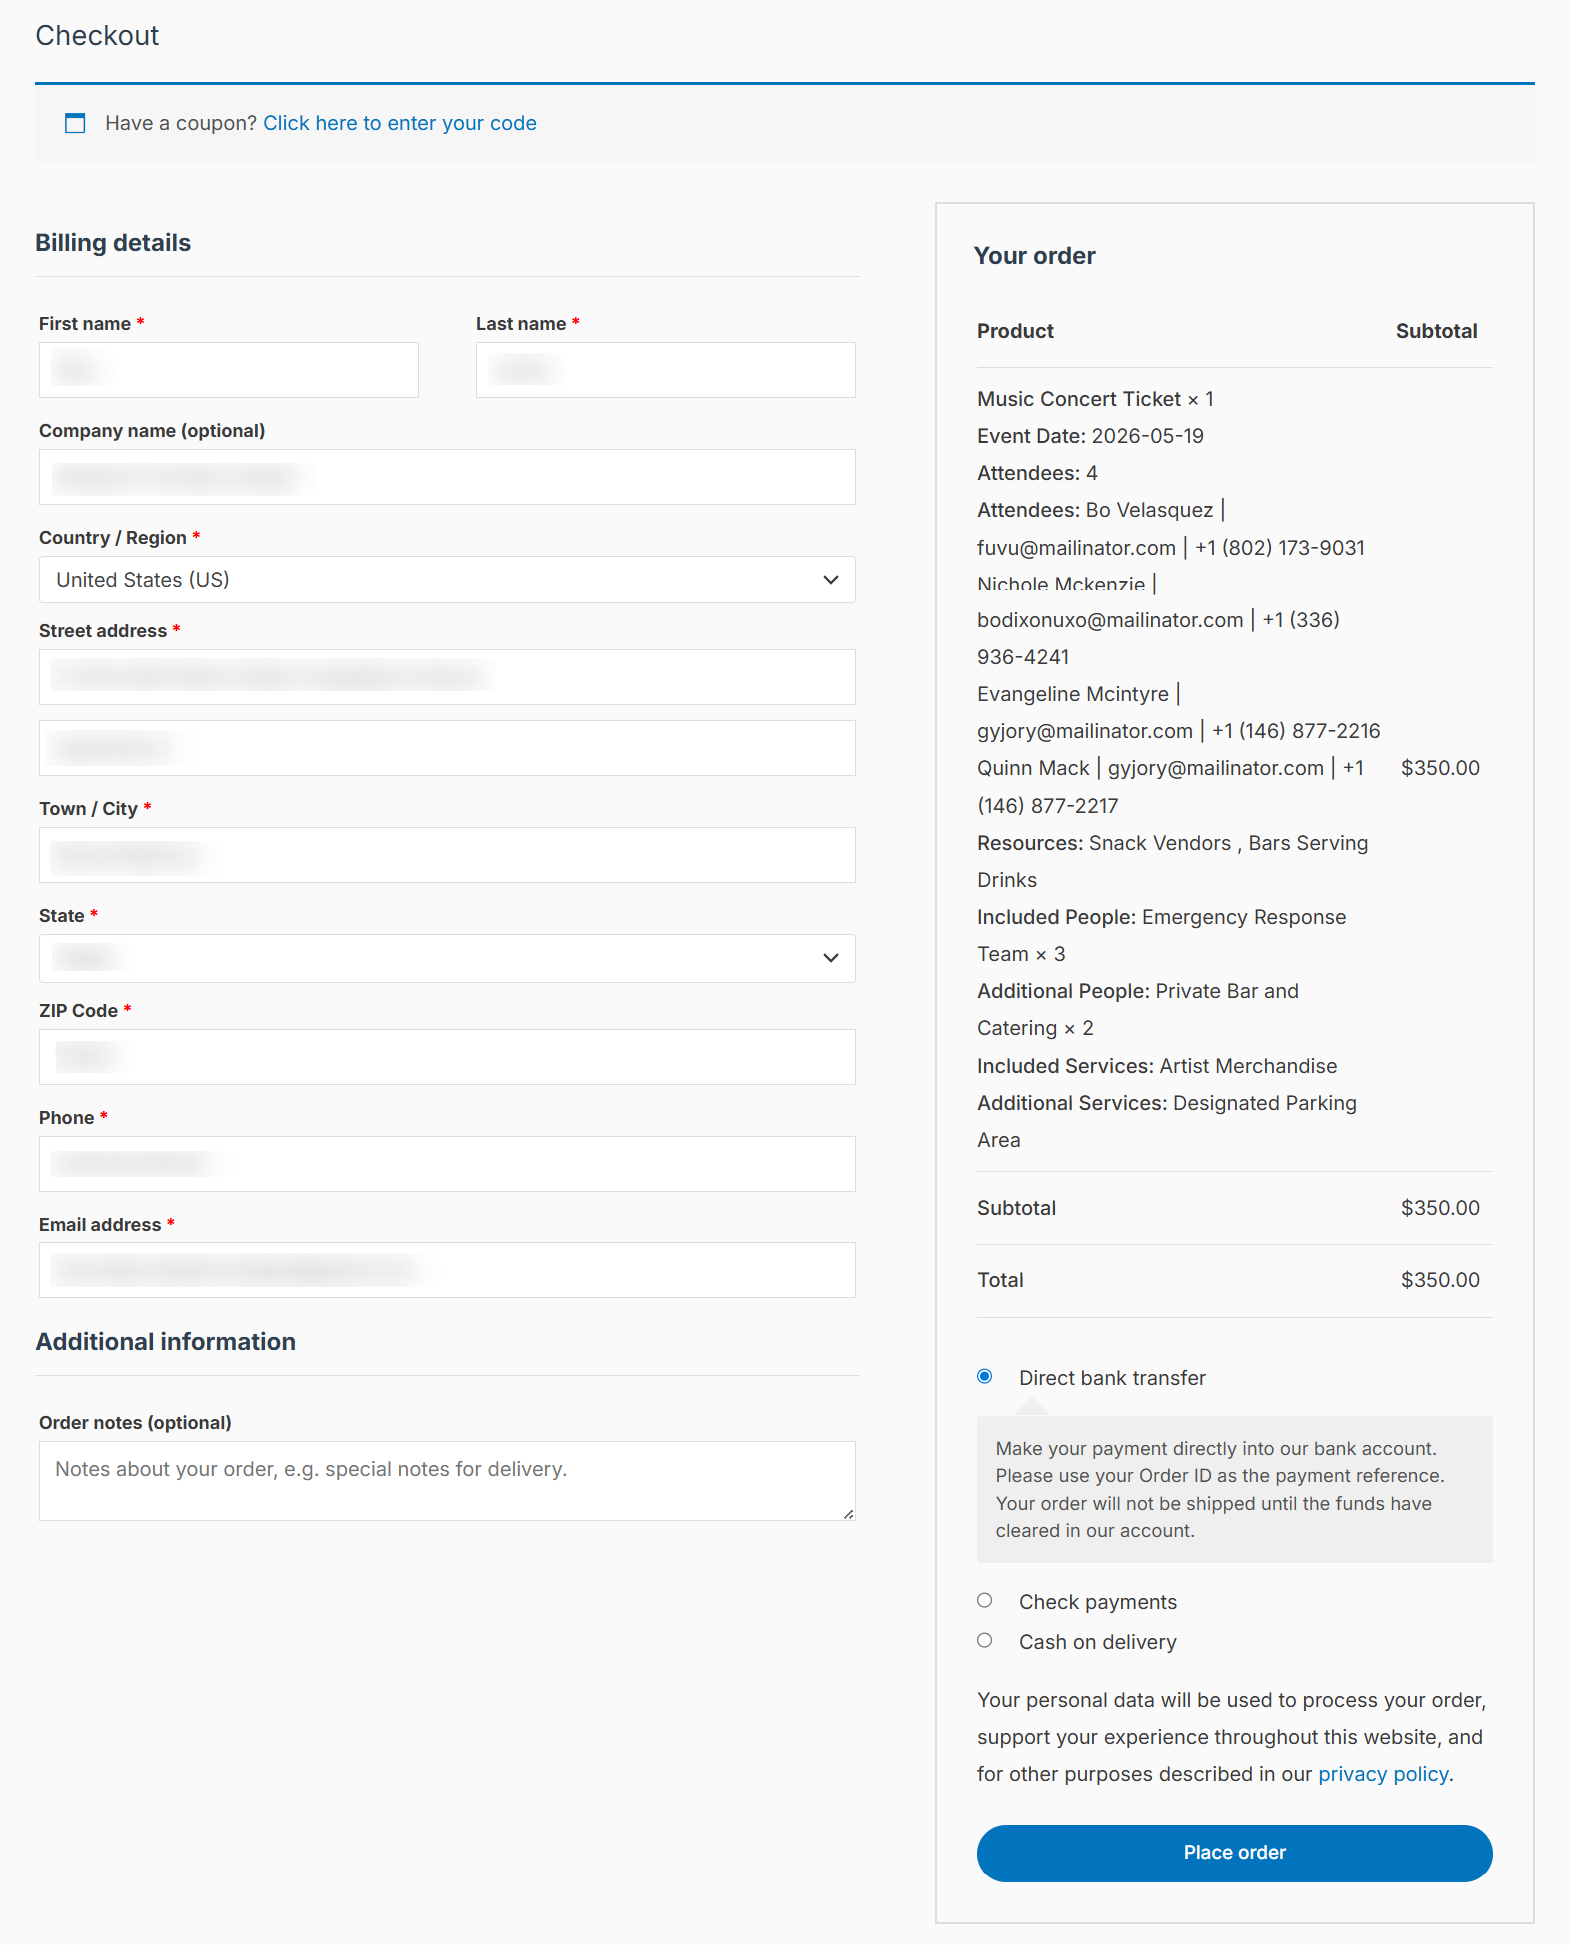
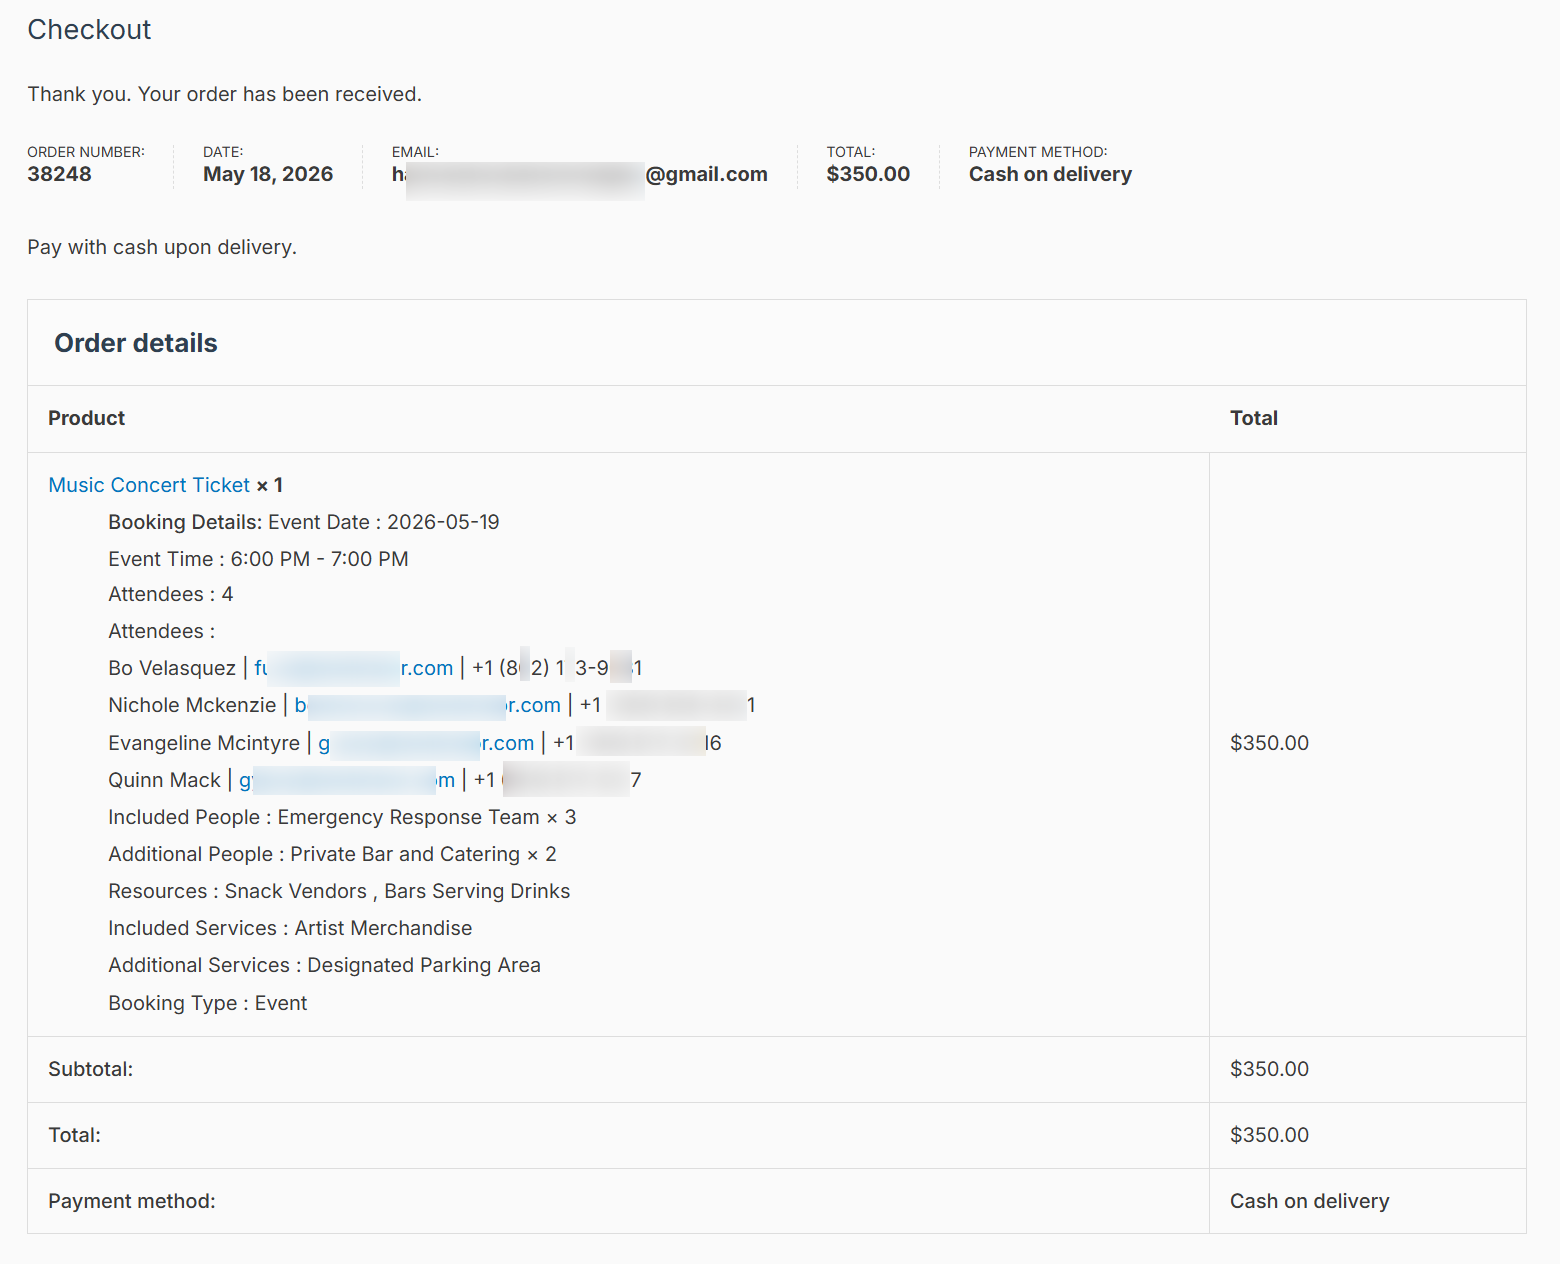
The customer will have to select a day, and he will see the number of slots available for that day. Based on the number of attendees, he will have to fill out their information (Name, Email, Phone number – Optional) to book the event.



How To Create And Add A Resource, Service, Or People Role To A Bookable Product Type
Navigate to the product edit page in its “Booking Options” tab. In the “Assigned Resource/Staff” heading. The administrator can create, edit, delete resources, services, and people roles. The administrator can also assign resources, services, and people roles already created to a bookable product by selecting it from the dropdown.
To create a new resource, the steps are as follows:
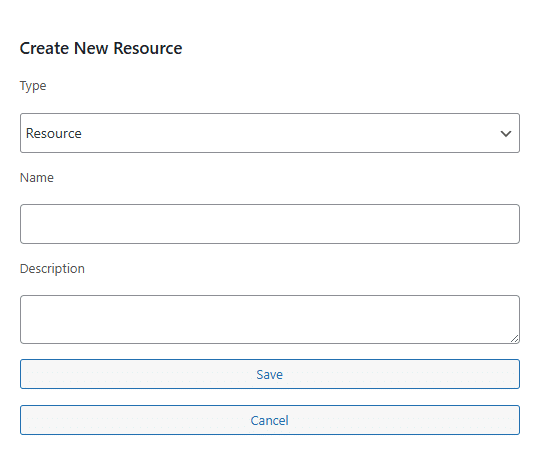
1- Click on the “Create New” button.
2- Select the “Resource” dropdown option from the “Type” option.
3- Enter the resource name and resource description (this is optional).
4- Finally, click the “Save” button.
To create a new service, the steps are as follows:
1- Click on the “Create New” button.
2- Select the “Service” dropdown option from the “Type” option.
3- Enter the service name. Enter the service description and price (these are optional). If the price is provided, then the customers will be able to choose from the product page whether they want to include this service in their order or not.
4- Finally, click the “Save” button.

To create a new people role, the steps are as follows:
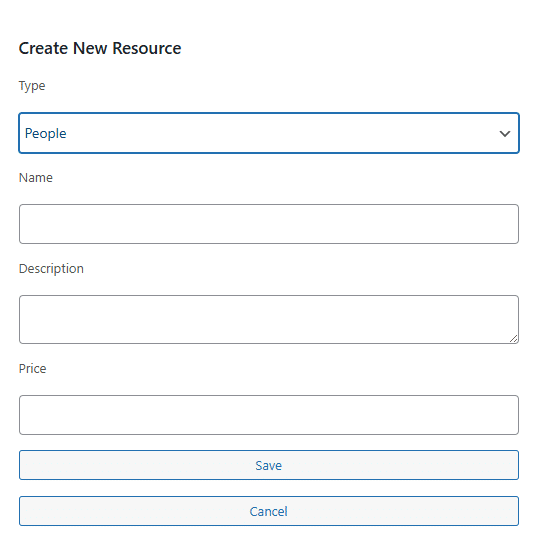
“People” is a resource type in which you can specify the name of a group of people who are associated with the product (Service / Appointment). For example, if you are offering a gym-related product like a membership plan. You can specify what kind of gym trainers will be available in the gym for a customer to book with the plan, like “General Fitness Trainers” and “Specialised Trainers”. If a people resource type will not have a price associated with it, then adding them (as many as the customer wants ) will not have any effect on the total price of the product, while if a people resource type will have a price associated with it, then adding them (as many as the customer wants) will affect the total price of the product.
Note: These people roles are not custom user-roles of WordPress. Kindly do not mistake them for WordPress user-roles like Administrator. These roles can be created/edited/deleted and are only accessible in the WooCommerce product type – “Bookable Product”.
1- Click on the “Create New” button.
2- Select the “People” dropdown option from the “Type” option.
3- Enter the people’s role name. Enter the people’s role description and price (these are optional). If price is provided, then the customers will be able to choose from the product page whether they want to include these people in their order or not, and if yes, then how many.
4- Finally, click the “Save” button.
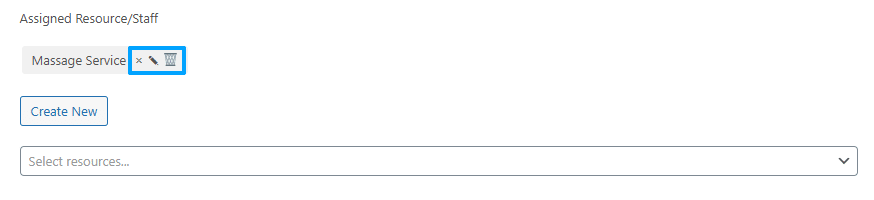
The administrator can edit, delete, and remove the resource types (resource, service, people) added to the bookable product by clicking the icons.
Integrations
In this tab, the administrator will be able to view and manage all the integration-related settings.
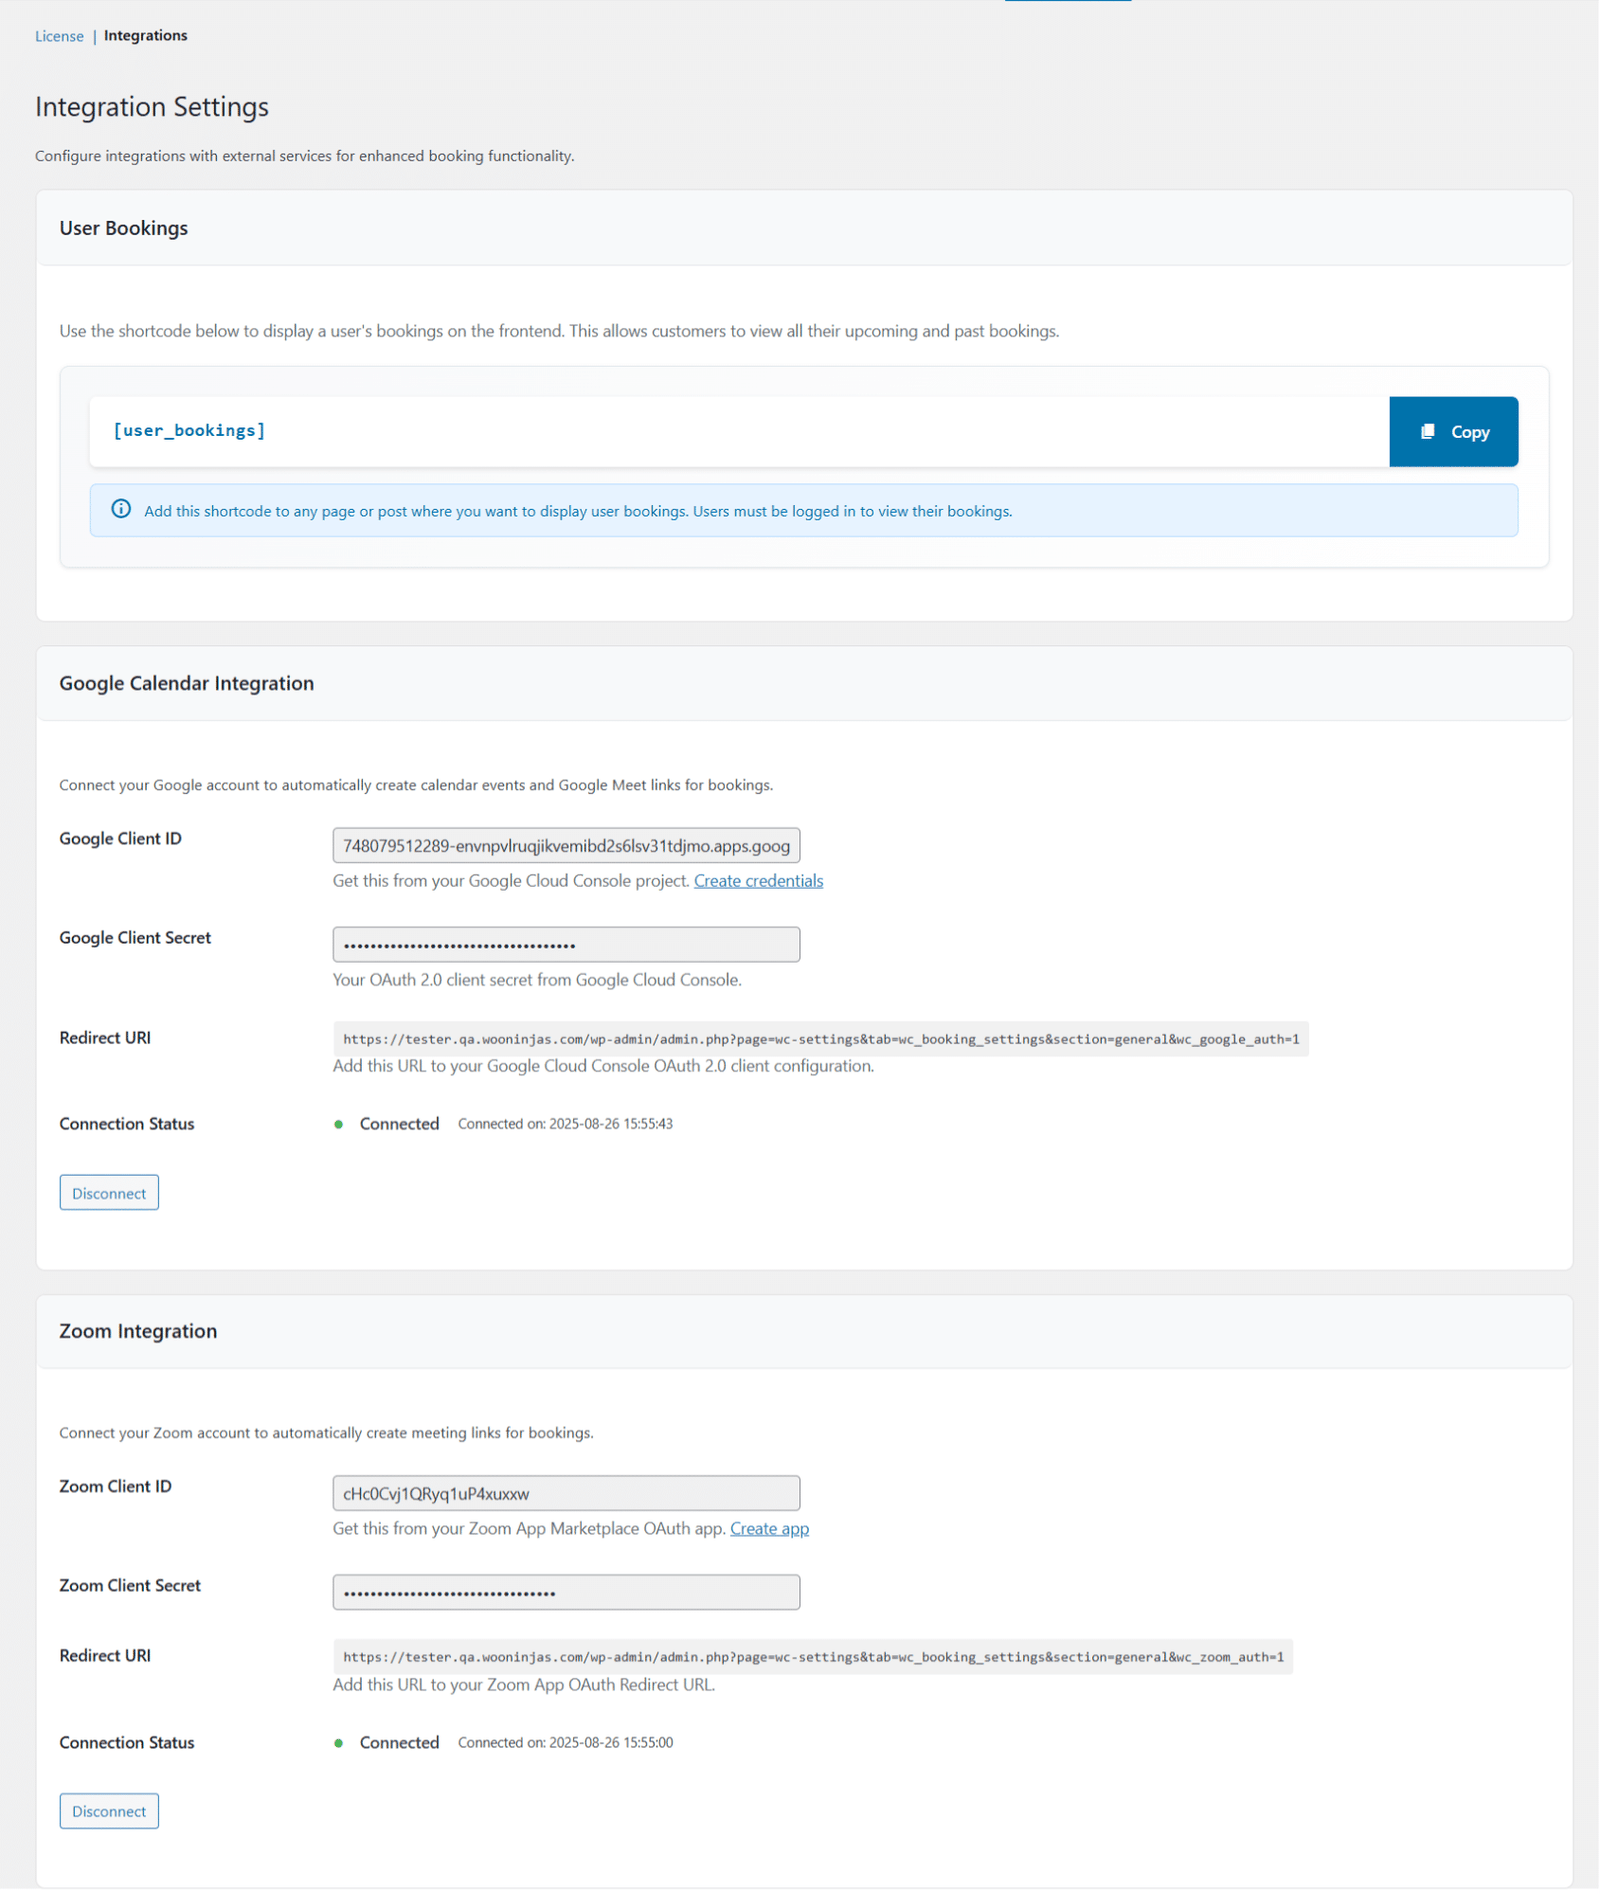
User Bookings Shortcode
The administrator can place the shortcode “[user_bookings]” on any page or post where they want to display user bookings. Customers must be logged in to view their bookings. This allows customers to view all their upcoming and past bookings and search them.
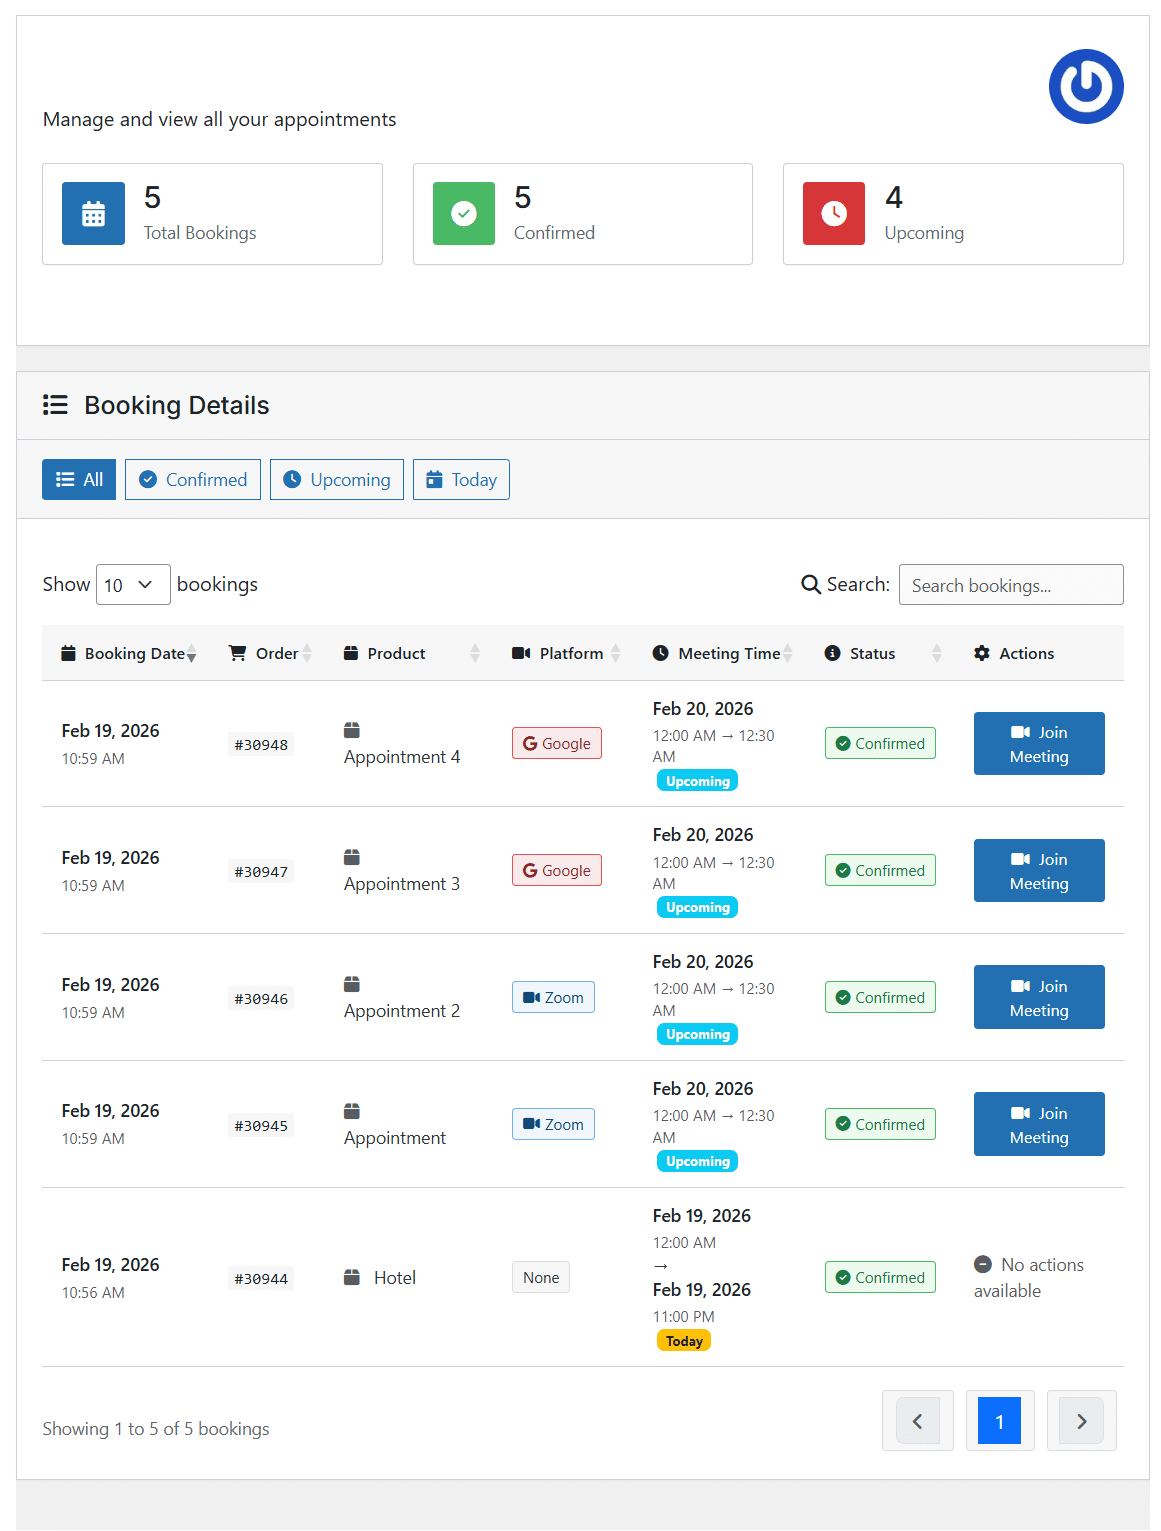
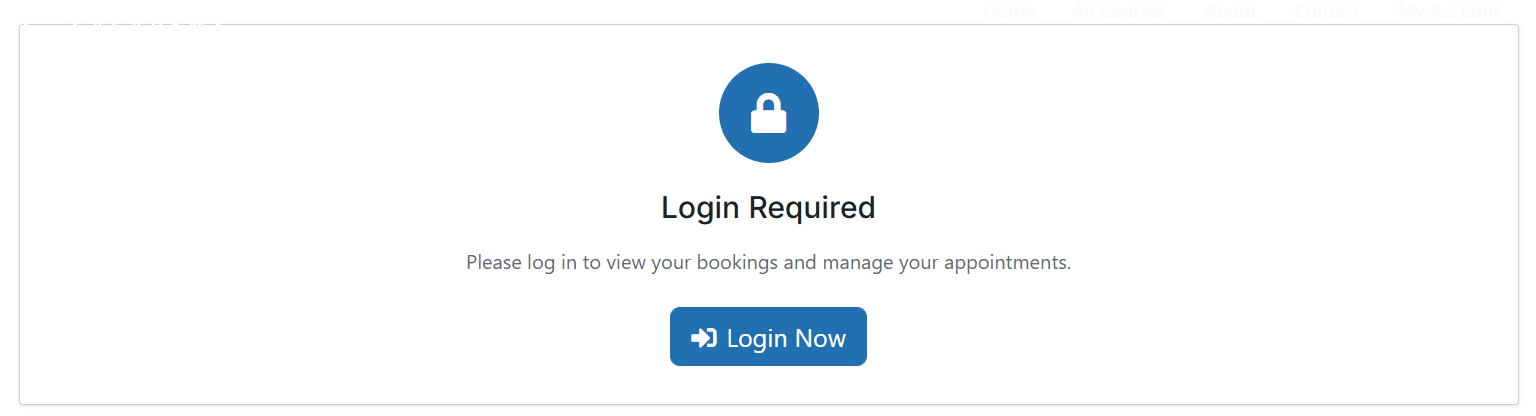
Otherwise, Logged-out users will see the following section:
Google Calendar and Google Meet Integration
Here, the administrator can connect their Google account to automatically create calendar events and Google Meet links for bookings. To get the “Google Client ID” and “Google Client Secret”, the steps are as follows:
1- Navigate to your Google Cloud “https://console.cloud.google.com/apis/credentials ”.
2- Create a new Project.
3- Go to “Credentials” sub-menu and search for “Google Meet REST API” and “Google Calendar API”. Enable them both.
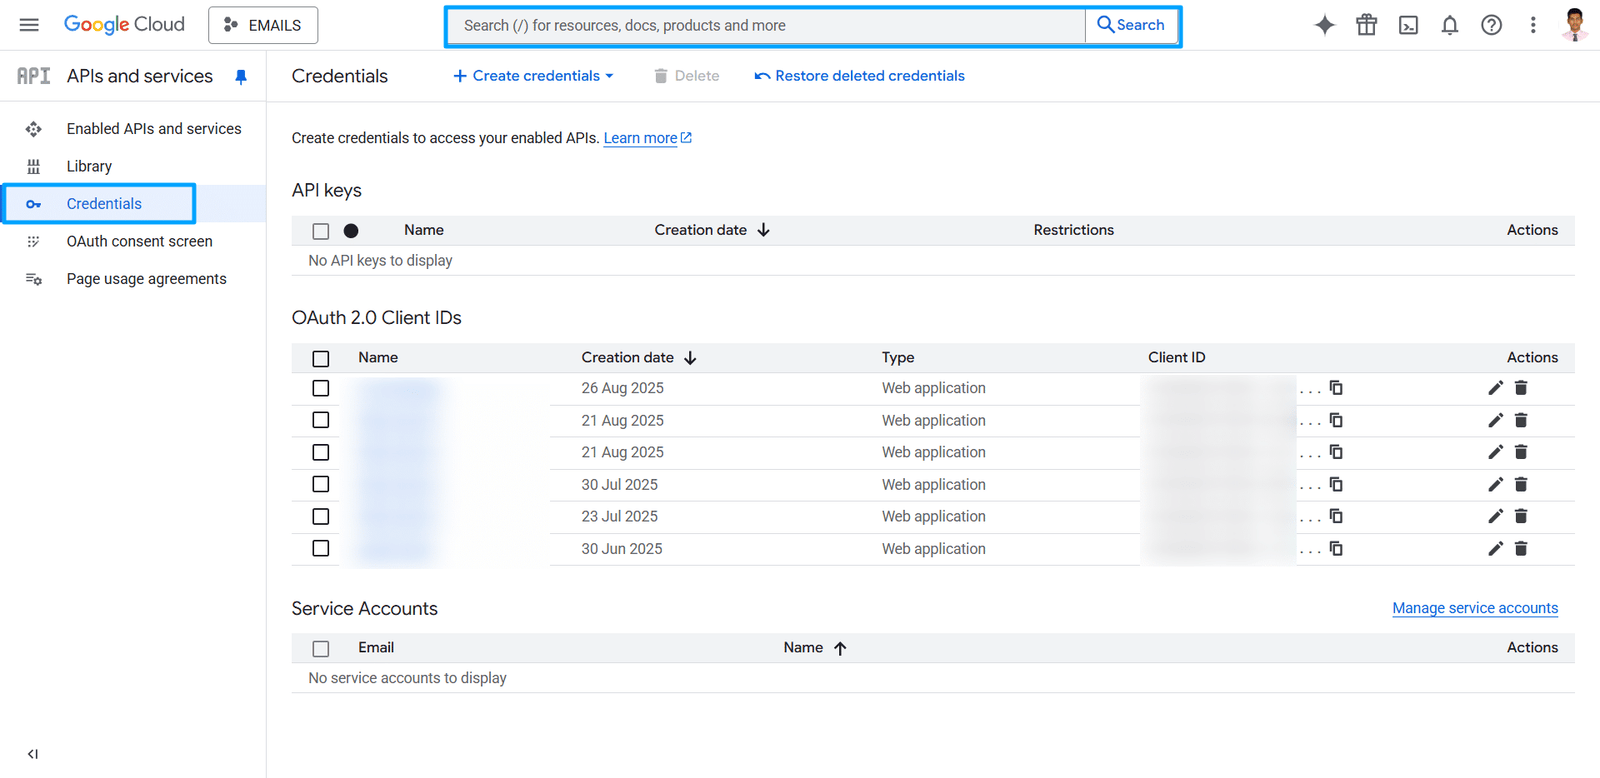
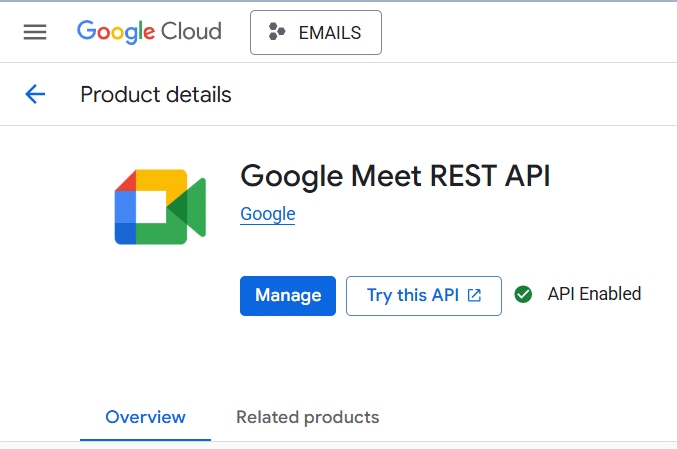

4-Come back to the “Credentials” sub-menu and click on “Create credentials” and select the “OAuth client ID” option.

5-Select Application type as “Web application” and give it a name. Click the “Add URI” button in the “Authorised redirect URIs” heading and enter the “Redirect URI” from your site.
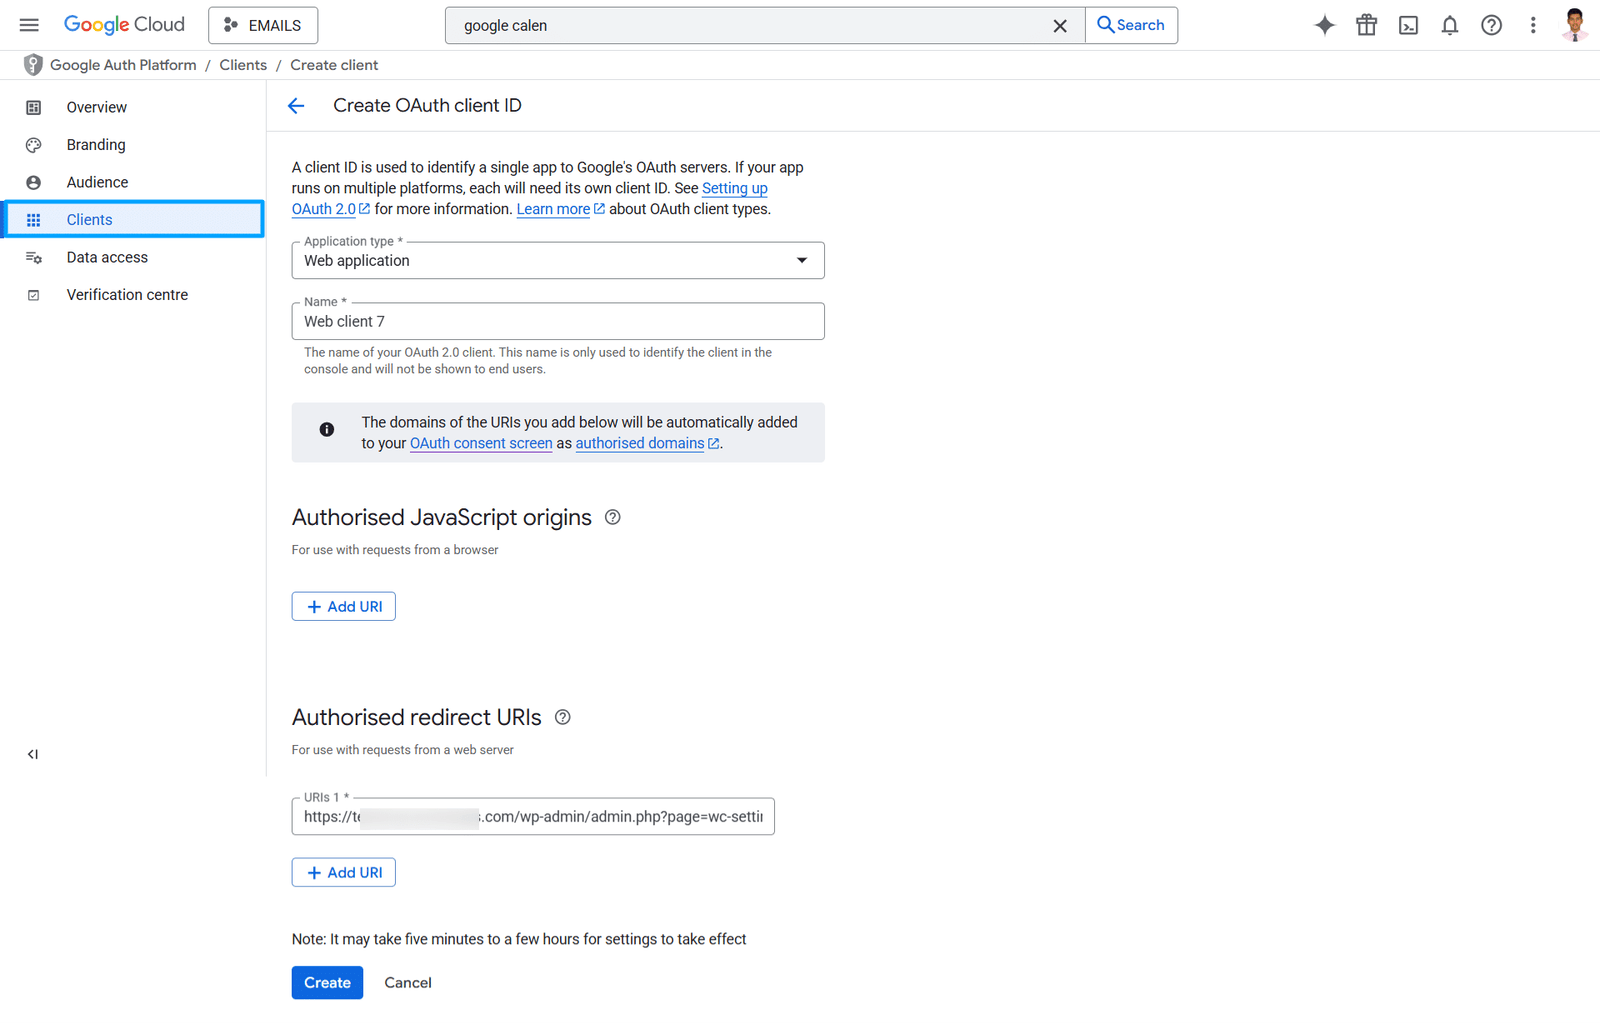
6- Click the “Create” button and download the JSON File. The JSON file will have both the fields required to connect your Google account to your site.
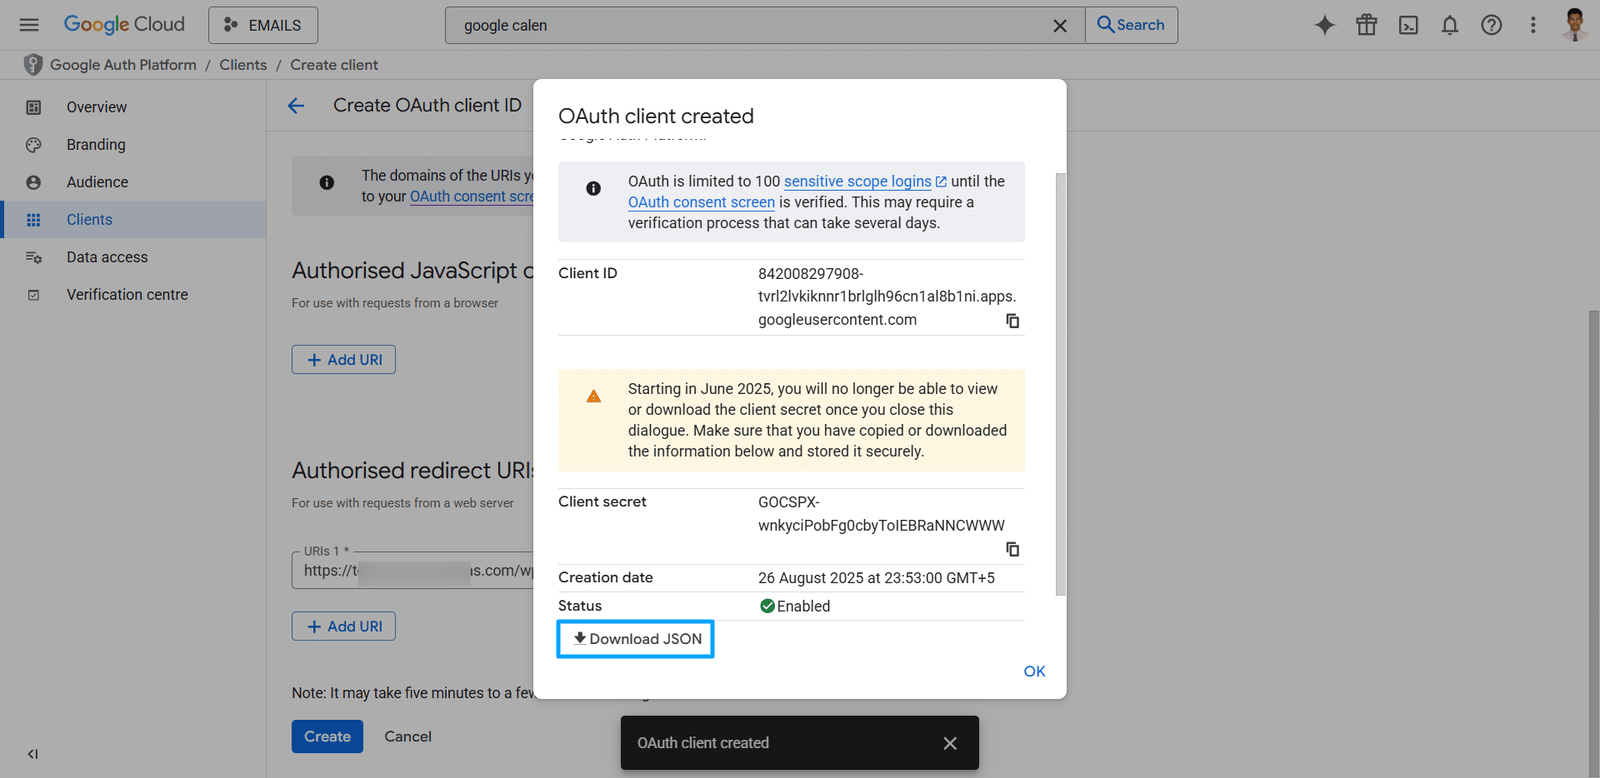

7- Place the “Google Client ID” and “Google Client Secret” in their respective fields and click the “Save Configuration” button to save the fields, and then click the “Connect with Google” button. Finally, grant permission to the application to connect to your site.
Zoom Integration
Here, the administrator can connect their Zoom account to automatically create meeting links for bookings. To get the “Zoom Client ID” and “Zoom Client Secret”, the steps are as follows:
1- Navigate and log in to your Zoom App Marketplace (https://marketplace.zoom.us/develop/create ). Click on the “Build app” option.

2- Select the “General App” option and click on create.
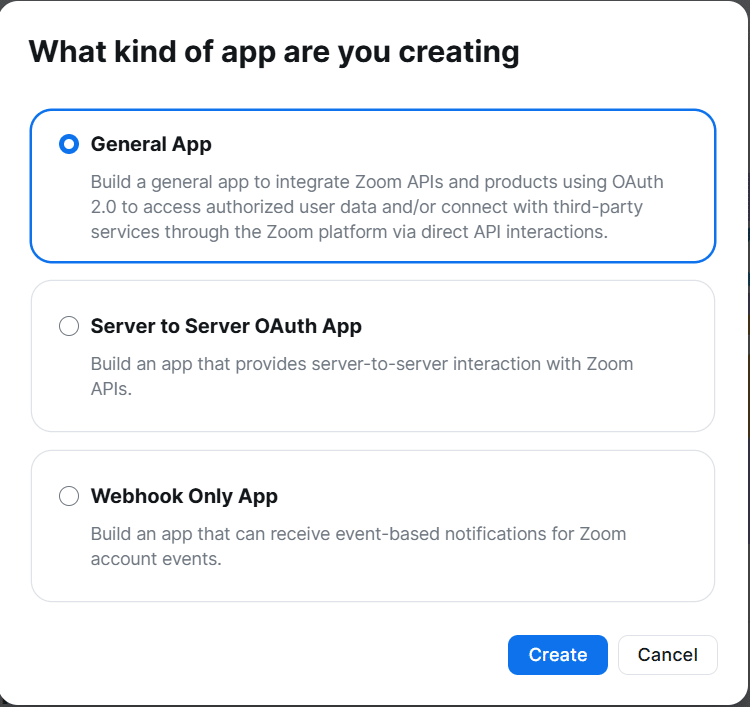
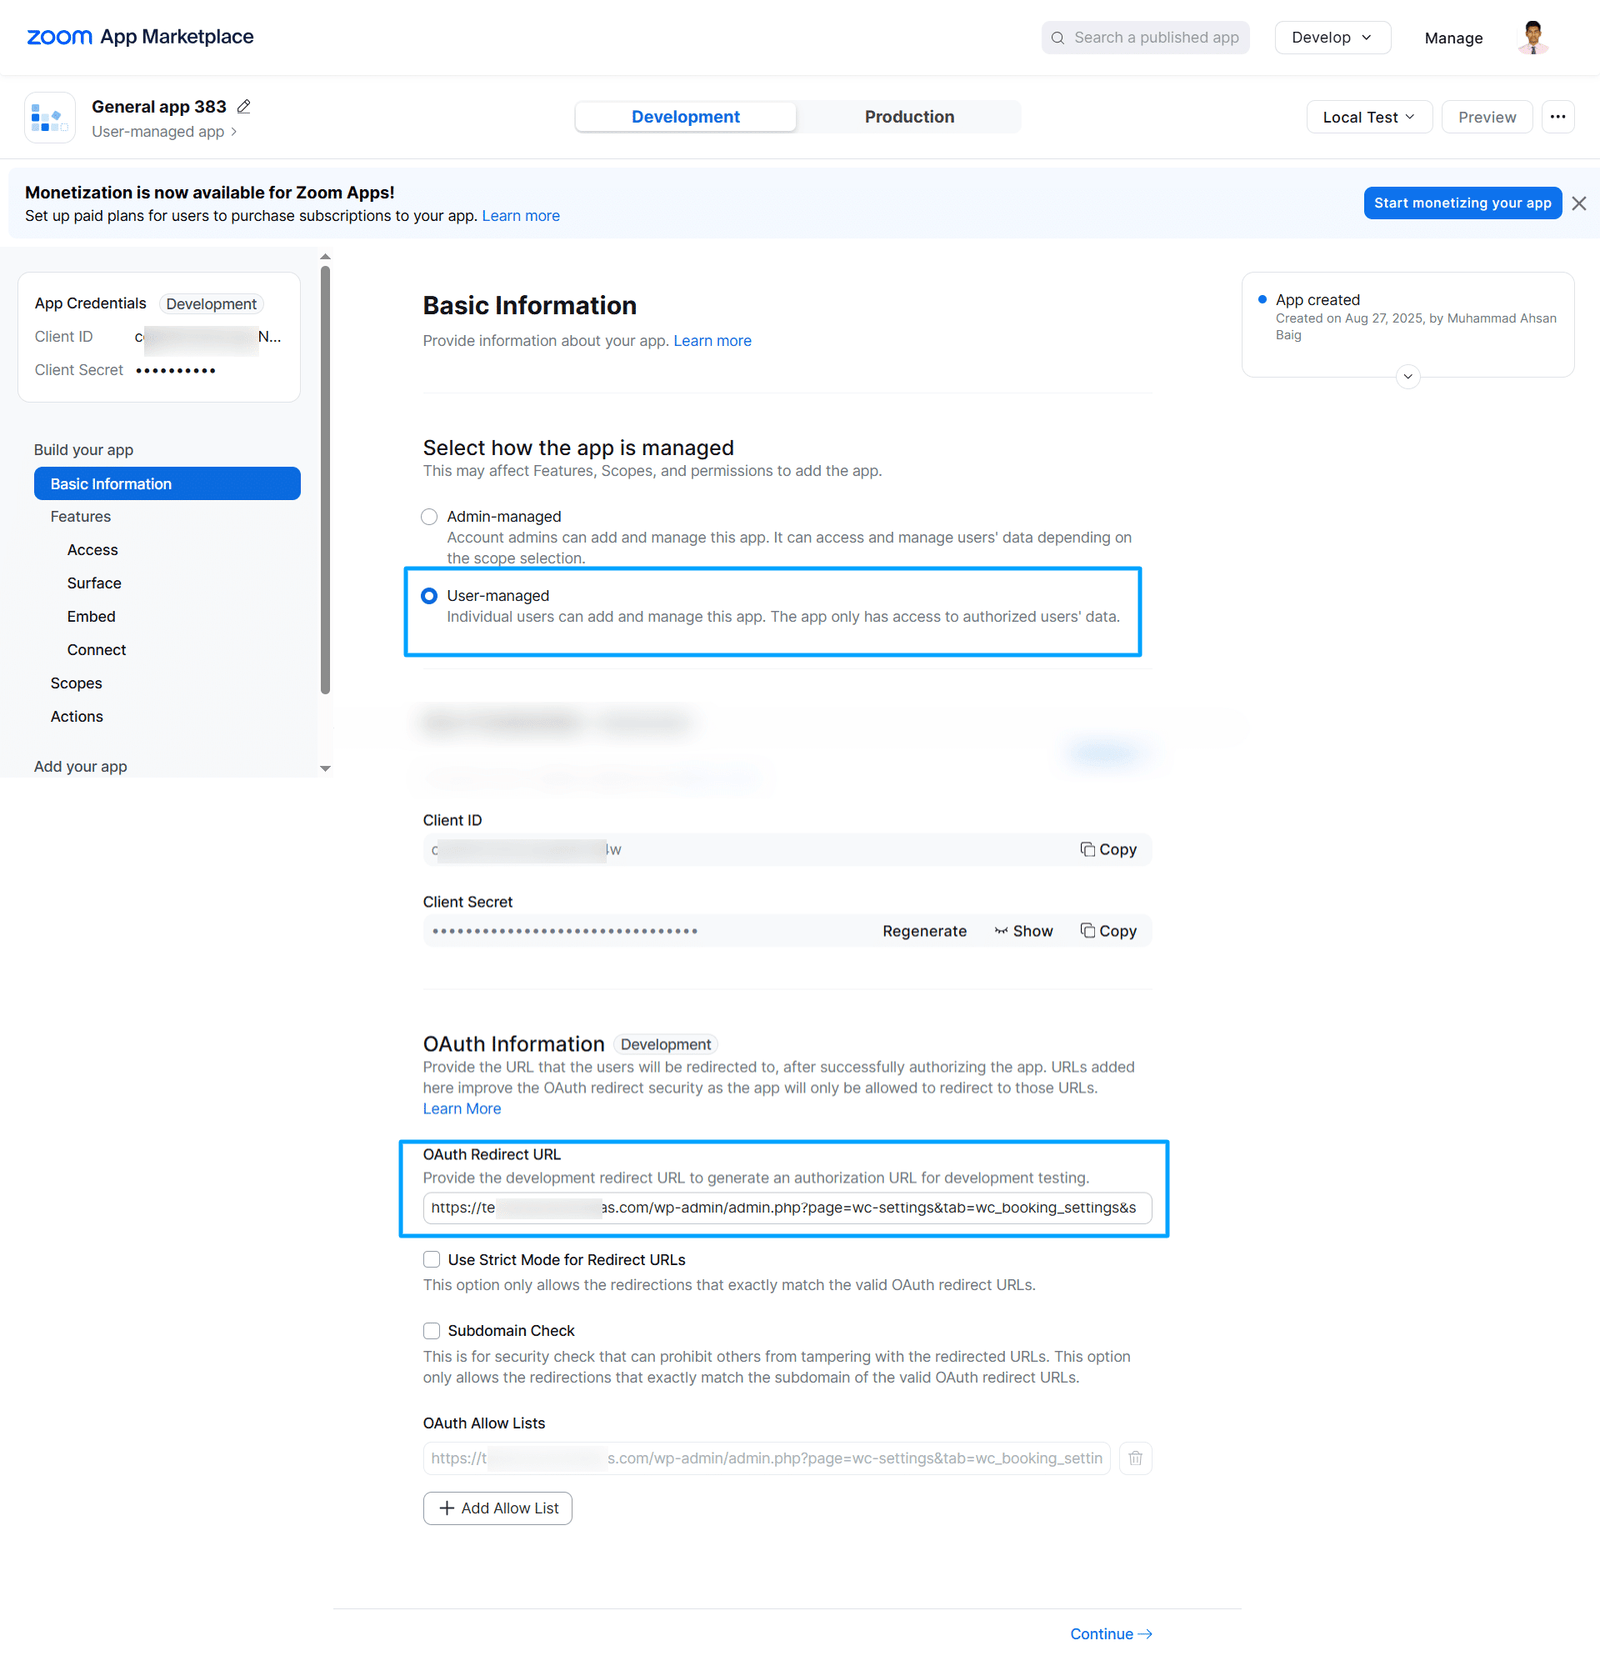
3- In the “Basic Information” sub-menu, select the “User-managed” option and enter the “Redirect URL” from your site in the “OAuth Redirect URL” option.
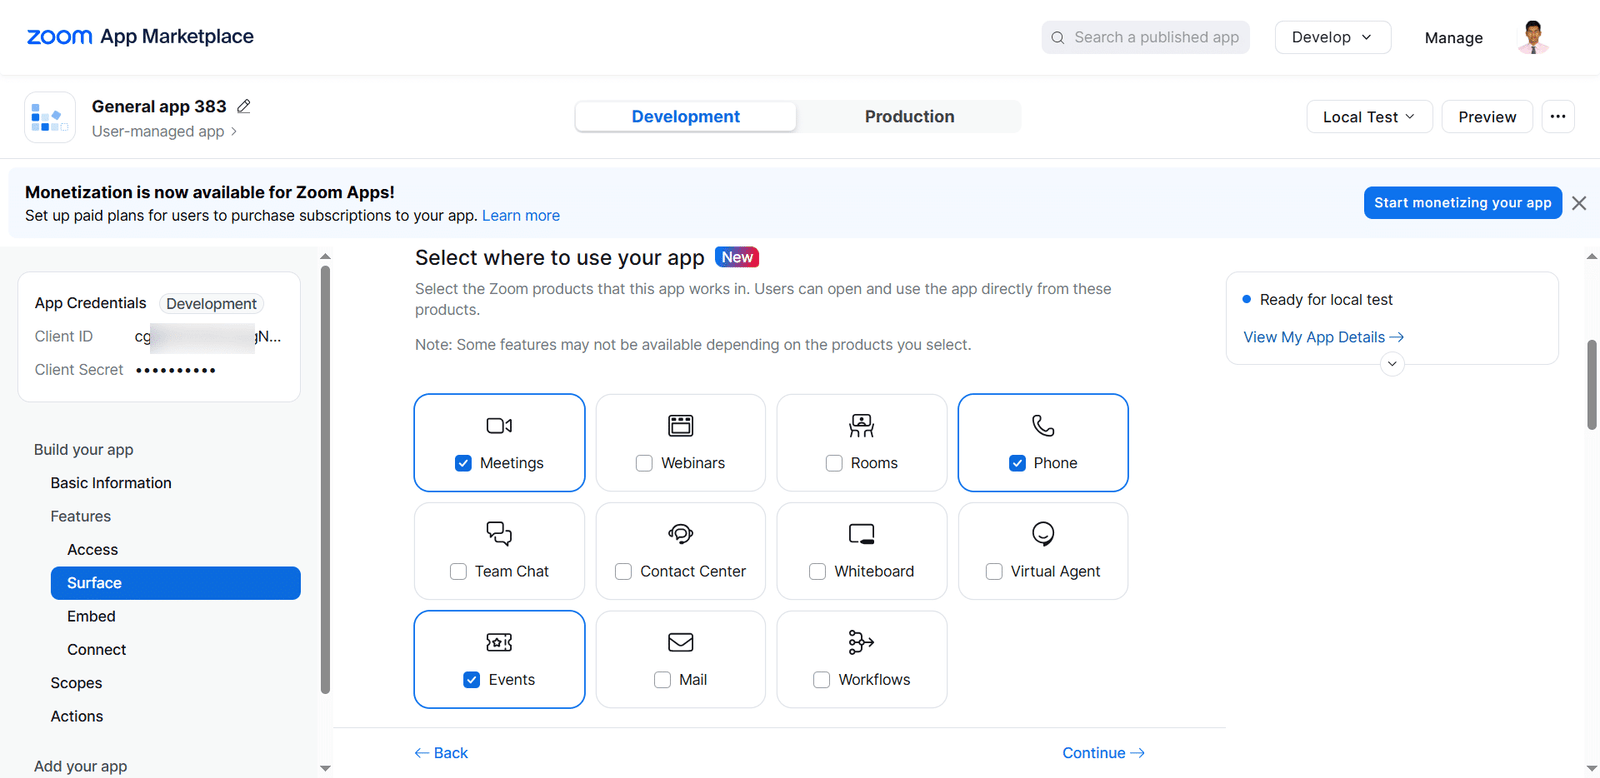
4- In the “Surface” sub-menu, select the options Meetings, Phone, and Events.
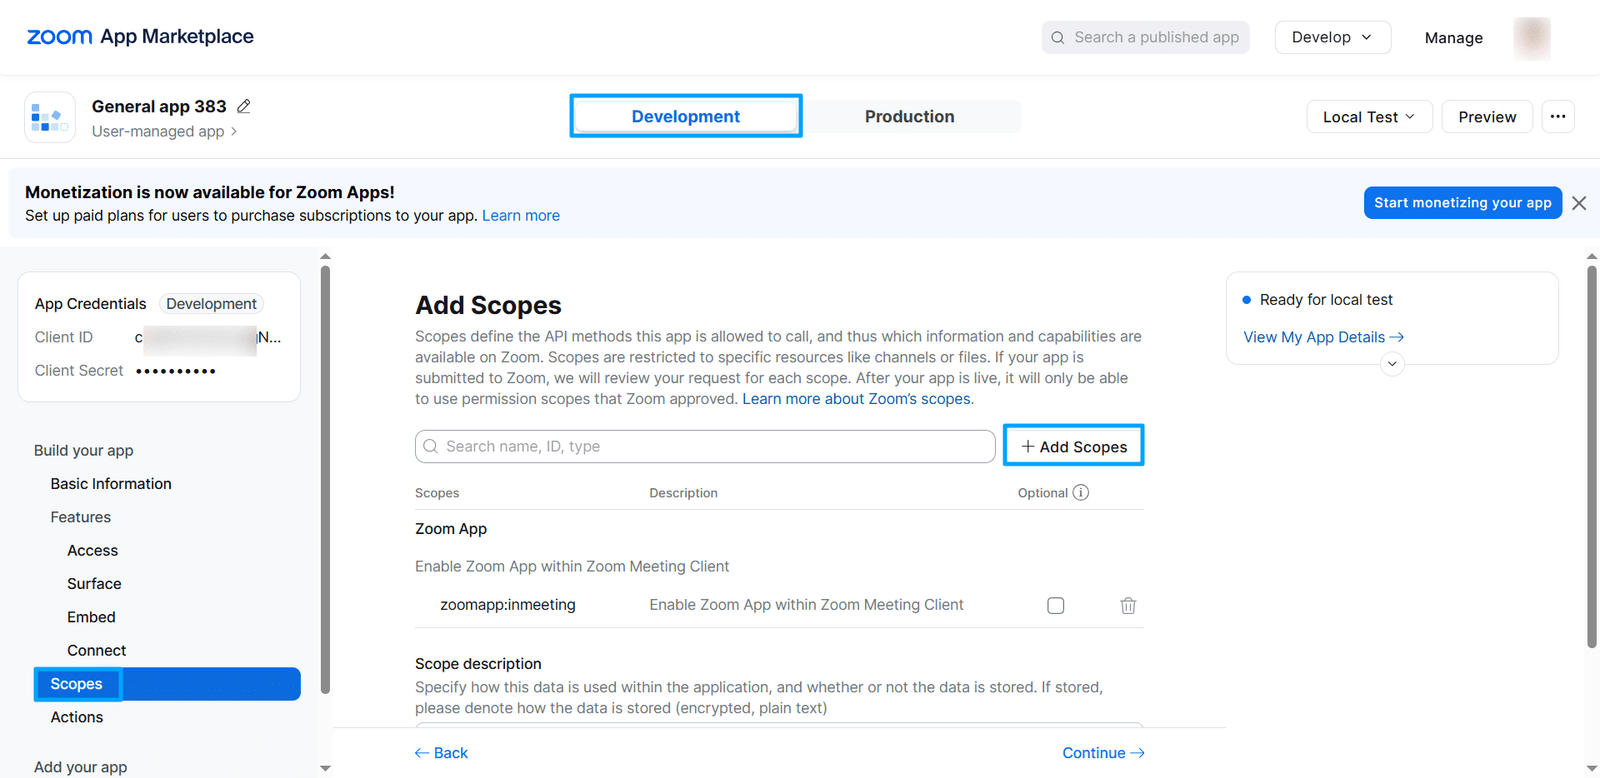
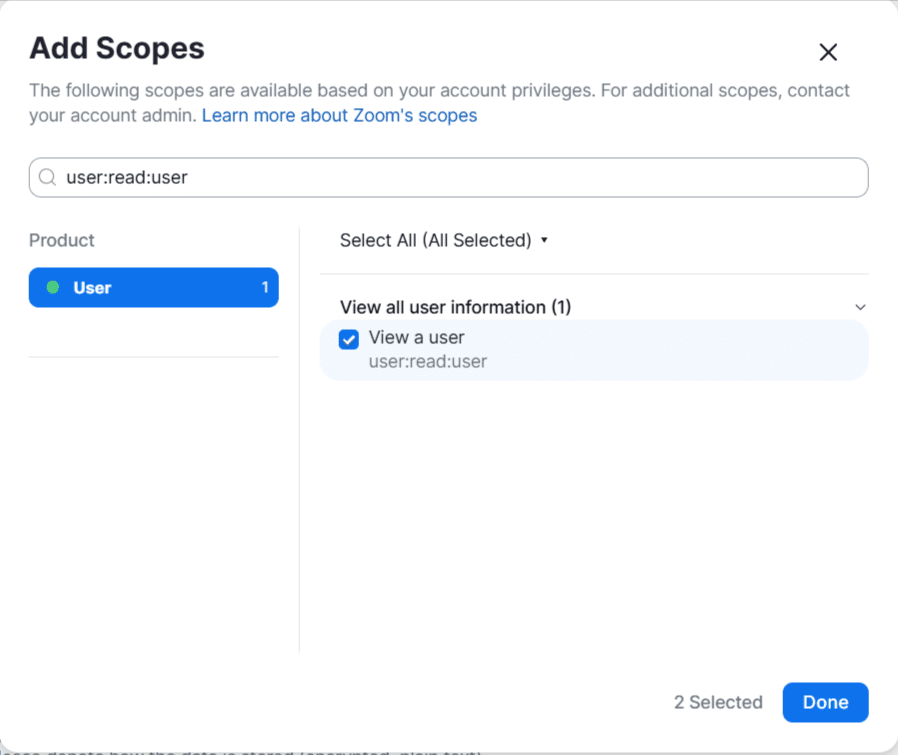
5- In the “Scopes” sub-menu, click the “+ Add Scopes” button. Search and add the 3 scopes “zoomapp:inmeeting”, “meeting:write:meeting”, and “user:read:user”.
6- Click on the “Add app now” button and grant the permission.

7- Place the “Zoom Client ID” and “Zoom Client Secret” in their respective fields and click the “Save Configuration” button to save the fields, and then click the “Connect with Zoom” button. Finally, grant permission to the application to connect to your site.
Booking Reports
In this sub-menu, the administrator will be able to view, search, and filter all the appointment/meeting records purchased by all the customers for all the products of the bookable product type whose order status is marked as completed. If a respective product’s WooCommerce order has been marked with any status other than “Completed”, then the record entry will not be visible for the respective WooCommerce orders.
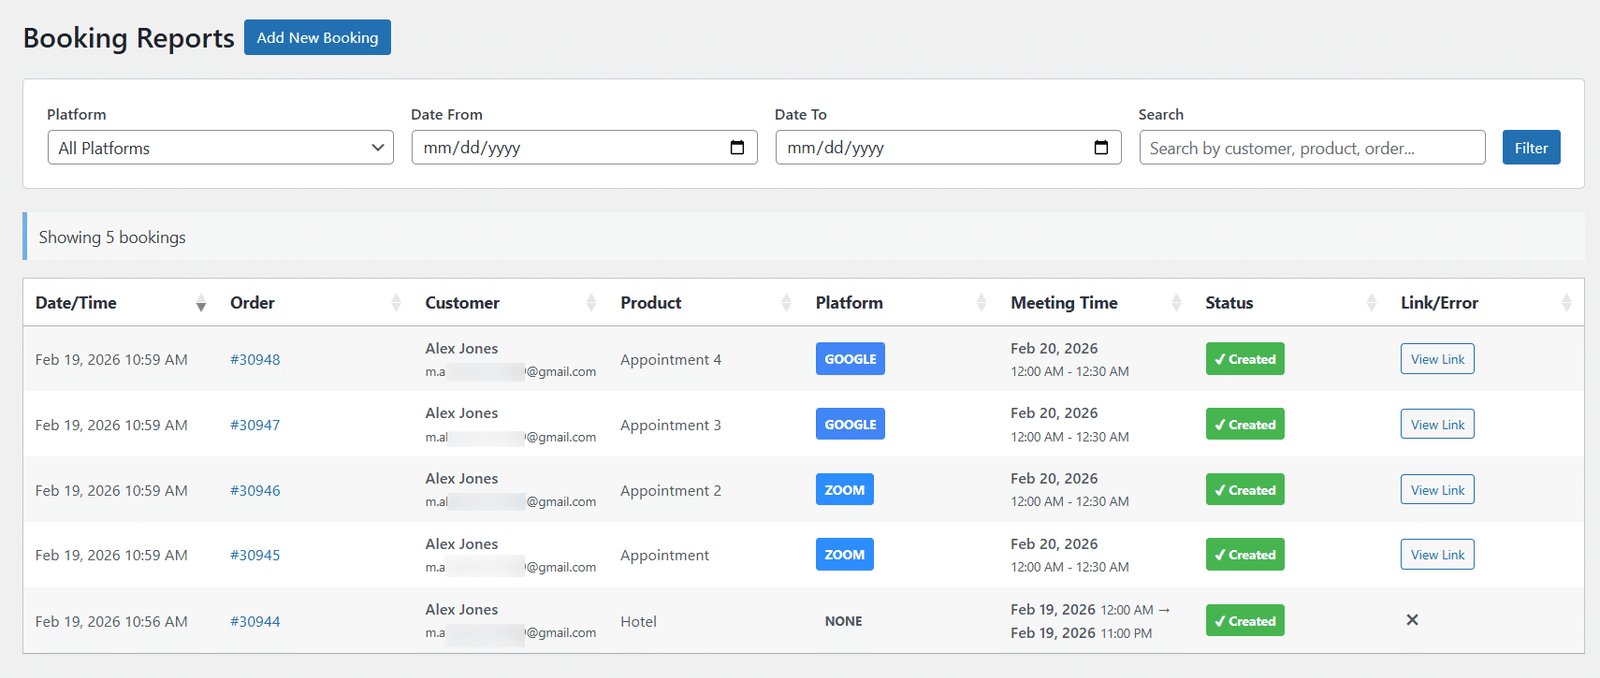
The administrator can also manually create bookings of the WooCommerce product type “Bookable Product” of types “Hotel”, “Virtual” and “Rental”. The steps are as follows:
1- Navigate to the “Booking Reports” sub-menu and click the “Add New Booking” button.
2- Select a customer whose account is already created on the site from the dropdown.
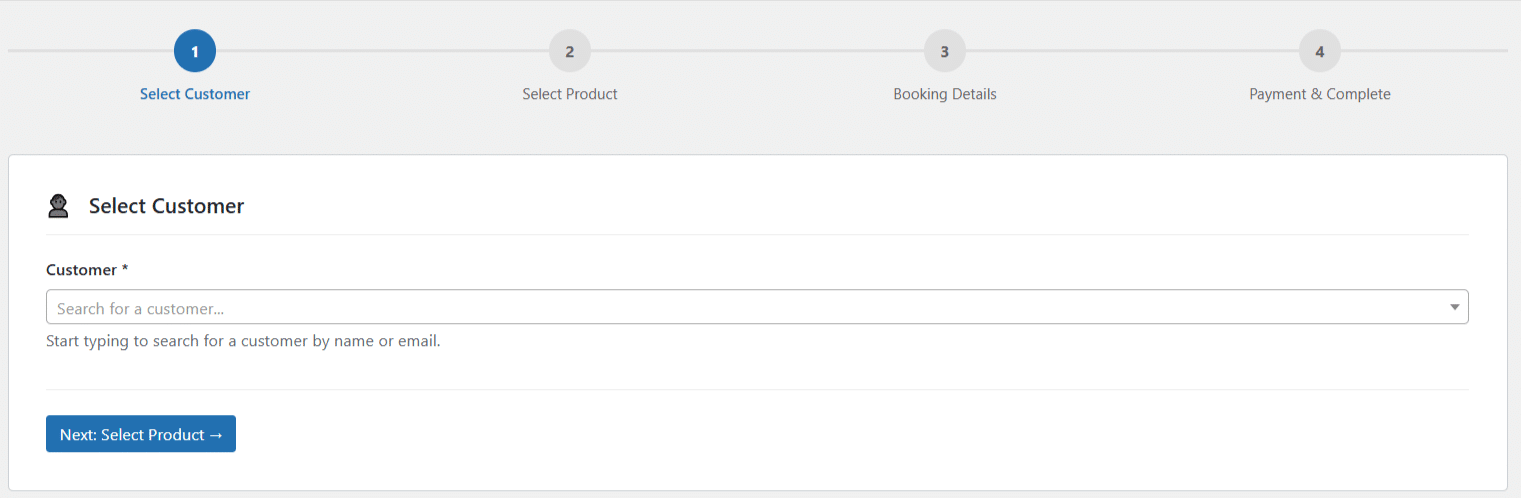
3- Select the WooCommerce Product of “Bookable Product” type whose order the customer wants to create.

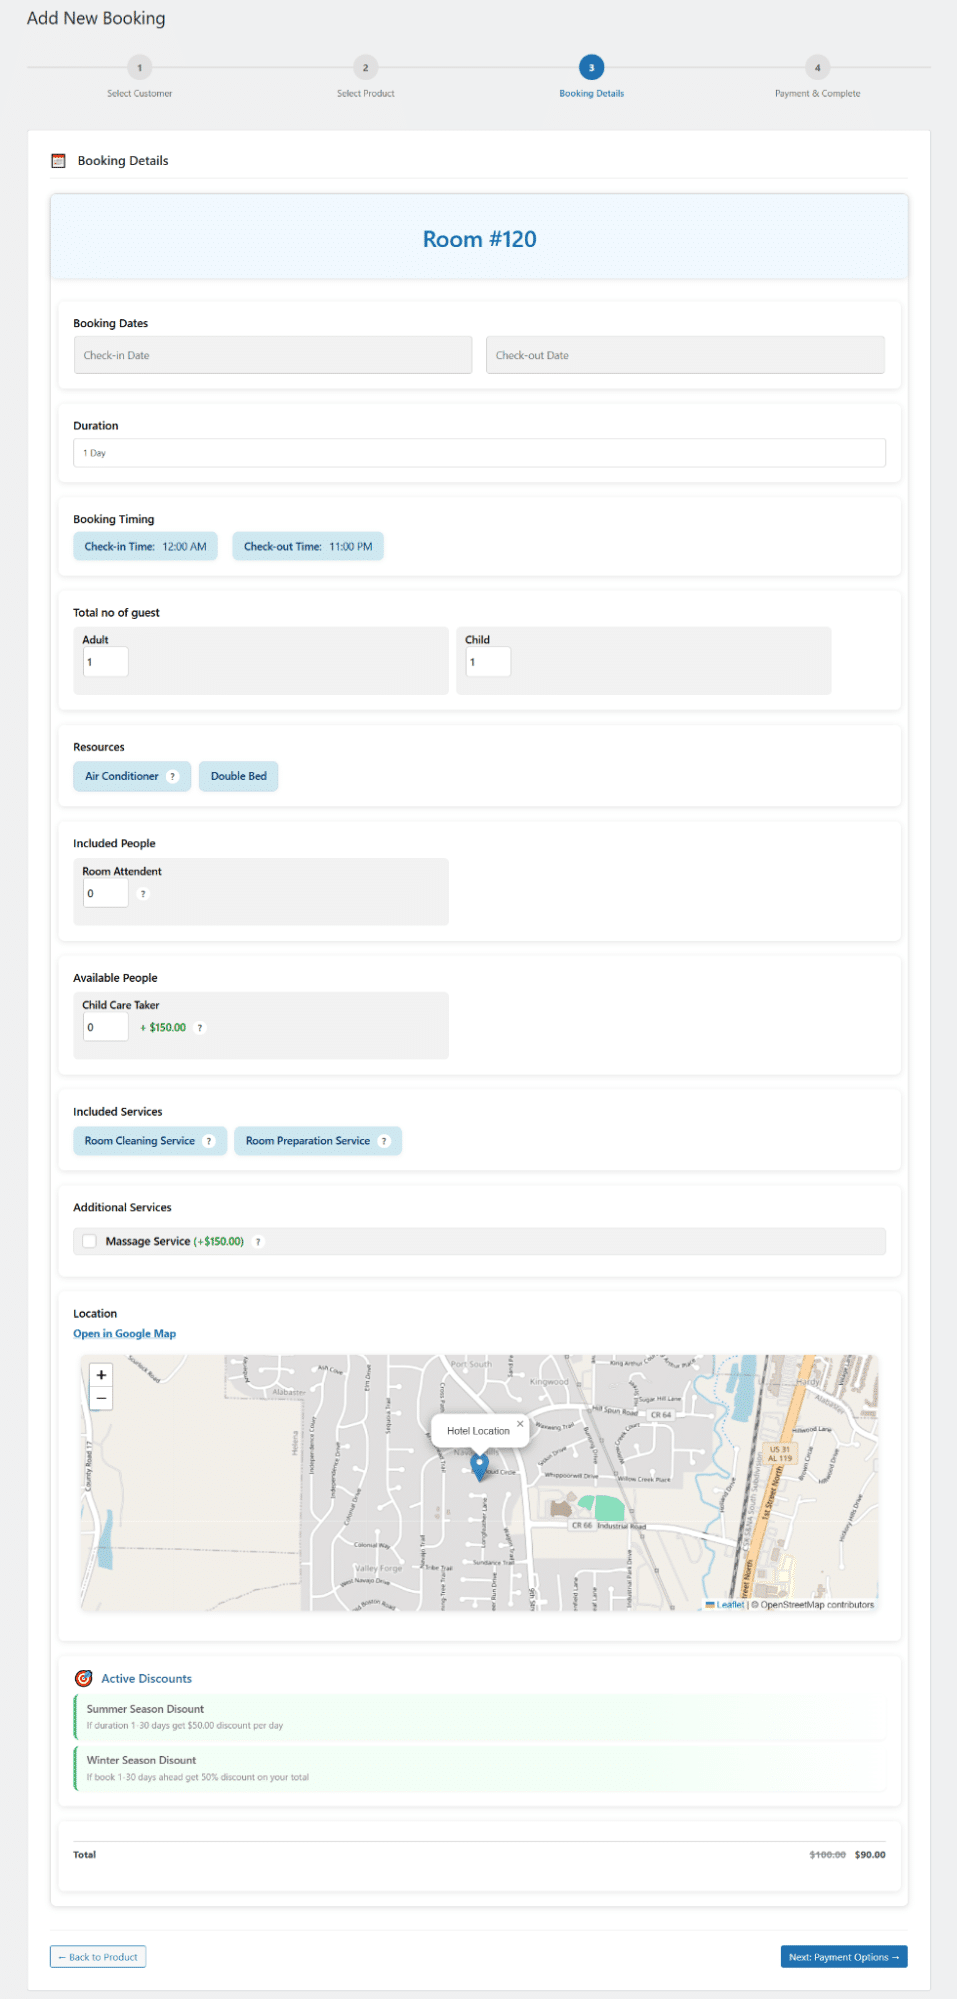
4- Provide all the relevant information regarding the respective WooCommerce bookable product whose booking you want to create. Like selecting the check-in, checkout date, etc.
5- Select whether the customer will pay from his WooCommerce Customer dashboard (Select “Pending Payment” option), or if he has already paid (Select “Paid” option). If the “Pending Payment” option is selected, then the respective WooCommerce Order will be marked as processing. If the “Paid” option is selected, then the respective WooCommerce Order will automatically be marked as completed.
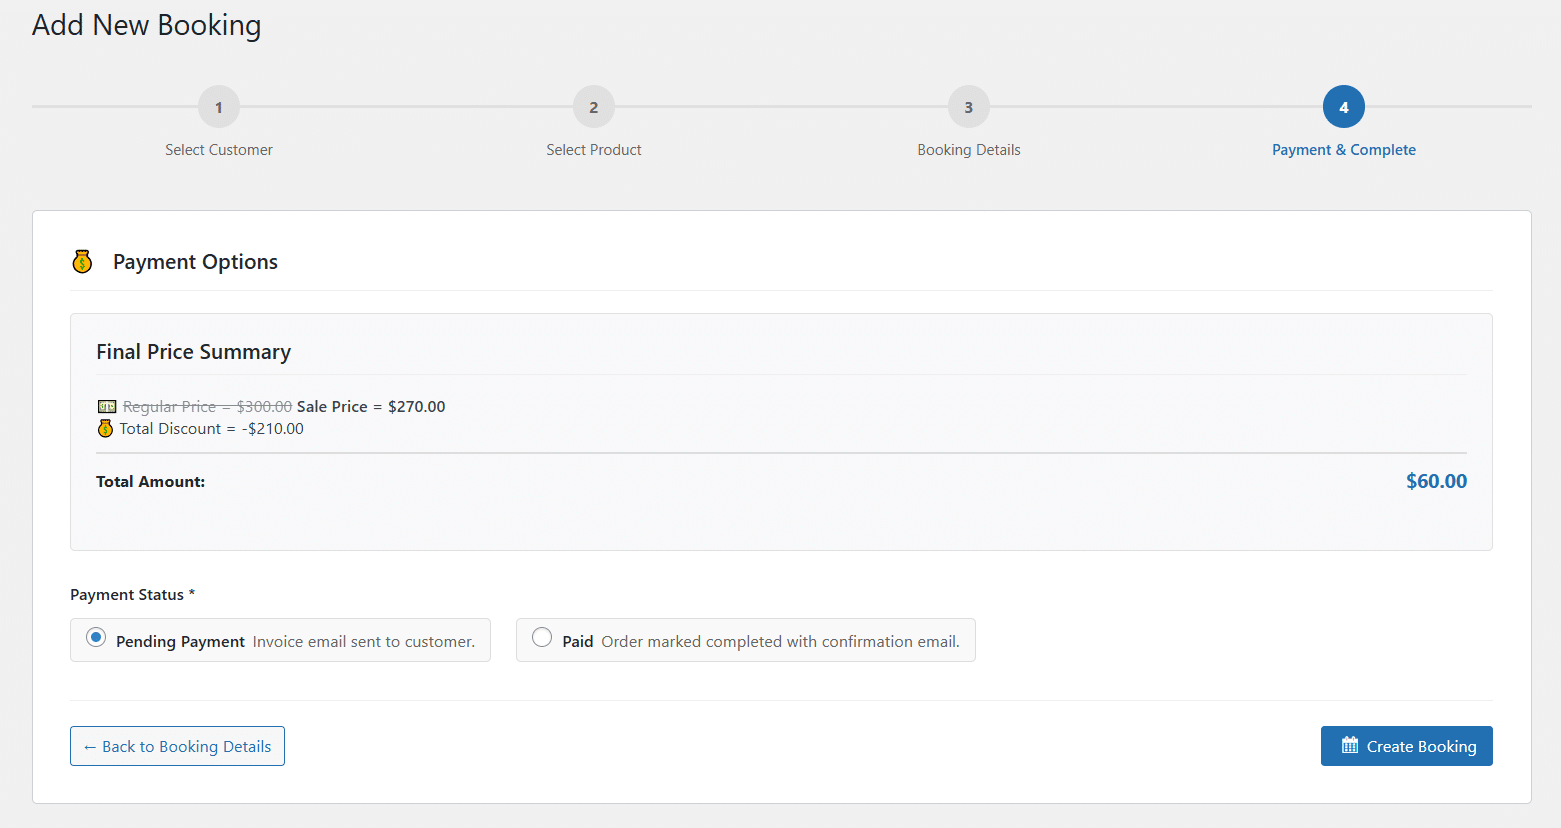
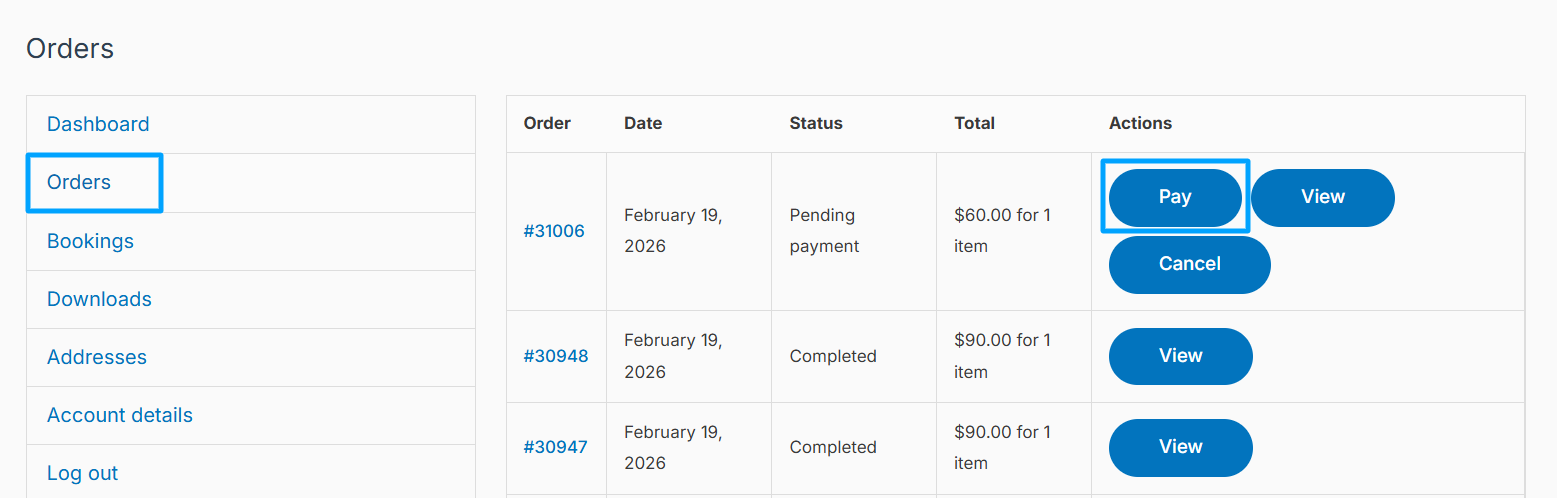
6- Finally, click the “Create Booking” button to manually create the booking for the customer.
Event Attendees
In this sub-menu, the administrator will be able to view all the attendees’ details of all the orders (which are completed) and download them in PDF format as well.

How to Cancel/Reschedule Bookings
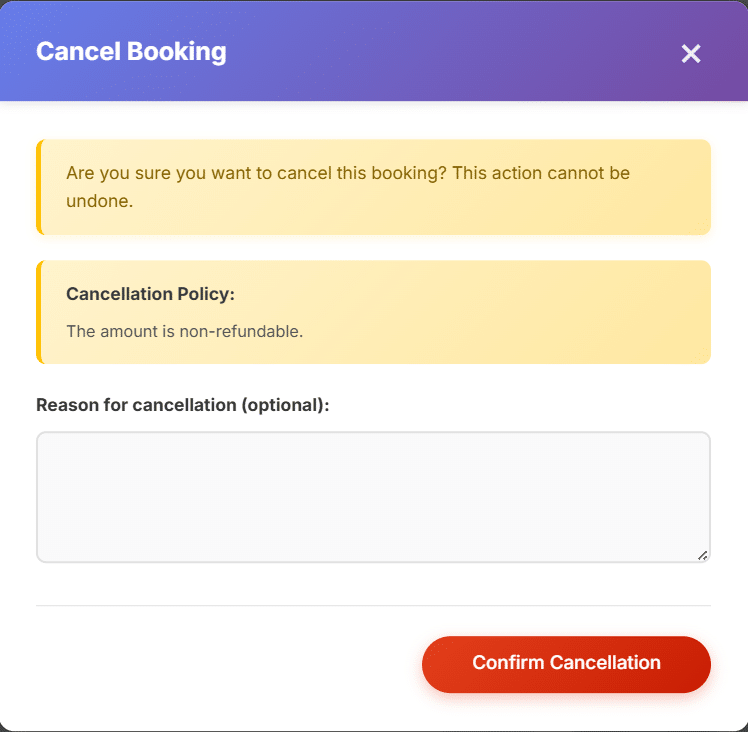
Navigate to the WooCommerce Customer Dashboard (“Bookings” tab). If the customer’s order falls under the order cancellation criteria, he will see the “Cancel” button. Similarly, if the customer’s order falls under the order rescheduling criteria, he will see the “Reschedule” button.

To cancel the booking, the customer needs to click the “Cancel” button of the respective order. If the administrator has checked the “Enable to show this policy text in cancellation modal” checkbox of the respective product, then the customer will see the “Cancellation Policy” text in the cancel pop-up. He will be asked to provide a reason for cancellation (this is optional). Finally, clicking the “Confirm Cancellation” button in the pop-up will cancel the respective WooCommerce order.
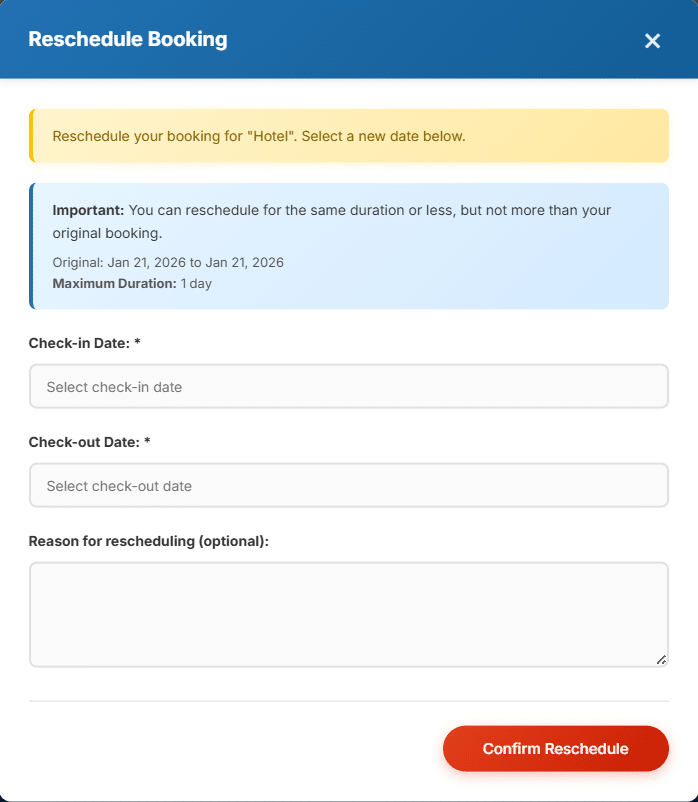
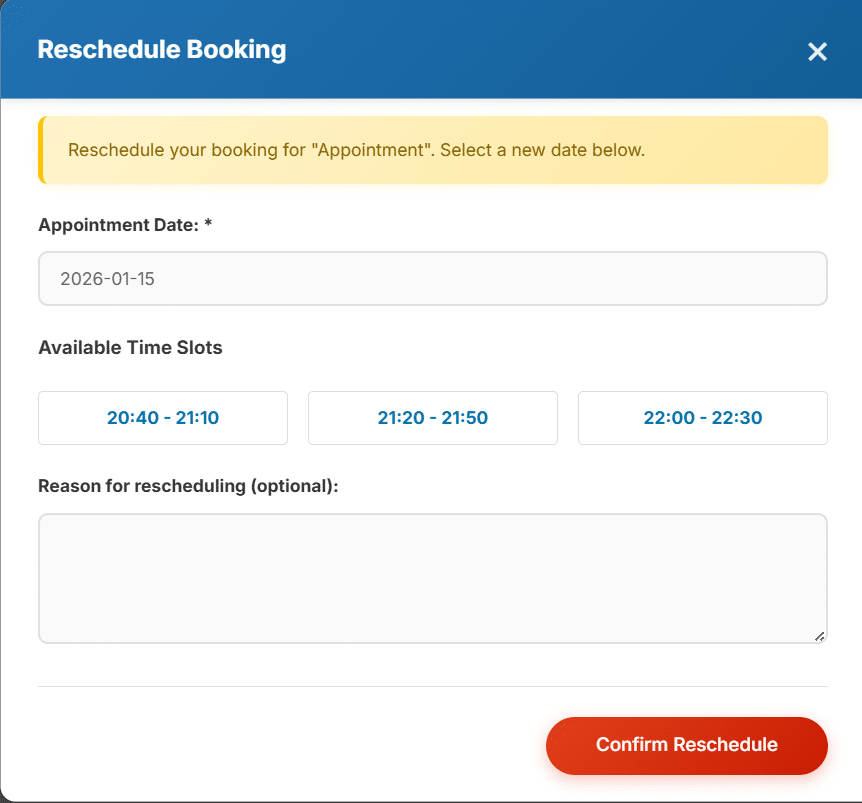
To reschedule the booking, the customer needs to click the “Reschedule” button of the respective order.
In the rescheduling pop-up, in case of a “Hotel” booking type product, select the rescheduling “Check-in Date” and “Check-out Date”. Kindly note that the duration of the booking should be the same; if the booking was made for 2 days duration, the new booking duration should also be 2 days and fall under the available days. Similarly, in the case of a “Virtual” booking type product, select the new “Appointment Date” and “Available Time Slots”.In the rescheduling pop-up, in case of a “Hotel” booking type product, select the rescheduling “Check-in Date” and “Check-out Date”. Kindly note that the duration of the booking should be the same; if the booking was made for 2 days duration, the new booking duration should also be 2 days and fall under the available days. Similarly, in the case of a “Virtual” booking type product, select the new “Appointment Date” and “Available Time Slots”.
He will be asked to provide a reason for rescheduling (this is optional). Finally, clicking the “Confirm Reschedule” button in the pop-up will reschedule the respective WooCommerce order.
How to Enable/Disable Booking Emails
Navigate to the “WooCommerce menu → Settings → Emails”. You can enable and disable the following WooCommerce Booking-related emails coming from our addon:
- Booking Cancelled
If enabled, this email will be sent to the respective customers when they cancel a booking from the WooCommerce Customer Dashboard (Booking tab). If the customer provides a reason for cancellation, it will also be sent in the email.
- Admin Booking Cancelled
If enabled, this email will be sent to the administrators when a customer cancels a booking from the WooCommerce Customer Dashboard (Booking tab). If the customer provides a reason for cancellation, it will also be sent in the email.
- Booking Rescheduled
If enabled, this email will be sent to the respective customers when they reschedule a booking from the WooCommerce Customer Dashboard (Booking tab). If the customer provides a reason for rescheduling, it will also be sent in the email.
- Admin Booking Rescheduled
If enabled, this email will be sent to the administrators when a customer reschedules a booking from the WooCommerce Customer Dashboard (Booking tab). If the customer provides a reason for rescheduling, it will also be sent in the email.

Widgets
User Bookings
Place the “User Bookings“ widget on any page where you want to display user bookings. Customers must be logged in to view their bookings. This allows customers to view all their upcoming and past bookings and search them. It will work like the “[user_bookings]” shortcode on the frontend.

FAQ’s
1- Does Book’d by WooNinjas Add-on have any dependent plugin(s)?
Book’d by WooNinjas Add-on requires the WooCommerce plugin to be installed before activating it.
2- What will happen if a bookable product order of “Hotel” type is refunded or cancelled?
The respective date(s) of the bookable product order of “Hotel” type will become available on the product page again for someone to book again.
3- What will happen if a bookable product order of “Appointment” type is refunded or cancelled?
The respective time slot of the bookable product order of “Appointment” type will become available on the product page again for someone to book again.
4- How many time slots can be booked by a customer?
Currently, a customer can only book a single time slot per order (of “Appointment” type bookable product), but a customer can book multiple time slots by booking multiple orders.
5- Where will the customer see the booking details of the bookable product types?
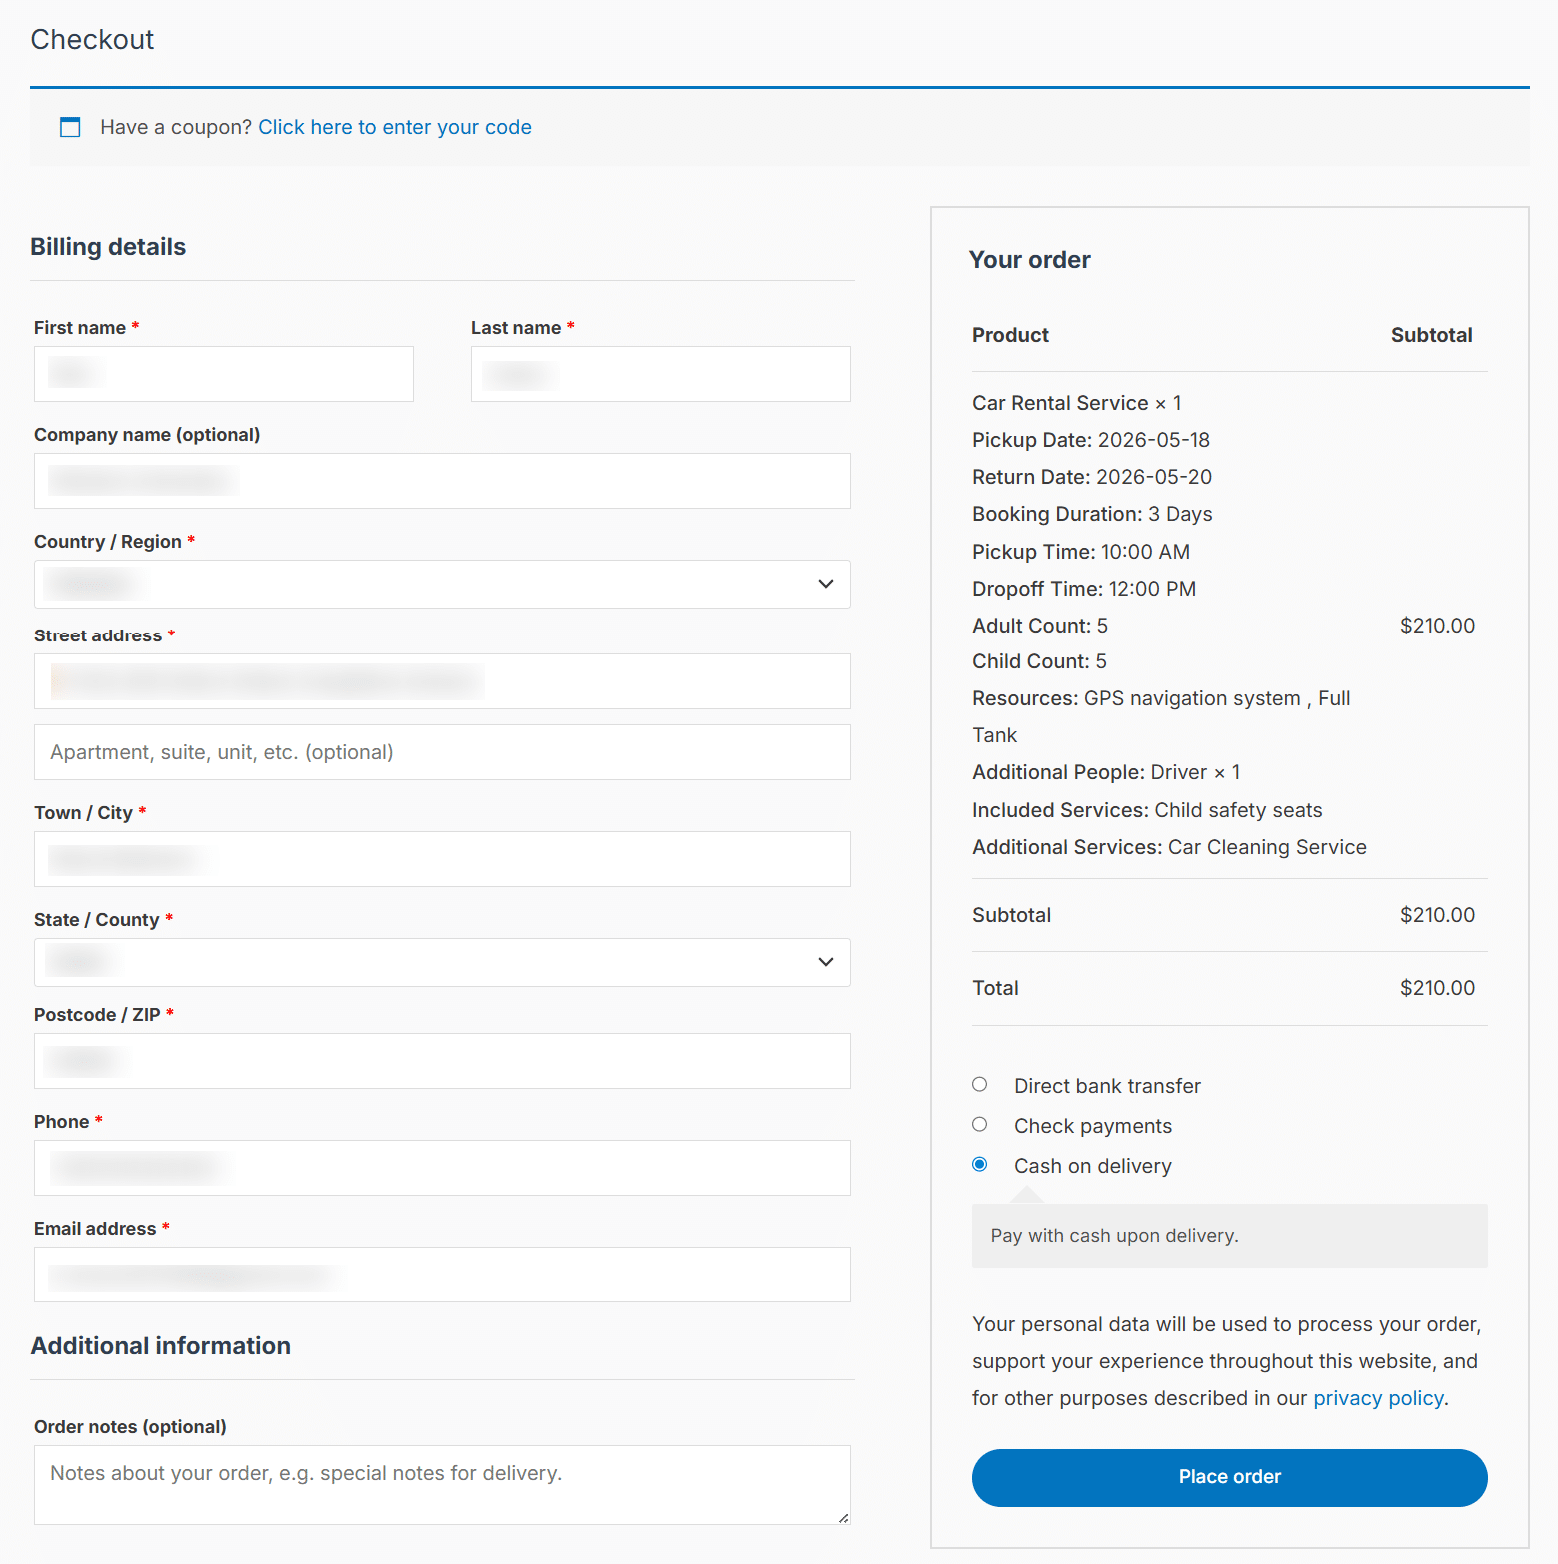
The customer will see the booking details of the bookable product types on the cart page, checkout page, and customer dashboard’s “Orders” tab.
6- Will the customers receive Zoom’s manual link and automatic link appointment emails if Google is not integrated on your site?
The customers will not receive Zoom’s manual link and automatic link appointment emails if Google is not integrated on your site. Google’s Integration is solely responsible for sending appointment emails for both Zoom and Google meeting links.
7- Why is the Automatic Meeting Link option is not visible on my Localhost?
The Automatic Meeting Link Generation option is not available on localhost environments. This feature requires:
- A publicly accessible website (staging or live – not localhost).
- A properly connected Google Calendar integration.
What you should do:
- Move your site to a staging or live server.
- Connect your Google Calendar in the add-on settings.
Once these requirements are met, the Automatic meeting link generation option will become available and work as expected.
8- Zoom is connected, but I don’t see the “Automatic” meeting link option for booking products. Why?
If Zoom appears connected but the “Automatic” meeting link option is missing, please check the following:
1. Google Calendar must be connected
Automatic meeting link generation for both Zoom and Google Meet depends on the Google Calendar integration. Even if Zoom is successfully connected, the system cannot generate automatic meeting links unless a Google account is also connected in the add-on settings. Once Google Calendar is connected, the “Automatic” option will become available.
2. Reconnect Zoom if needed
If the option still does not appear, disconnect your Zoom account from the add-on settings and reconnect it to refresh the API permissions.
Changelogs
1.1.12
- New: Added editable labels for Adult Count, Child Count, and Attendees Count fields.
- New: New: Added show/hide controls for Adult Count, Child Count, and Attendees Count fields.
1.1.11
- Fix: Updated license handling to use the Book’d by WooNinjas plugin name consistently.
1.1.10
- New: Added rental type option for courses and training under the Rental product type.
1.1.9
- Fix: Resolved issue where event timings weren’t showing for selected days.
1.1.8
- New: Added Event Attendees listing table for event-type bookable products.
- Fix: Resolved issue where the regular price was not displayed correctly on the product page.
1.1.7
- New: Added block editor support for “User Bookings” shortcode.
1.1.6
- New: Added Event Booking type for slot-based bookings.
1.1.5
- New: Introduced a new rental booking type that allows users to book rental products.
1.1.4
- Fix: Addressed security vulnerabilities and improved overall plugin security.
1.1.3
- New: Added help text to Bookable Product settings fields for improved clarity.
- New: Added product-level setting to auto‑cancel pending/failed orders and free slots after a set time limit.
- New: Added option to display the time zone alongside booking time slots.
- New: Added product-level toggle to enable or disable time zone display.
- New: Added hotel booking duration filter with support for selecting 1, 2, or 3 years.
- New: Added blackout date fields for hotel booking type.
- New: Added bulk blackout date import via CSV.
- New: Added support for recurring blackout dates.
- New: Added visual calendar view for managing availability and blackout dates.
1.1.2
- New: Manual booking on the report page for admins.
- Fix: Rescheduling restricted to original booking duration.
- Fix: Booking shortcode and report filter issues resolved.
1.1.1
- New: Added minimum and maximum duration for the hotel type.
- New: New: Added advanced rules for the hotel type.
1.1.0
- New: Added an option to allow customer to cancel bookings.
- New: Added an option to allow customer to reschedule booking.
- New: Make number of attendees count optional in appointment.
1.0.5
- New: Renamed Base Price to Regular Price.
- New: Added a Discount Price field.
- New: Price field with currency displayed dynamically.
- New: In Availability, added a checkbox to avoid assigning time separately for each selected day.
- New: For Virtual type, added a Number of Attendees field instead of Adult Count or Child Count.
- Fix: Fixed minor issues.
1.0.4
- Fix: Resolved script enqueue order issue in product settings page for Flatpickr library.
- Fix: Fixed potential null reference error in user bookings shortcode script loading.
1.0.3
- Fix: Improved physical location validation for booking settings.
1.0.2
- Fix: Resolved an issue preventing the license from activating.
- Fix: Addressed a warning message to improve stability.
1.0.1
- New: Zoom & Google meet & calendar Integration.
1.0.0
- Initial release.
