With the TutorLMS Quiz Import/Export add-on, creating, updating, migrating, and backing up quizzes has never been this easy! Export your quizzes into a .xls or .xslx file with a single click. Create new quizzes or edit them directly from a simple template for a quick and easy import.
Video Tutorial
Watch the tutorial video below for a quick walkthrough of the add-on’s features and setup process.
For detailed instructions, please continue reading the full documentation. If you still have any questions, feel free to submit a support ticket.
- Video Tutorial
- Installation
- Activate Your License Key
- Export Quizzes
- Associate Quizzes to Courses and Topics
- Import Quizzes (.xls, .xlsx files):
- Import Quizzes (.docx file):
- Import A Single Quiz:
- Download The Import Template:
- Import A Single Quiz:
- Multiple Quizzes:
- Settings
- Enable Google Docs Compatibility
- Destination Quiz
- Points for the Correct Answer
- Blocks
- TutorLMS Quiz Import/Export Template Guide (.xls , .xlsx files)
- Important
- Quizzes
- Quiz Title
- Quiz ID
- Quiz Content
- Course
- Course ID
- Topic
- Topic ID
- Quiz Order
- Position in Topic
- Time Limit
- Hide Quiz Time Display
- Feedback Mode
- Attempts Allowed
- Passing Grade
- Max Questions For Answer
- Quiz Auto Start
- Question Layout View
- Questions Order
- Hide Question Number Overview
- Short Answer Characters Limit
- Open-Ended Answer Characters Limit
- Questions
- Answers
- Quizzes
- DOCX Question File – Question Formatting Rules
- Question Docx File
- DOCX Answer File – Answer Formatting Rules
- Answer Docx File
- FAQ's
- Changelogs
Installation
- Install the TutorLMS plugin & activate it.
- Install TutorLMS Quiz Import/Export and activate it.
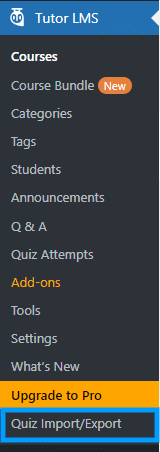
- A new Quiz Import/Export menu will appear under the TutorLMS menu.
Activate Your License Key
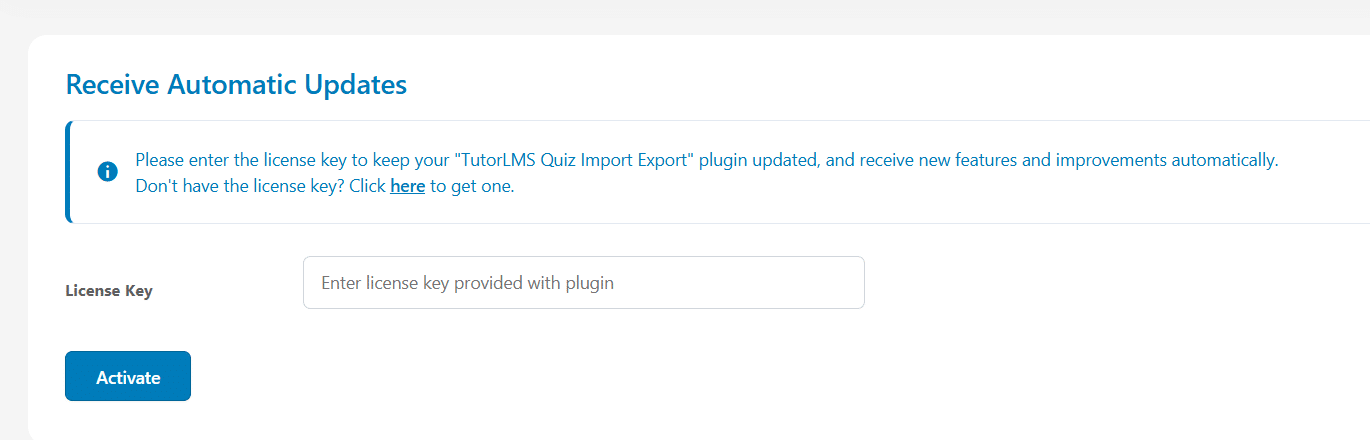
The license key can be configured from the License Settings tab, found on the main Quiz Import/Export menu. License keys will be sent to your email address when you purchase the addon.
Insert your license key in the field and then click on Activate.
Export Quizzes
Export Single Quiz
Navigate to Quiz Import/Export > Manage Quiz.
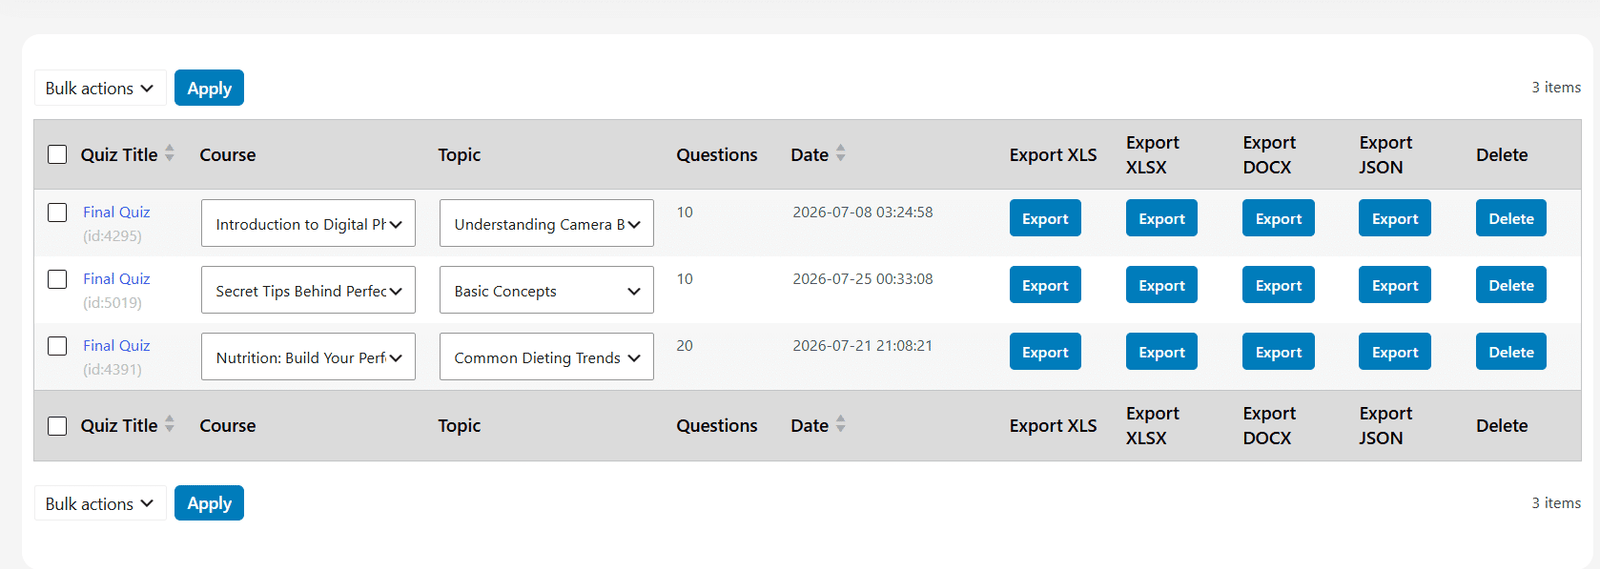
This tab will show all of the quizzes. The export buttons will appear here next to every listed quiz.
To export the quiz, simply click on the export button. The quiz will be downloaded as an .xls, .xlsx, or JSON file, which can be imported to another site using this add-on. In case of DOCX, a zip file will be exported containing a folder that will have both the respective quiz’s question and answer files.
Export Multiple Quizzes
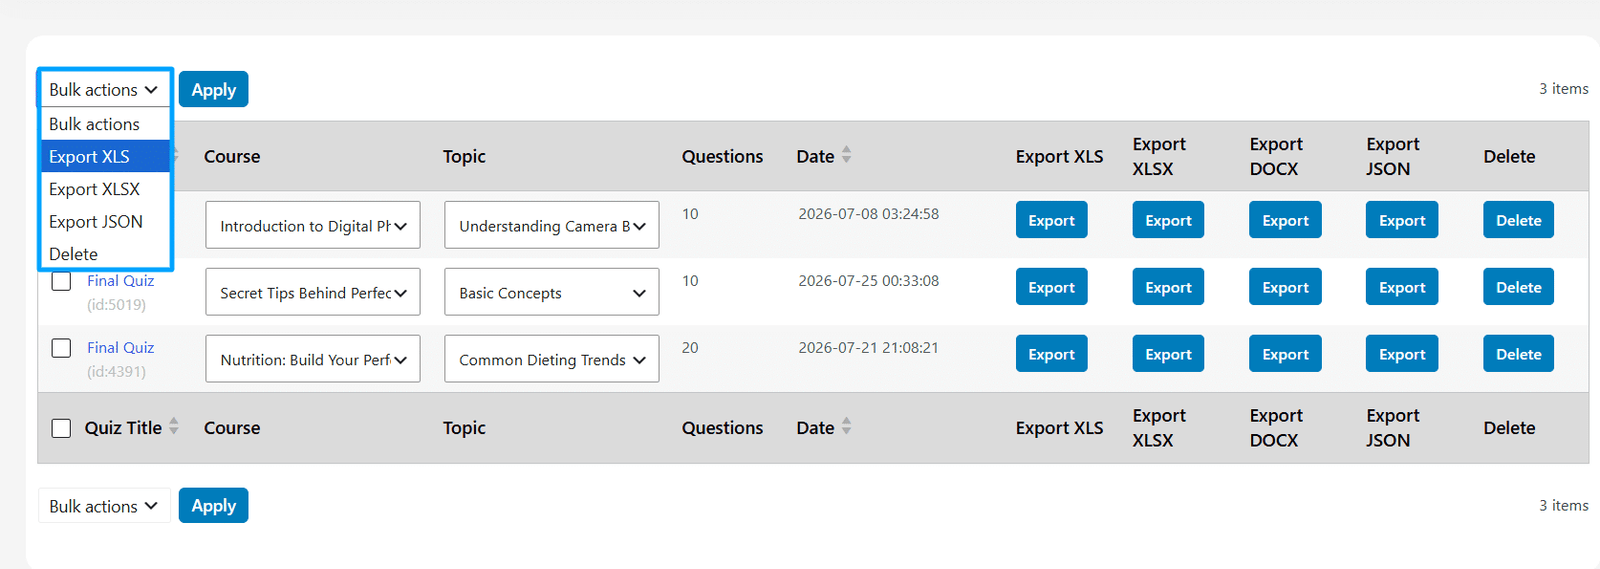
Navigate to Quiz Import/Export > Manage Quiz. This tab will show all of the quizzes.
To export multiple quizzes in bulk, simply select all of the quizzes that you
want to export, and from the “Bulk Actions” WordPress dropdown, select “Export XLS”, “Export XLSX” or “Export JSON” and click on the “Apply” button.
The quiz will be downloaded as a .xls, .xlsx, or .json file, which can be imported to another site using this add-on.
Associate Quizzes to Courses and Topics
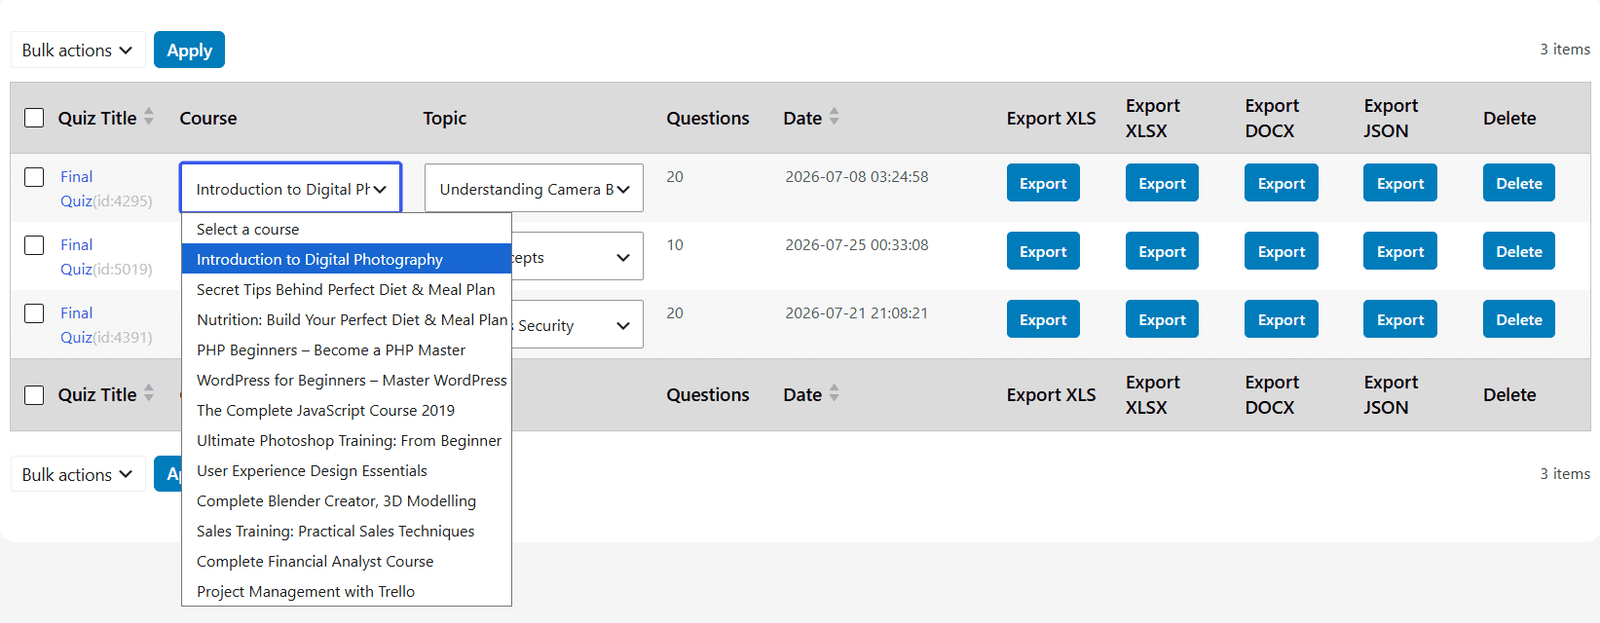
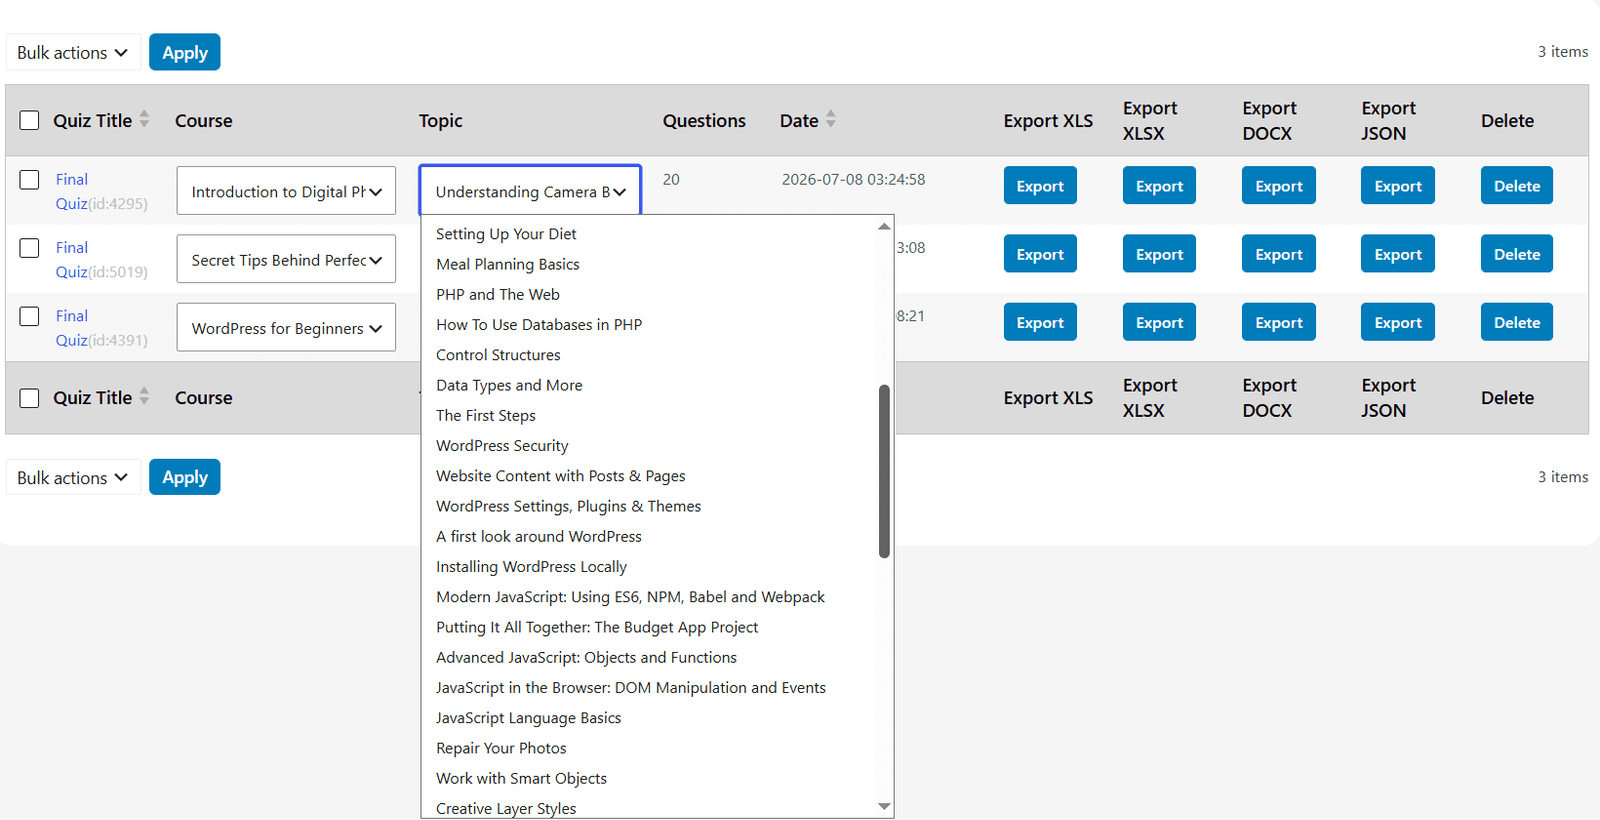
Navigate to Quiz Import/Export > Manage Quiz. This tab displays a list of quizzes, with each row representing an individual quiz. For each quiz, you’ll find dropdown menus in the “Course” and “Topic” columns, allowing you to associate each quiz with specific courses and their corresponding topics.
Import Quizzes (.xls, .xlsx files):
Download The Import Template
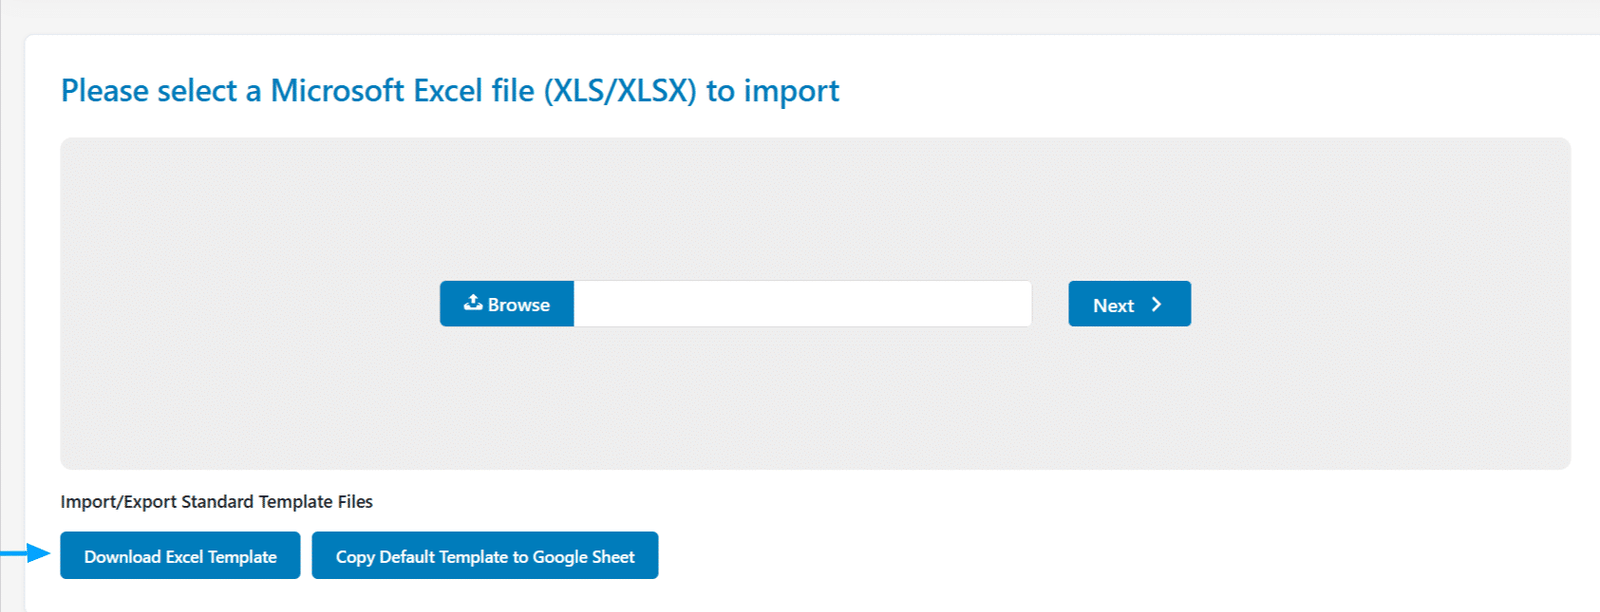
Download the standard template file from the “Import Quiz” tab by clicking on the “Download Excel Template” button.
Next, add or edit content on the file and save your changes.
Import a Single Quiz
To import a quiz, go to the “Import Quiz” tab from the Quiz Import/Export menu located under the main TutorLMS plugin menu. Here, you will find the input area for the quiz file to be imported. To complete the import, click on Browse, select the Microsoft Excel .xls or .xlsx file containing the quiz, and click on the Next button.
Import Multiple Quizzes
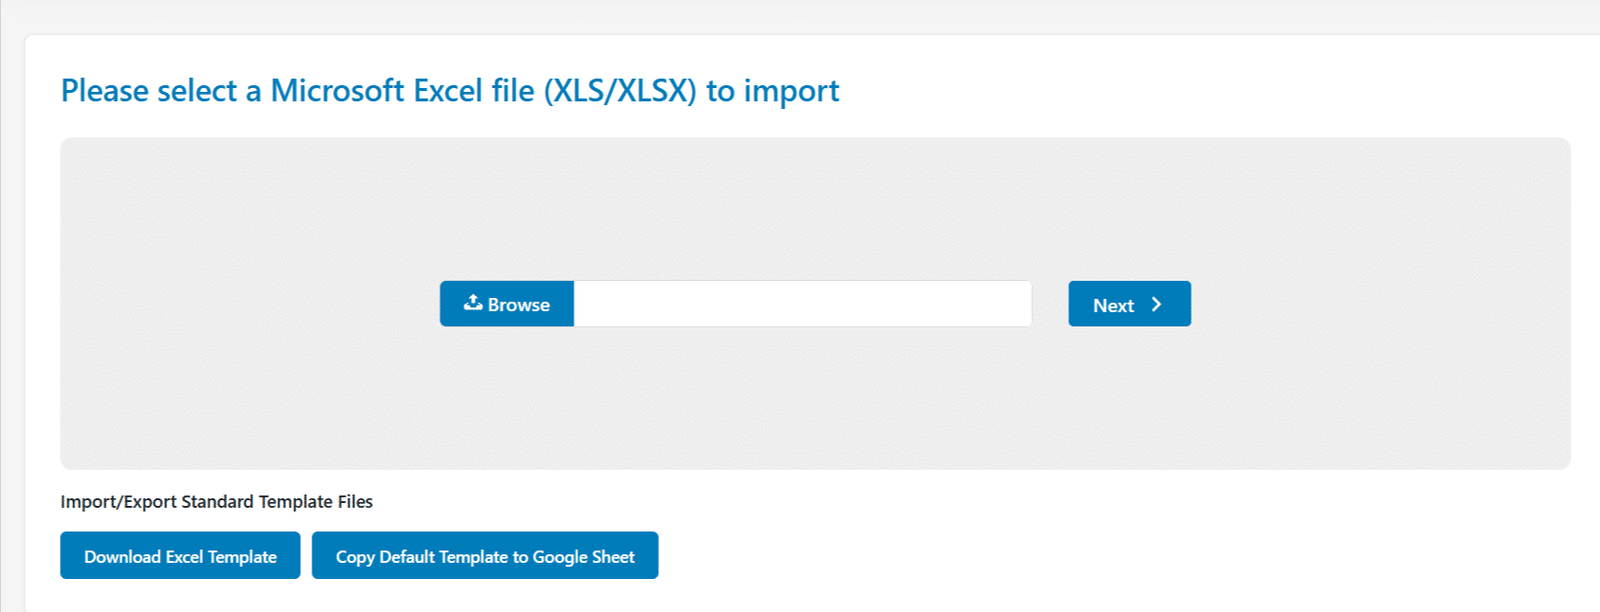
You can import several quizzes at once by adding a different quiz on each separate line of the Quizzes sheet of your spreadsheet file. Make sure to specify the individual Title for each quiz on each line. Then, to import a quiz, go to the Import Quiz tab from the Quiz Import/Export menu located under the main TutorLMS plugin menu. Here, you will find the input area for the quiz file to be imported. To complete the import, click on Browse, select the Microsoft Excel .xls or .xlsx file and click on the Next button.
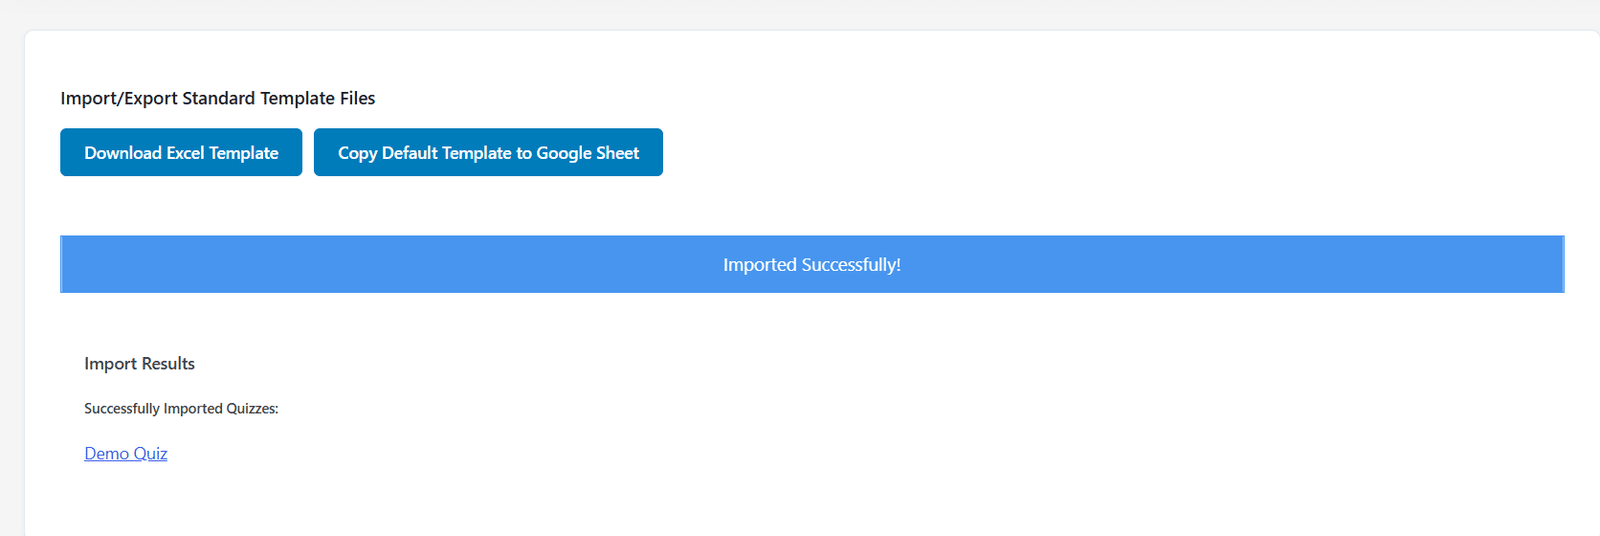
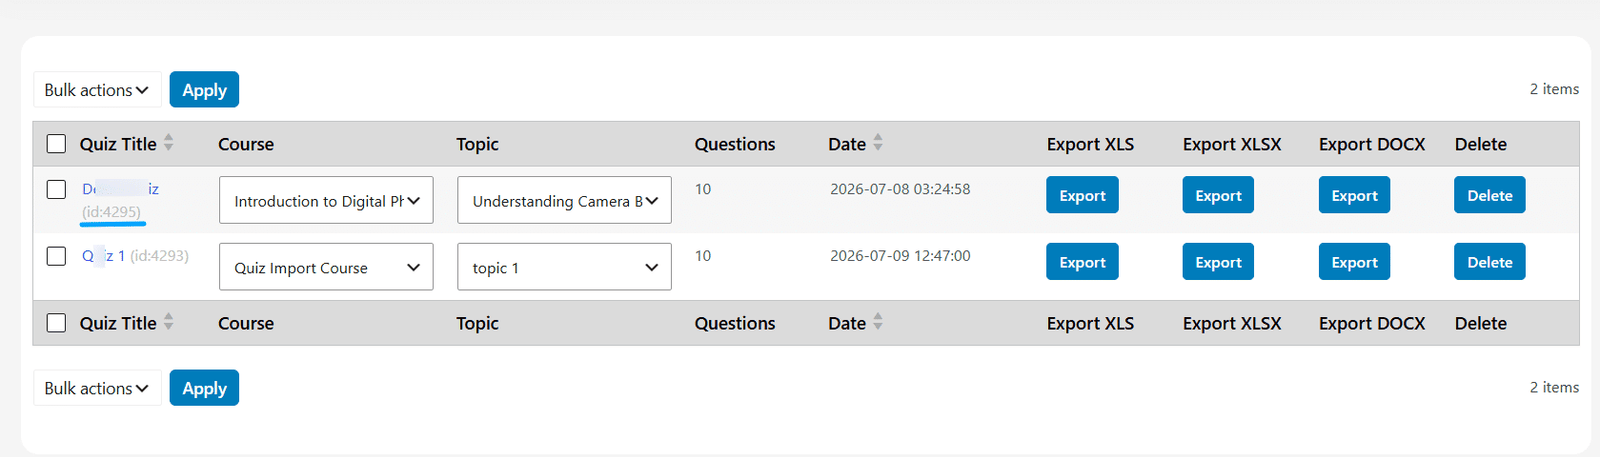
After importing the file, you will see all imported quizzes listed on your screen, as seen in the following image:
Import Quizzes (.docx file):
Download The Import Template:
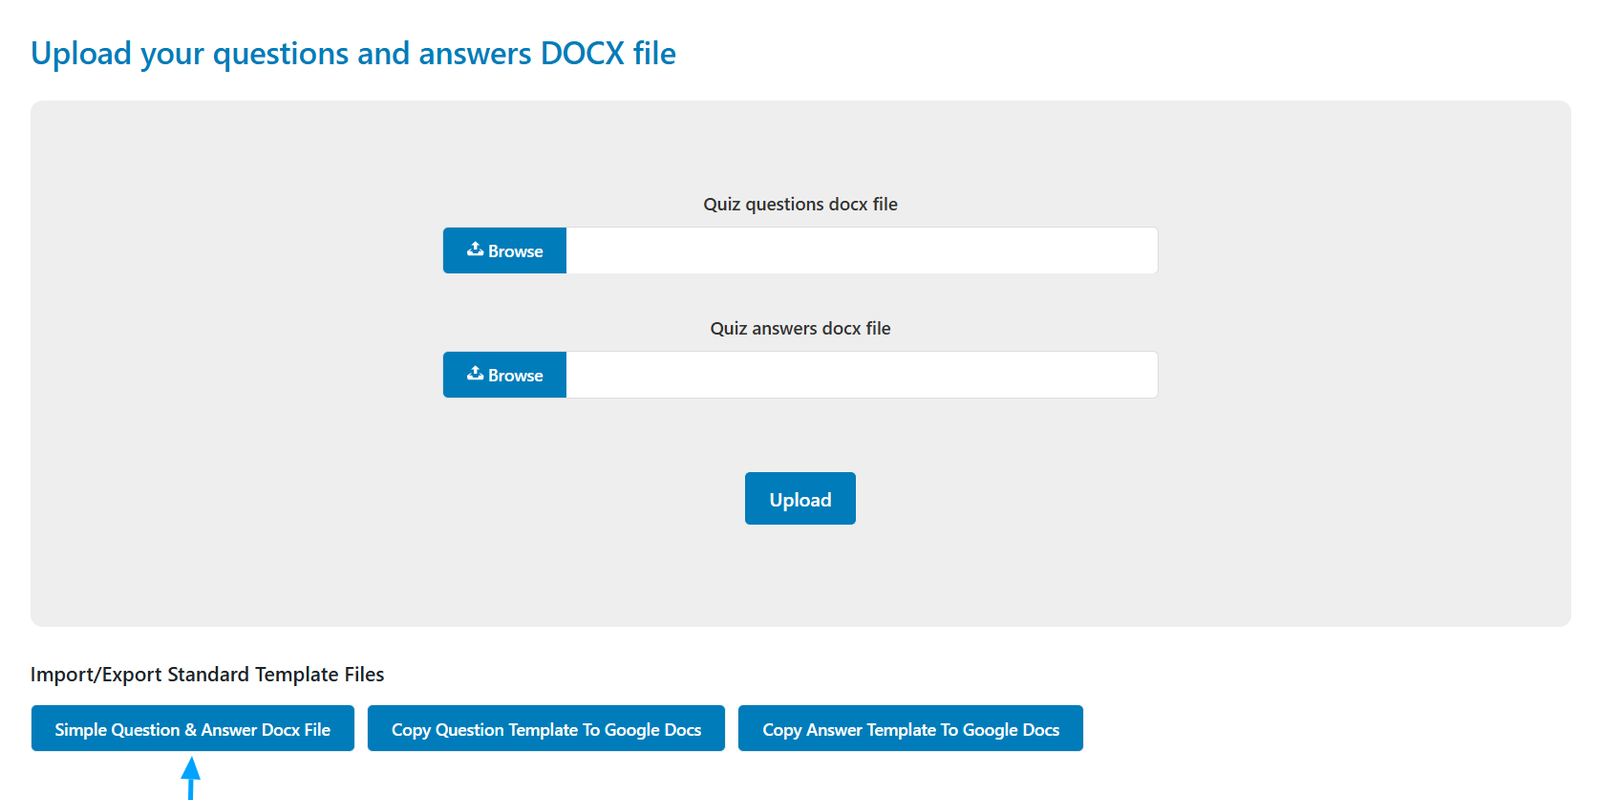
Download the standard template file from the “Import Docx” tab by clicking on the “Simple Question & Answer Docx File” button.
Next, add or edit content in the file and save your changes.
Note: If you want to import quiz(s) along with their respective settings, then use the .xls template guide.
Import A Single Quiz:
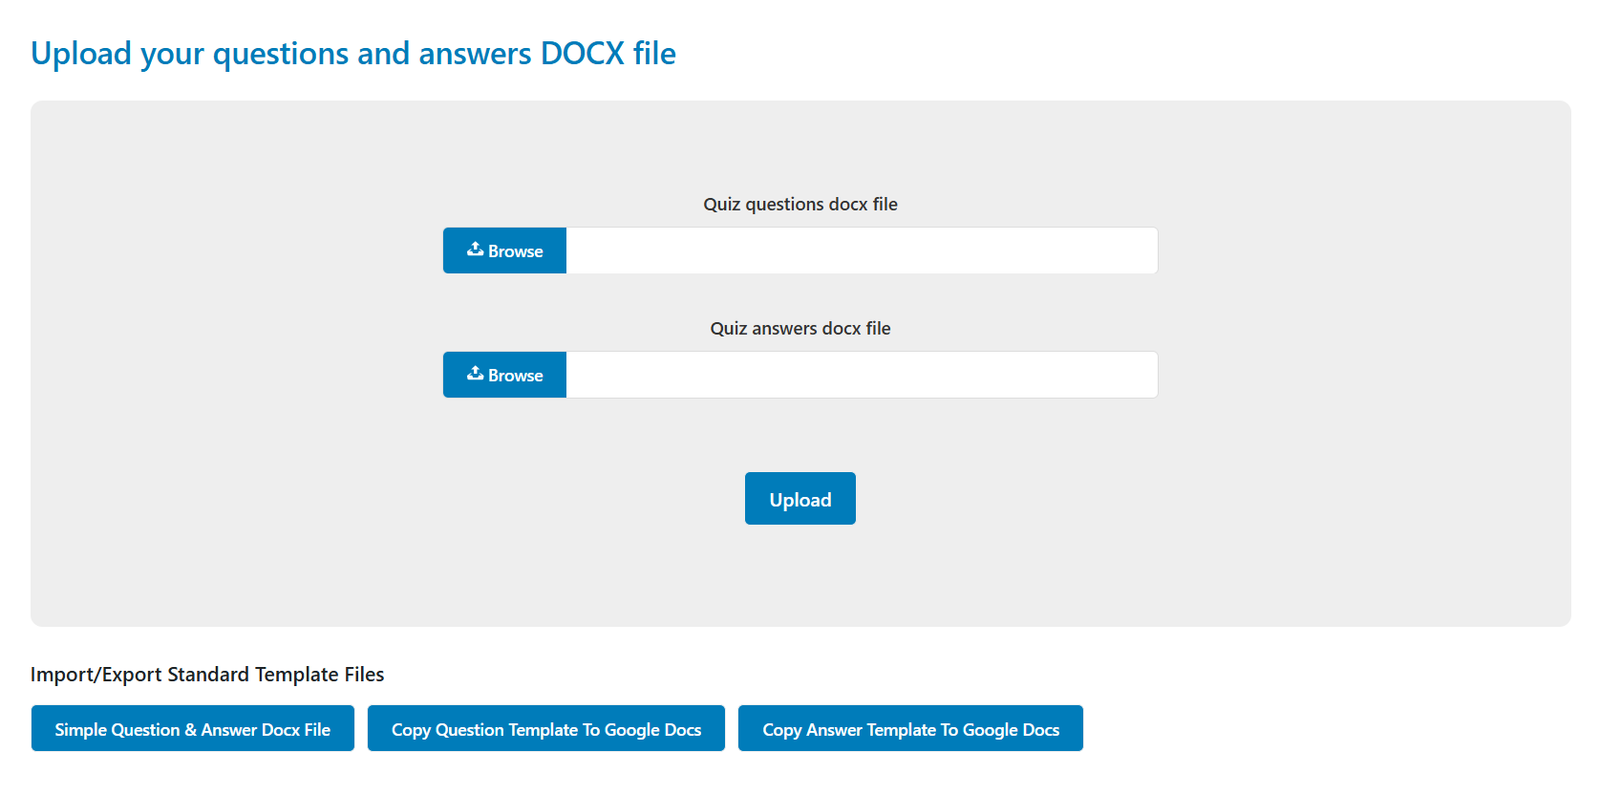
To import a quiz, go to the “Import Docx” tab from the Quiz Import/Export menu
located under the main TutorLMS plugin menu. Here, you will find the input area for
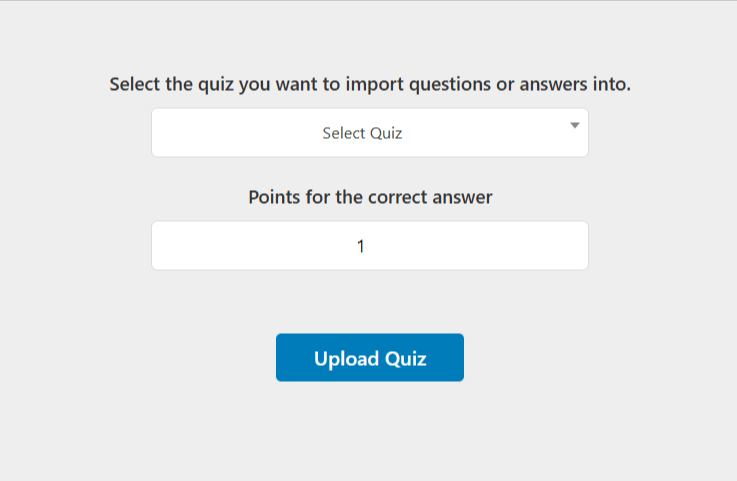
the quiz’s question and answer files to be imported. To complete the import, click on Browse, select the Microsoft Word .docx files containing the quiz’s questions and answers, and click on the Upload button. Then, in the next step, select the quiz in which you want to import the questions and provide the default value to be assigned to the “Point For This Question” option of the individual question(s) if the “[FP:1.00]” shortcode is not provided for any question in its answer file. Finally, click the “Upload Quiz” button.
Import Quizzes (.json file):
Download The Import Template:
Download the standard template file from the “Import JSON” tab by clicking on the “Download JSON Template” button.
Next, add or edit content in the file and save your changes.
Note: If you want to import quiz(s) along with their respective settings, then use the .xls template guide.
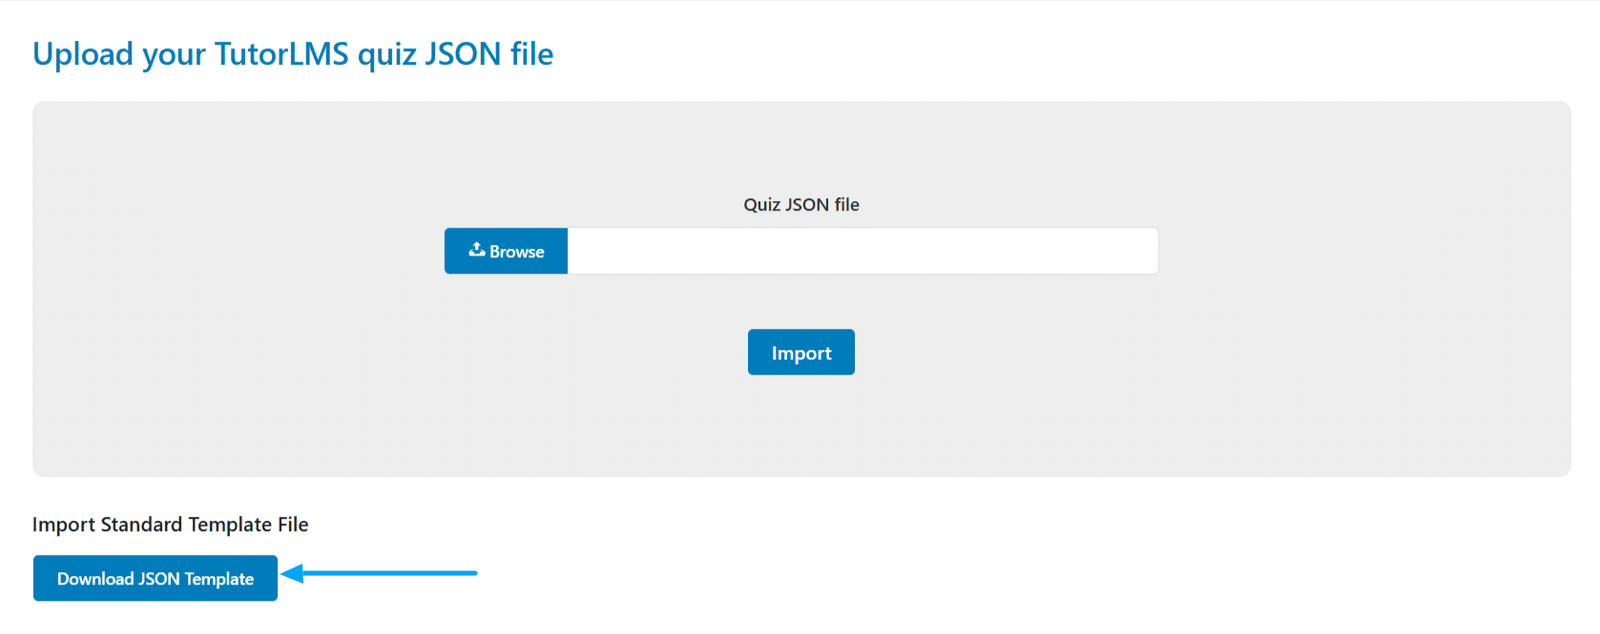
Import A Single Quiz:
To import a quiz, go to the “Import JSON” tab from the Quiz Import/Export menu located under the main TutorLMS plugin menu. Here, you will find the input area for the quiz file to be imported. To complete the import, click on Browse, select the .json file containing the quiz, and click on the Import button.
Multiple Quizzes:
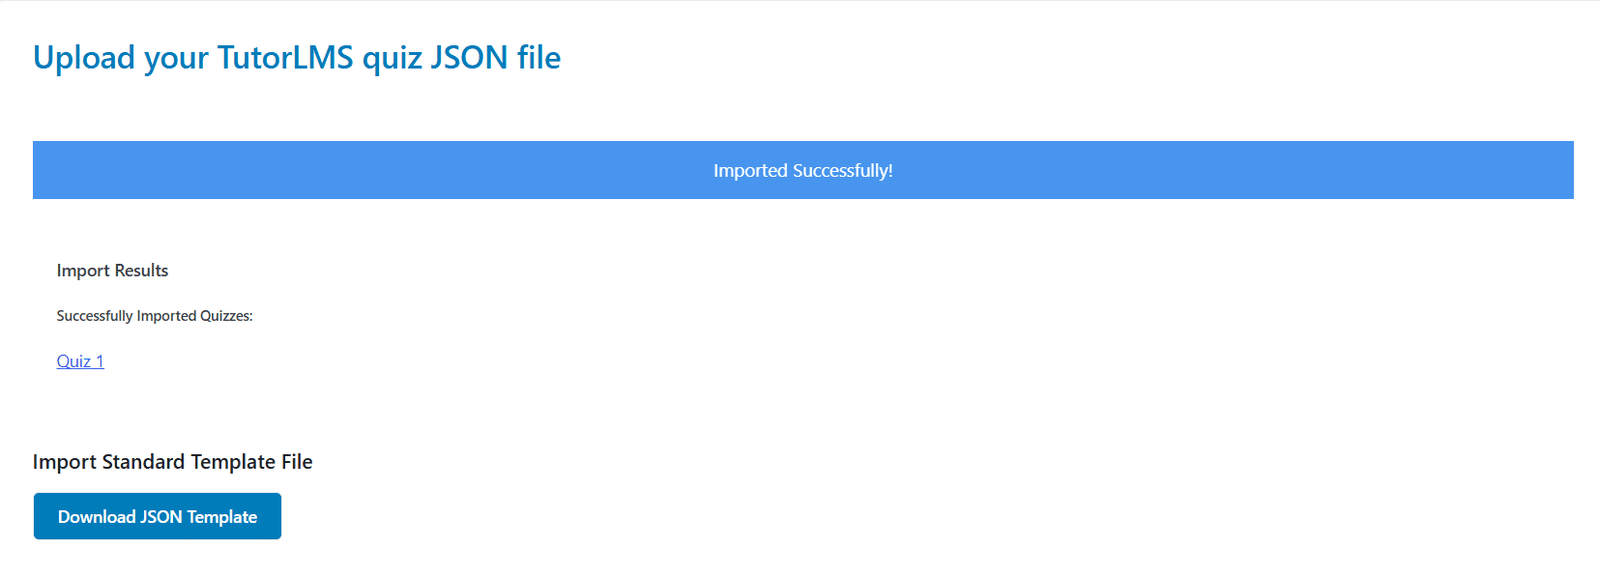
You can import several quizzes at once from your parent site to the migrating site at once. To import multiple quizzes, go to the “Import JSON” tab from the Quiz Import/Export menu located under the main TutorLMS plugin menu. Here, you will find the input area for the quiz file to be imported. To complete the import, click on Browse, select the .json file, and click on the Import button.
After importing the file, you will see all imported quizzes listed on your screen, as seen in the following image:
Settings
Enable Debug Logs
Enabling the “Enable Debug Logs” toggle in the settings tab allows the system to generate import debug logs, which offer valuable information and insights for troubleshooting any potential import issues.
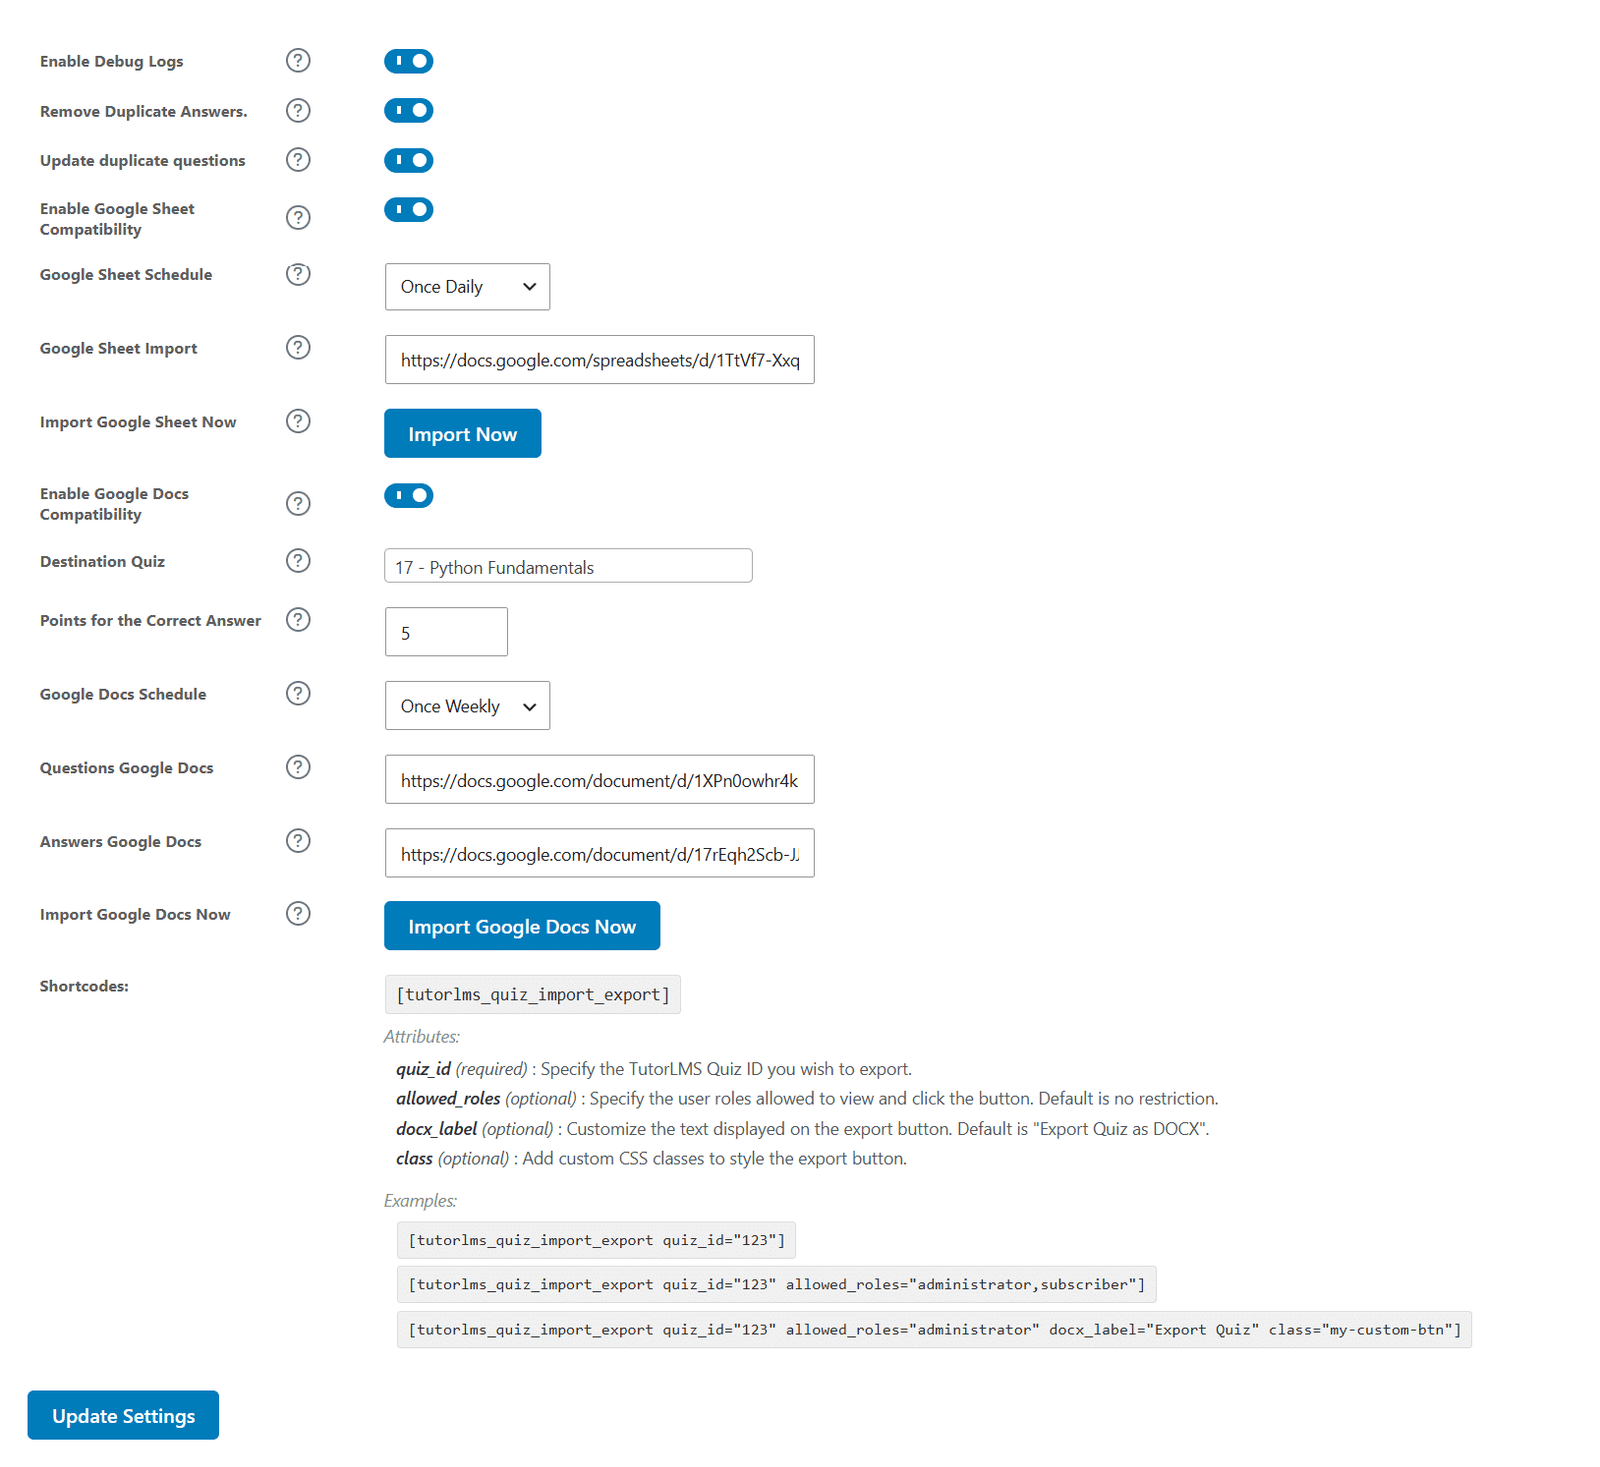
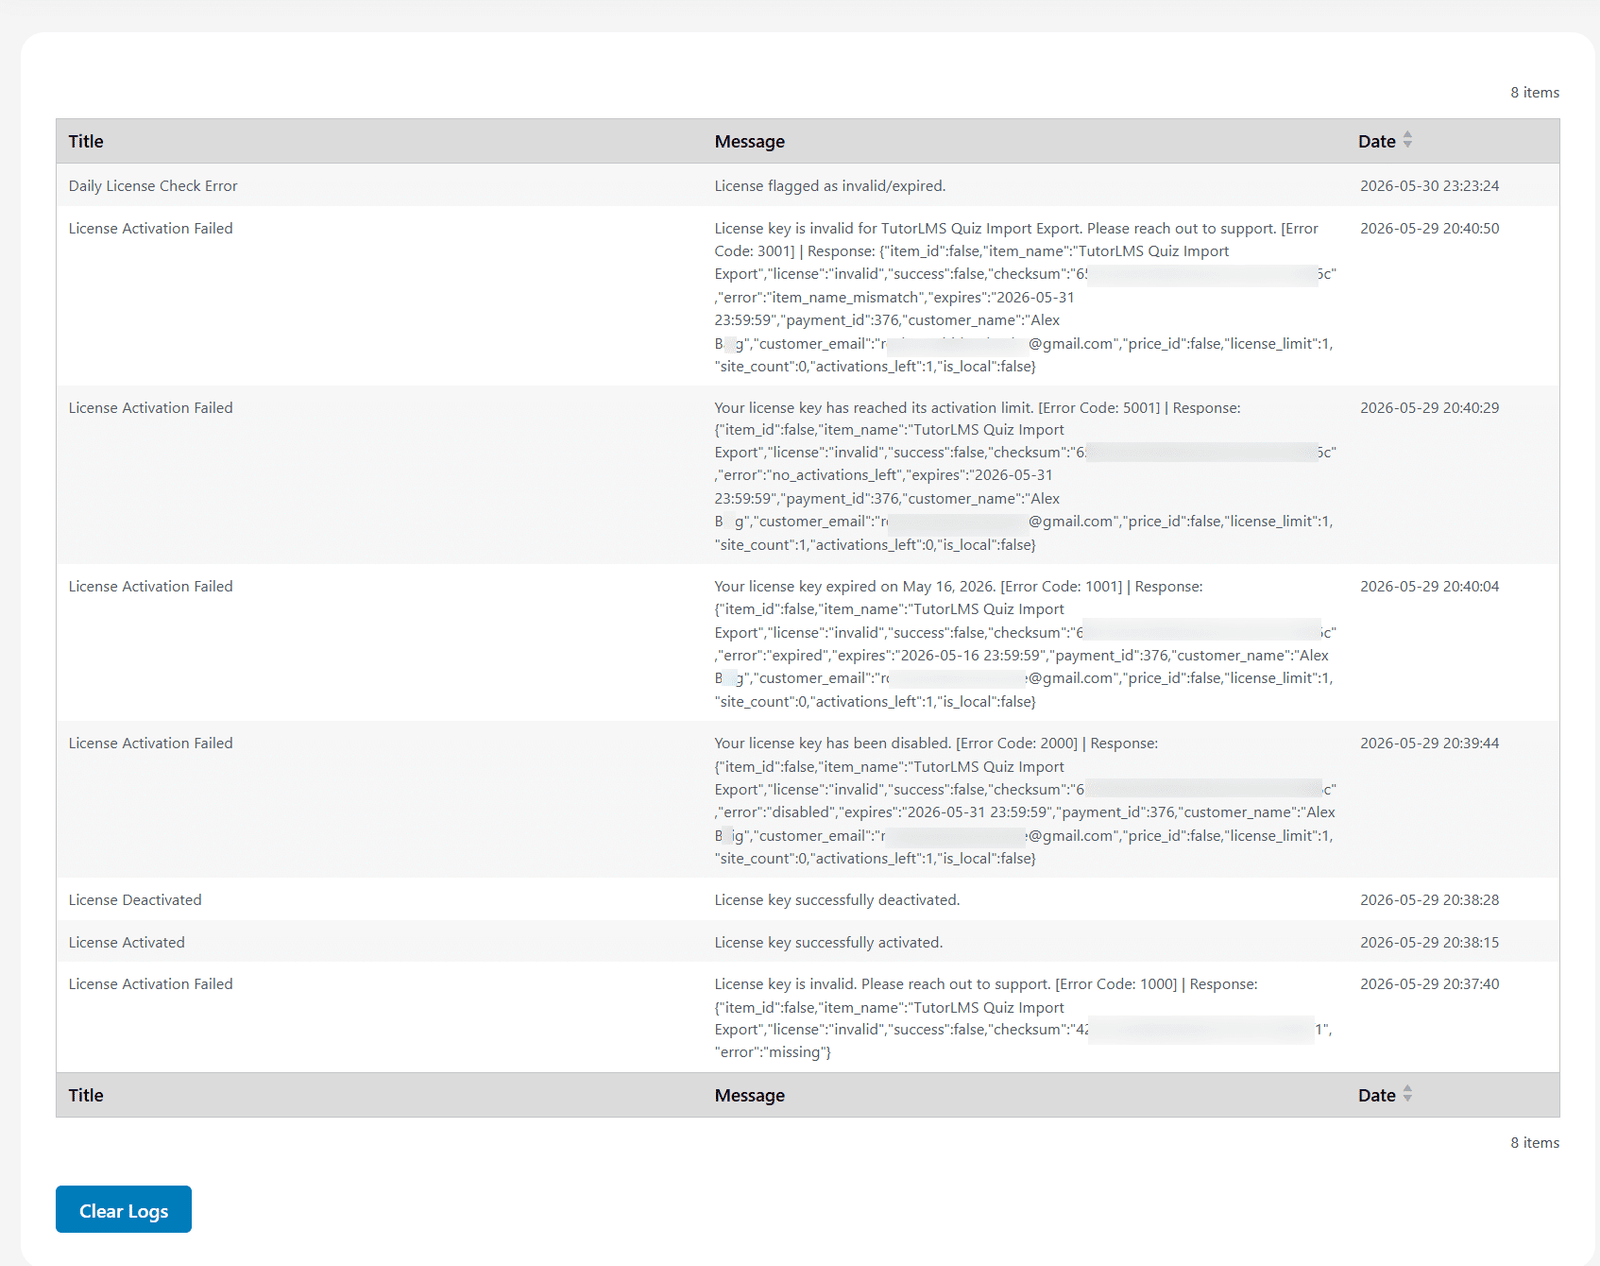
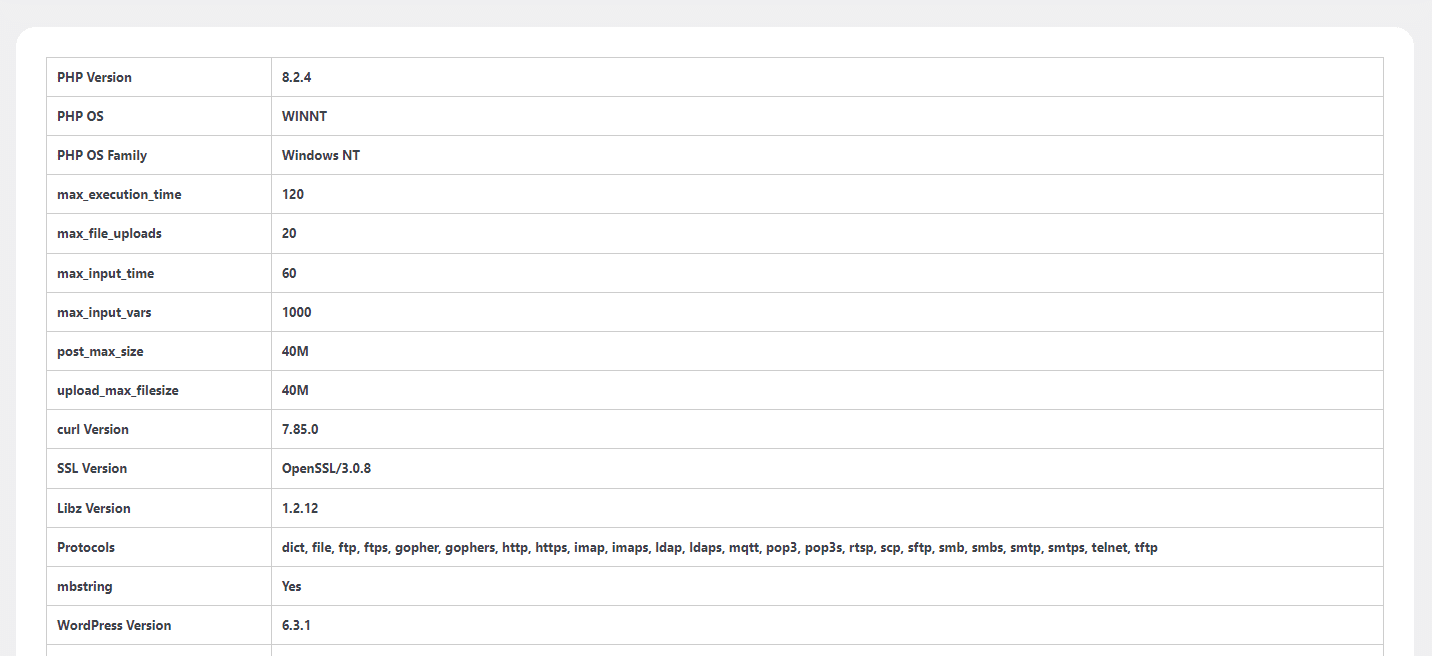
Once Debug logs are enabled, two new tabs will appear: “Debug logs” and “Systems Information“. The “Debug logs” tab displays detailed logs that provide a comprehensive overview of the import process, while the “System Information” tab showcases your system specifications.
Remove Duplicate Answers
Activating the Remove Duplicate Answers toggle in the settings tab empowers the system to eliminate duplicate answers from the imported quiz.
Update duplicate questions
Here, you can select whether you want the question with the same title that already exists in the quiz to be updated, instead of creating a new one. If the toggle is enabled, then the quiz questions that already exist will be updated. Similarly, if the toggle is disabled, then new quiz questions will be created and added at the bottom of the quiz during the importing process.
Note: This option is compatible with both excel file importing, json file importing, docx files importing, Google Sheet importing and Google Docs importing.
Enable Google Sheet Compatibility
Here, you can enable this option to import quiz(s) from a Google Sheet.
Google Sheet Schedule
Here, you can select the Google Sheet import schedule. Based on the interval, a cron job will run and create/update the TutorLMS quiz(s) based on the columns and records in the Excel sheet. You can select from the following options:
- Every minute
- Once Hourly
- Twice Daily
- Once Daily
- Once Weekly
Google Sheet Import
Here, you are supposed to provide the Google sheet import link from which you want to check and import/update the TutorLMS Quiz-related information. The URL link will be in the format:
“https://docs.google.com/spreadsheets/d/1nw/edit?usp=sharing”
To create your own TutorLMS Quiz Importing Google sheet, the steps are as follows:
1- Navigate to the “Import Quiz” tab and click on the “Copy Default Template to Google Sheet” button. Here, you will be asked to make your own online copy of the quiz-importing Excel sheet into your Google account.
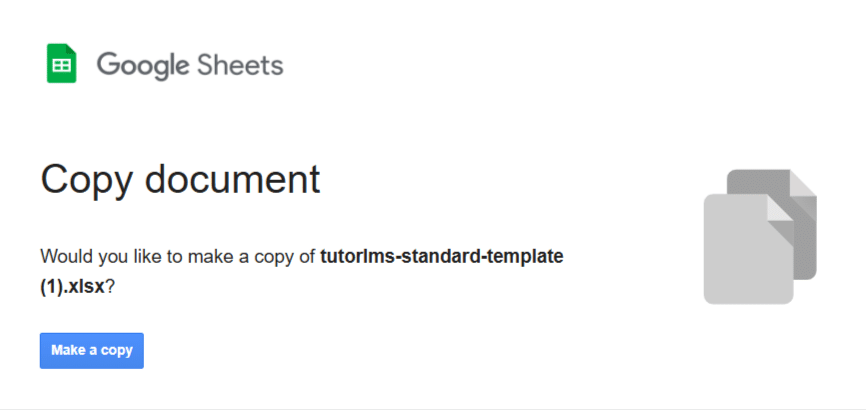
2- Finally, click the “Make a copy” button.
3- Once you have created your own quiz-importing Excel sheet. Click on the “Share” button. Provide restricted access to the Excel sheet with viewer role permissions.
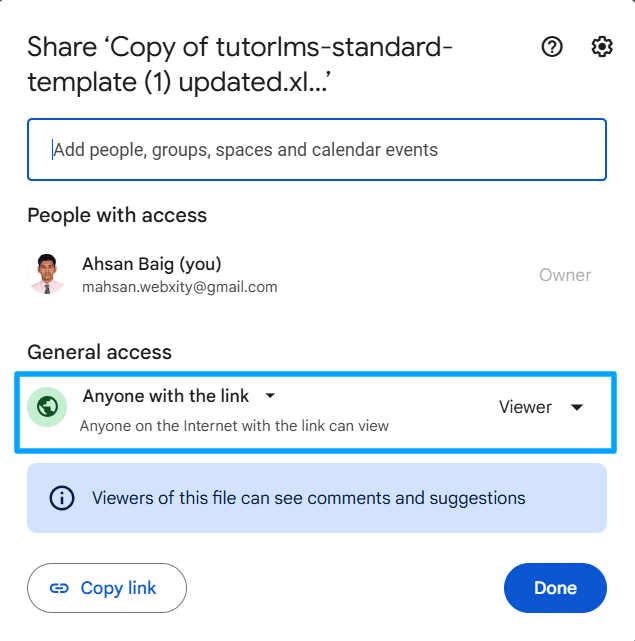
4- Click the “Copy link” button to copy the Excel sheet URL.
5- Finally, navigate back to the “Settings” tab and paste the Excel sheet URL in the “Google Sheet Import” option text field and click the “Update Settings” button.
Import Google Sheet Now
Here, you can click the “Import Scheduled Quizzes” button to manually run the Google Sheet import function to import/update quiz(s) from Google Sheet. After the function has been executed, your quiz-related information/content will be updated.
Enable Google Docs Compatibility
Here, you can enable this option to import an individual quiz using Google Docs.
Destination Quiz
Here, you can select the quiz that should receive the questions and answers from these Google Docs.
Points for the Correct Answer
Here, you can provide the default points to be assigned to a question when a question does not define its own points value in the answer file’s URL.
Google Docs Schedule
Here, you can select the Google Docs import schedule. Based on the interval, a cron job will run and update the respective TutorLMS quiz based on the content in the Google Doc URLs ( both question and answer). You can select from the following options:
- Every minute
- Once Hourly
- Twice Daily
- Once Daily
- Once Weekly
Questions Google Docs
Here, you are supposed to provide the Google Doc question file’s import link from which you want to check and update the TutorLMS Quiz-related information. The URL link will be in the format:
“https://docs.google.com/document/d/1nw/edit?tab=t.0”
To create your own TutorLMS Quiz Importing Google Doc question file, the steps are as follows:
1- Navigate to the “Import Docx” tab and click on the “Copy Question Template To Google Docs” button. Here, you will be asked to make your own online copy of the quiz-importing Google Doc question file into your Google account.
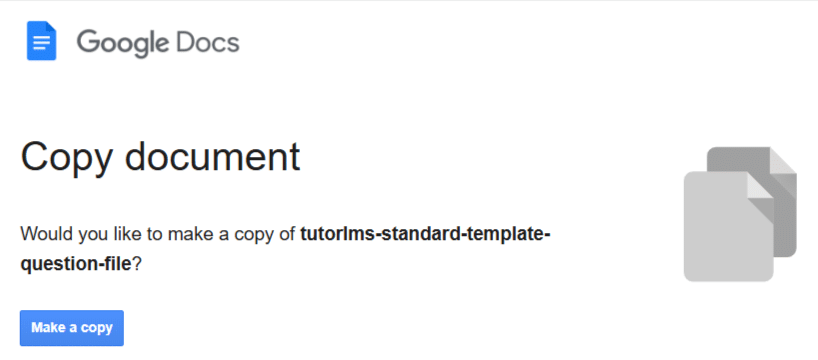
2- Finally, click the “Make a copy” button.
3- Once you have created your own quiz-importing Google Doc question file. Click on the “Share” button. Provide restricted access to the Google Doc with viewer role permissions.
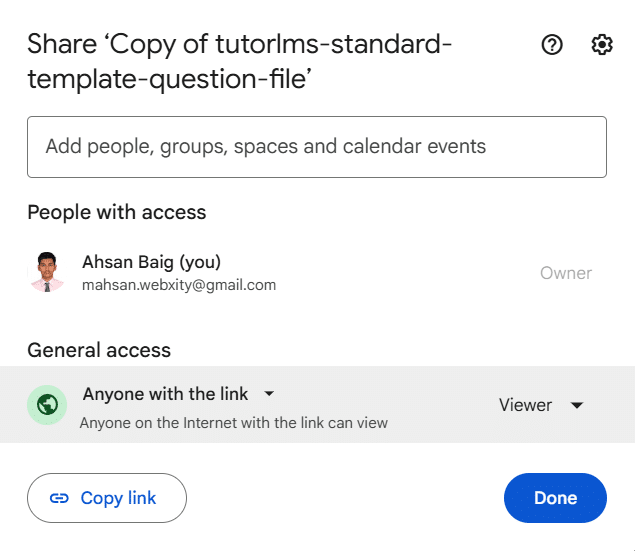
4- Click the “Copy link” button to copy the Google Doc URL.
5- Finally, navigate back to the “Settings” tab and paste the Google Doc URL in the “Questions Google Docs” option text field.
Answers Google Docs
Here, you are supposed to provide the Google Doc answer file’s import link from which you want to check and update the TutorLMS Quiz-related information. The URL link will be in the format:
“https://docs.google.com/document/d/1nw/edit?tab=t.0”
To create your own TutorLMS Quiz Importing Google Doc answer file, the steps are as follows:
1- Navigate to the “Import Docx” tab and click on the “Copy Answer Template To Google Docs” button. Here, you will be asked to make your own online copy of the quiz-importing Google Doc answer file into your Google account.
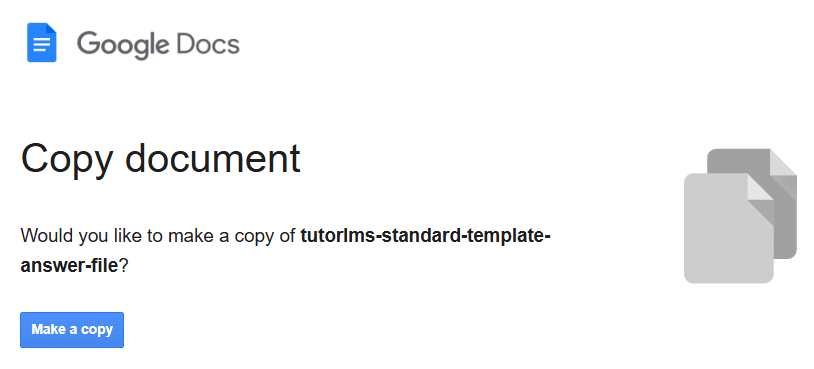
2- Finally, click the “Make a copy” button.
3- Once you have created your own quiz-importing Google Doc answer file. Click on the “Share” button. Provide restricted access to the Google Doc with viewer role permissions.
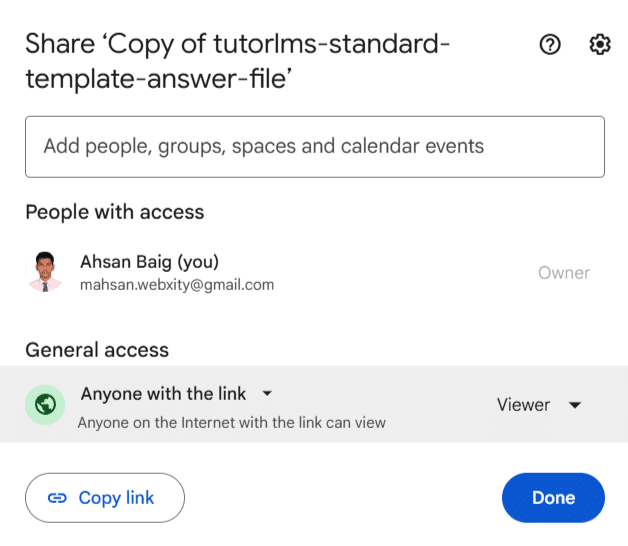
4- Click the “Copy link” button to copy the Google Doc URL.
5- Finally, navigate back to the “Settings” tab and paste the Google Doc URL in the “Answers Google Docs” option text field and click the “Update Settings” button.
Import Google Docs Now
Here, you can click the “Import Google Docs Now” button to manually run the Google Docs import function to update the respective quiz from Google Docs. After the function has been executed, your quiz-related information/content will be updated.
Shortcodes
Shortcode # 1
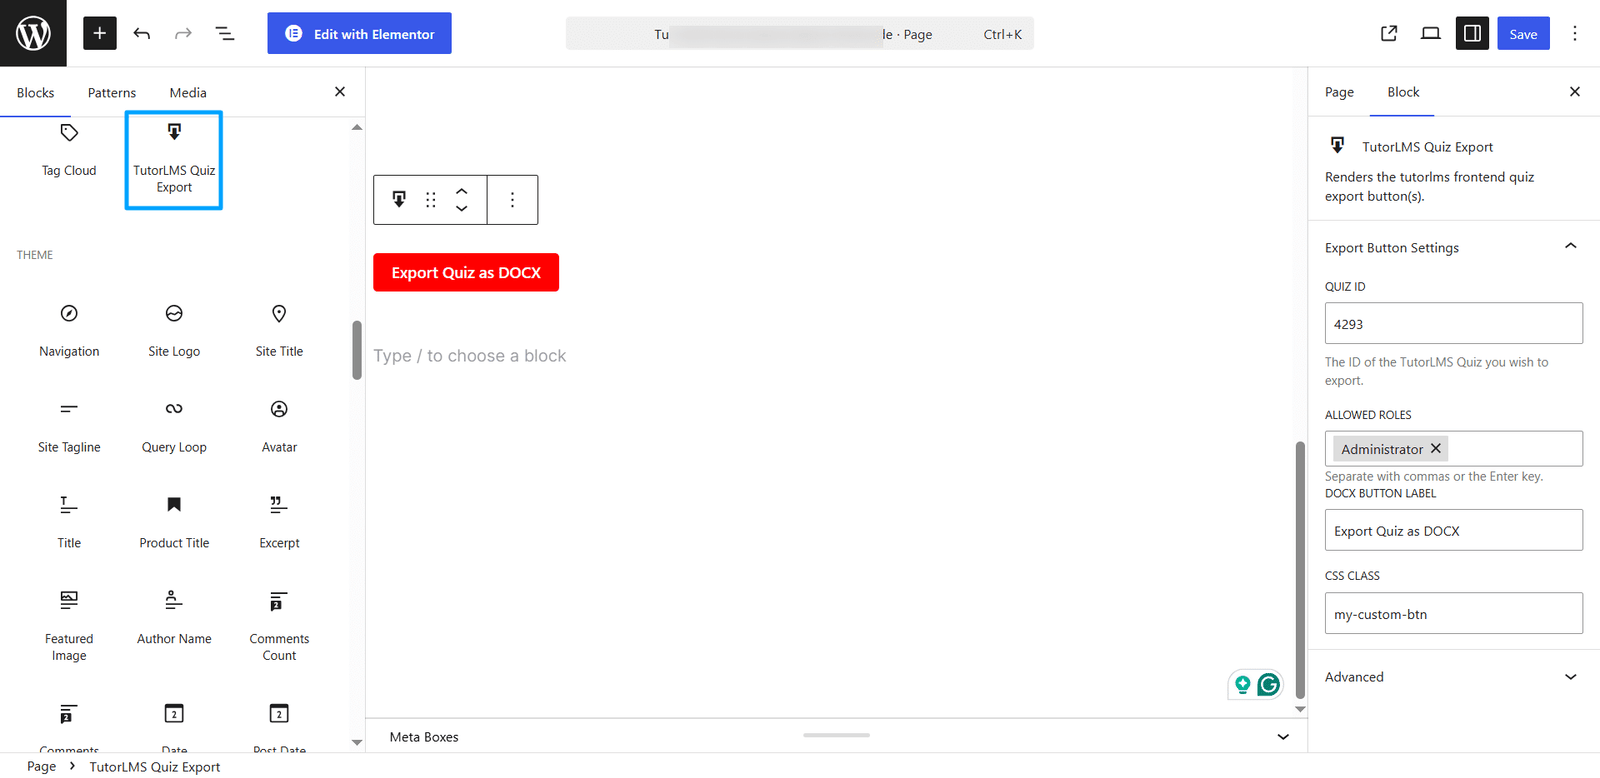
You can use the [tutorlms_quiz_import_export] to show a button on the frontend that will allow users to download the quiz in a .docx template.
The shortcode works as follows:
1- The shortcode [tutorlms_quiz_import_export] has 4 attributes, of which the “quiz_id” attribute is a required/mandatory attribute to be included for the shortcode’s functionality to work.
2- By default, the [tutorlms_quiz_import_export quiz_id=”123″] shortcode will only work/show for logged-in users.

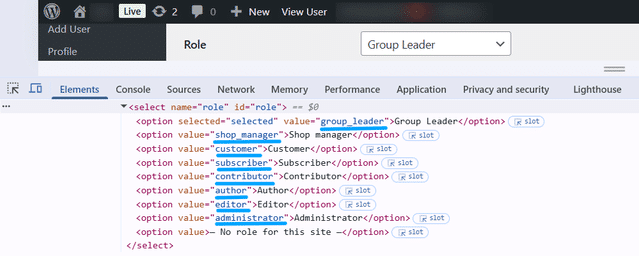
3- To allow multiple users of different user roles to access the shortcode functionality on the frontend, add multiple user roles in the “allowed_roles” attribute separated by a comma, like [tutorlms_quiz_import_export quiz_id=”123″ allowed_roles=”administrator,subscriber”]. This attribute is optional to use in the shortcode.
4- To get the value to enter for the “allowed_roles” attribute, navigate to the “Users” menu and open any profile to the “Role” field and inspect the dropdown to get the user role value to enter in the shortcode.
5- You can use the “docx_label” attribute to change the button text on the frontend pages, like [tutorlms_quiz_import_export quiz_id=”123″ allowed_roles=”administrator” docx_label=”Export Quiz”]. This attribute is optional to use in the shortcode.

6- You can use the “class” attribute to change the button CSS on the frontend pages, like [tutorlms_quiz_import_export quiz_id=”123″ allowed_roles=”administrator” docx_label=”Export Quiz” class=”my-custom-btn”]. This attribute is optional to use in the shortcode. You can add your custom CSS on the site using your theme customizer like:
.my-custom-btn{ background-color:red; }

Blocks
You can place the “TutorLMS Quiz Export” block on any page you want to allow the selected user roles to download the respective quiz in a .docx template from the frontend pages. It will work just like the “[tutorlms_quiz_import_export]” shortcode on the frontend.
TutorLMS Quiz Import/Export Template Guide (.xls , .xlsx files)
TutorLMS Quiz Import/Export uses a standard template to import and export all TutorLMS question types. This template should be filled in the given order to create your own templates for import/export.
Important
- Do not add, delete, rename, or reorder any columns in the provided template.
- Leave unused fields blank.
- Ensure all data is mapped to the correct columns before importing.
- Modifying the template structure may cause the import to fail or produce unexpected results.
Downloading The Template: The standard template can be found in the plugin folder:
TutorLMS-quiz-import-export > Sample-import-files > Standard-template.xls
Completing The Template:
Note that the TutorLMS Quiz Import/Export template supports special characters and has been tested with dozens of languages. If you need to import quizzes that contain special characters, please input your file encoded in UTF-8 format. This will ensure all quizzes are imported accurately and avoids the conversion of strings like “≤, ÷, ∑, ∛, µ” into unwanted characters.
The template contains the following 3 sub sheets:
- Quizzes > Add all of the Quiz settings.
- Questions > Add all of the Quiz questions.
- Answers > Add answers to all of the questions.
Quizzes
Quiz Title
This column will hold the quiz title for the quiz to be imported.
Quiz ID
This column will hold the quiz’s unique post ID.
Quiz Content
This column will hold quiz content/description in text/HTML format.
Course
Add the course title to associate the quiz with.
Course ID
This column will hold the quiz’s Course ID.
Topic
Add the topic title to associate the quiz.
Topic ID
This column will hold the quiz’s Topic ID.
Quiz Order
This column will hold the quiz’s order number.
Position in Topic
This column will hold the quiz’s position number in the topic.
Time Limit
Here you can add the time limit of the quiz. You can alter the list displayed by setting different parameters:
a:2:{s:10:”time_value”;s:1:”1″;s:9:”time_type”;s:7:”minutes”;}
Parameters
- “1”: This is the time limit and you can set it to any number. 0 means no time limit.
- “minutes”: Change the time limit to seconds, minutes, hours, days, or weeks.
Examples:
a:2:{s:9:”time_type”;s:7:”seconds”;s:10:”time_value”;s:1:”2″;}
a:2:{s:9:”time_type”;s:7:”minutes”;s:10:”time_value”;s:1:”4″;}
a:2:{s:9:”time_type”;s:5:”hours”;s:10:”time_value”;s:1:”5″;}
a:2:{s:9:”time_type”;s:4:”days”;s:10:”time_value”;s:1:”7″;}
a:2:{s:9:”time_type”;s:5:”weeks”;s:10:”time_value”;s:1:”8″;}
Hide Quiz Time Display
Add 1 to enable the “Hide quiz time – display” option. Here, you can set whether the toggle will be enabled or disabled. To enable, enter “1”; otherwise, enter “0” or leave the cell empty.
Feedback Mode
Add the feedback mode. You can select between “Default (default)”, “Reveal (reveal)”, or “Retry (retry)”.
Attempts Allowed
Add the Restriction on the number of attempts a student is allowed to take for this quiz. Set 0 for no limit. Use it when the “retry” option is used in the “Feedback Mode” column.
Passing Grade
Set the passing percentage for this quiz.
Max Questions For Answer
This amount of questions will be available for students to answer, and the question will come randomly from all available questions belonging to a quiz. If this amount is greater than the available questions, then all questions will be available for a student to answer.
Quiz Auto Start
If you enable this option, the quiz will start automatically after the page is loaded. To enable it, set the value to 1. Here, you can set whether the toggle will be enabled or disabled. To enable, enter “1”; otherwise, enter “0” or leave the cell empty.
Question Layout View
Here you can set different question layouts. Available layouts are:
“Set_question_layout_view”, “single_question” or empty cell, “question_pagination”, and “question_below_each_other”.
Questions Order
Here you can set the question order. 4 types of orders are available;
- For ascending order, add “asc”
- For descending order, add “desc”
- Random, add “rand”
- Sorting, add “sorting”
Hide Question Number Overview
Show/hide the question number during the attempt. To enable it, set it to 1.
Short Answer Characters Limit
Set the character limit in which the Student will place the answer in the short answer question type.
Open-Ended Answer Characters Limit
Set the character limit in which the Student will place the answer in the Open-Ended/Essay question type.
Questions
Associated Quiz
Add the title of the Quiz with which the quiz will be associated.
Question Title
Add the title of the question.
Question ID
Add a unique post ID for the question.
Question Description
Add the question description.
Question Type
Add the question types. The following 10 types are available to add:
- true_false
- single_choice
- multiple_choice
- open_ended
- fill_in_the_blank
- short_answer
- matching
- image_matching
- image_answering
- ordering
Question Mark
Add the points for the answer.
Answer Required
To give the answer compulsory, set the value to 1. Here, you can set whether the toggle will be enabled or disabled. To enable, enter “1”; otherwise, enter “0” or leave the cell empty.
Randomize Question
To enable randomization, set the value to 1. Use it only for the question types “multiple_choice” and “matching, image_matching”.
Show Question Mark
You can show/ hide the question marks on the front end. To enable, set the value to 1. Here, you can set whether the toggle will be enabled or disabled. To enable, enter “1”; otherwise, enter “0” or leave the cell empty.
Question Order
Here you can set the Question order/ priority level.
Is Image Matching
Here, you can set whether the toggle will be enabled or disabled. To enable, enter “1”; otherwise, enter “0” or leave the cell empty. Use this field for the “image_matching” and “matching” question types.
Has Multiple Correct Answer
Here, you can set whether the toggle will be enabled or disabled. To enable, enter “1”; otherwise, enter “0” or leave the cell empty. Use it for the “multiple_choice” question type.
Answer Explanation
Here, you can provide the question’s answer explanation text.
Answers
Associated Question
Add the title of the Question with which the answer will be associated.
Question Type
Add the question types. The following 10 types are available to add:
- true_false
- single_choice
- multiple_choice
- open_ended
- fill_in_the_blank
- short_answer
- matching
- image_matching
- image_answering
- ordering
Answer Title
Add the title of the answer.
Correct Answers
For the correct answers, set this field to 1, otherwise set “0” for the wrong answer.
Image
If the answer has an image, then you can add its link here.
Answer Two Gap Match
In this column, add the Answers of the “Fill in the Blank” and “Matching” type Questions. Also, for the “true_false” question type, provide “true” for the correct answer and “false” for the wrong answer.
Answer View Format
The format of the answers is set to text.
Answer Order
Easily prioritize your answers with a simple numbering system. Assign “1” to place an answer on top, and “2” to position it below the first answer.
TutorLMS Quiz Import/Export Template Guide (.docx file)
We have added eight TutorLMS Question Types for Quiz Import, as follows:
- True/False
- Multiple Choice
- Open Ended/Essay
- Fill in the Blanks
- Short Answer
- Matching
- Image Answering
- Ordering
To ensure accurate extraction and automated processing, the formatting in the Word DOCX must follow these rules exactly. Even small deviations will cause extraction errors.
DOCX Question File – Question Formatting Rules
- Question Numbering (Mandatory Format)
- Use Word’s built-in numbered list
- Format: 1. only (number followed by a dot)
- Do not type the number manually. You must use Word’s automatic numbering feature.
- Do not use any other format for starting a question; only use 1. List Format.
- Questions will only be detected if they begin with automatic numbering in the format “1.”
- Option Formatting
- Each option must start with formatting A. (uppercase letter + dot), such as A., B., C.
Note: This must be applied using Word formatting. Manually typing A. will not be accepted.
- Do NOT use a., a), or any other variation.
- Additional Notes
- Between questions, you may use other numbering styles like 1), i), I), i.e., as long as they are not used for questions or options.
- Do not use 1. A. format anywhere except for the starting question and the starting option.
Note: Not all formatting options are supported during the importing and exporting of the question’s description (optional) and the answer’s explanation fields.
Question Docx File
By following these steps, you can easily create a question docx file:
- The numbered list format is needed to create a list of questions.
- The .docx format allows you to include images in questions.
- You can also include/embed videos in the questions by “ Video Link ” shortcode. Videos can be included from different platforms like YouTube and Vimeo.
For example:
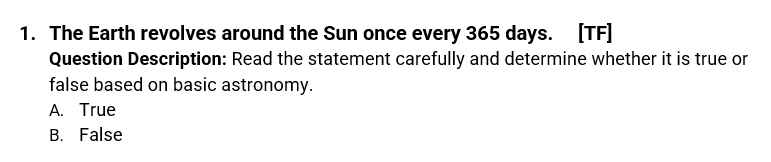
1. True/False
You can create a True/False question by following these steps:
- Write your questions in an ordered list format using numbers only (not alphabetically).
- Provide the question’s text.
- You have to add the shortcode “[TF]” at the end of the question to indicate that it is a True/False question.
- If your question has some description, you can provide it in the next line after the “Question Description:” text to indicate that the text after it is the question’s description. This step is optional.
- In the last step, you have to write your options in an ordered list format using alphabetical order.
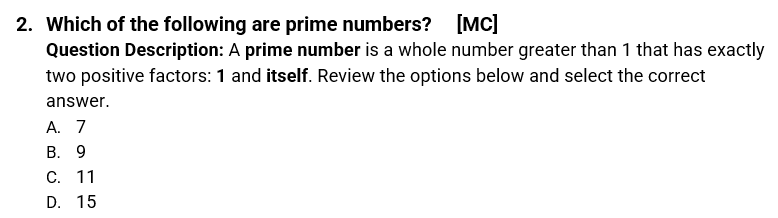
2. Multiple Choice
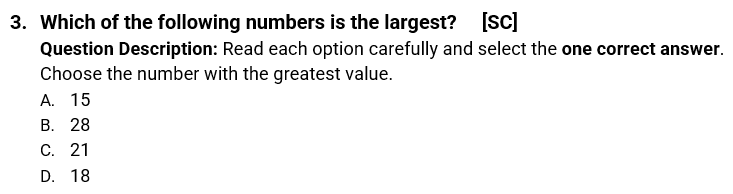
You can easily create a multiple-choice question by following these steps:
- Format all questions using a numbered list (e.g., 1, 2, 3…).
- Provide the question’s text.
- In case your respective question has the “Multiple Correct Answer” option enabled, use the “[MC]” shortcode. Otherwise, use the “[SC]” option if your respective question has the “Multiple Correct Answer” option disabled.
- If your question has some description, you can provide it in the next line after the “Question Description:” text to indicate that the text after it is the question’s description. This step is optional.
- For each question, display the answer choices in a lettered list using the alphabet (e.g., A, B, C, D). You have to write your options in an ordered list format using alphabetical order.
- If the options have a picture as well, then provide the picture right after the option’s text. This step is optional.
3. Open Ended/Essay
You can create an Open Ended/Essay question by following these steps:
- Format all questions using a numbered list (e.g., 1, 2, 3…).
- Provide the question’s text.
- You have to add the shortcode “[OE]” at the end of the question to indicate that it is an Open Ended/Essay question.
- If your question has some description, you can provide it in the next line after the “Question Description:” text to indicate that the text after it is the question’s description. This step is optional.

4. Fill in the Blanks
You can create Fill in the Blanks questions by following these steps:
- Format the question using a numbered list (e.g., 1, 2, 3…).
- Provide the question text.
- Add the shortcode “[FB]” at the end to mark it as a Fill-in-the-Blank question. (No answer needs to be included.)
- Provide the “Fill in the Blanks” text after the “Fill in the blanks:” text. Insert 3–4 underscores (___) in the position where the learner should enter their answer.
- If your question has some description, you can provide it in the next line after the “Question Description:” text to indicate that the text after it is the question’s description. This step is optional.

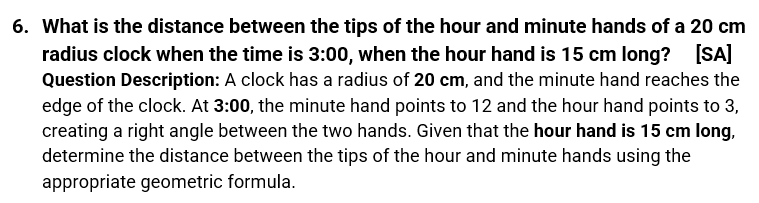
5. Short Answer
You can ask these types of questions by following these steps:
- Format the question using a numbered list (e.g., 1, 2, 3…).
- Provide the question text.
- Add the shortcode “[SA]” at the end to mark it as a Short Answer question.
- If your question has some description, you can provide it in the next line after the “Question Description:” text to indicate that the text after it is the question’s description. This step is optional.
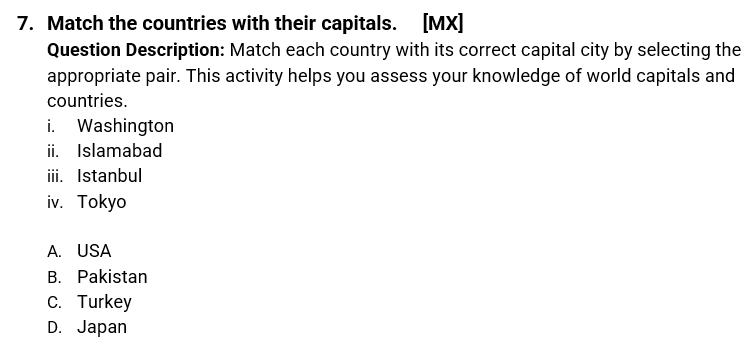
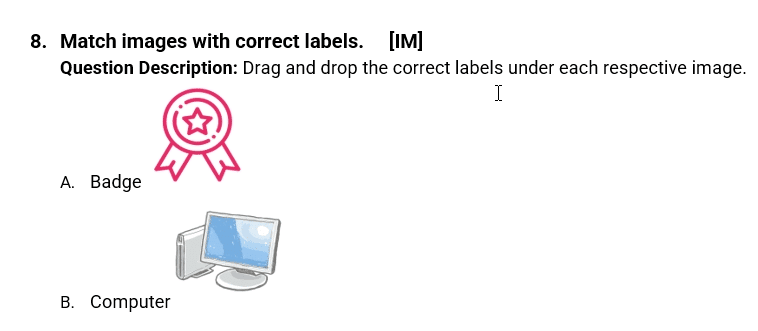
6. Matching
You can ask these types of questions by following these steps:
- Format the question using a numbered list (e.g., 1, 2, 3…).
- Provide the question’s text.
- In case your respective question has the “Image Matching” option enabled, use the “[IM]” shortcode. Otherwise, use the “[MX]” option if your respective question has the “Image Matching” option disabled.
- If your question has some description, you can provide it in the next line after the “Question Description:” text to indicate that the text after it is the question’s description. This step is optional.
- List the criteria options, first column in roman numbering system and second column in alphabetical numbering system.
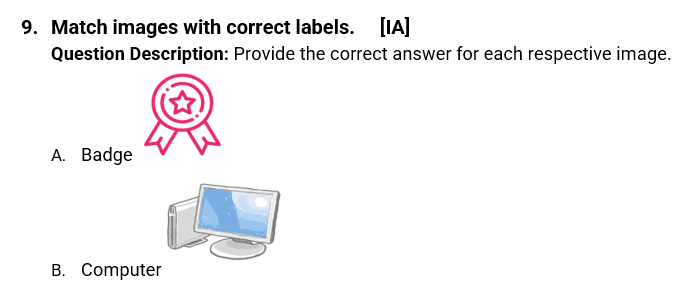
7. Image Answering
You can ask these types of questions by following these steps:
- Format the question using a numbered list (e.g., 1, 2, 3…).
- Provide the question text.
- Add the shortcode “[IA]” at the end to mark it as an Image Answering question.
- If your question has some description, you can provide it in the next line after the “Question Description:” text to indicate that the text after it is the question’s description. This step is optional.
- In the last step, you have to write your options in an ordered list format using alphabetical order.
- If the options have a picture as well, then provide the picture right after the option’s text. This step is optional.
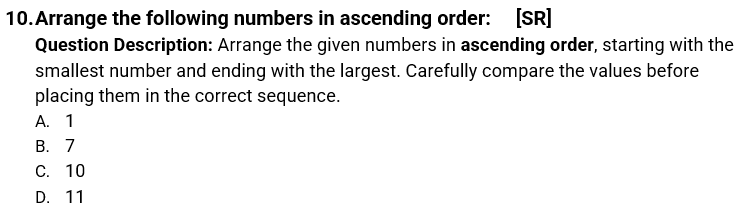
8. Ordering
You can ask these types of questions by following these steps:
- Format the question using a numbered list (e.g., 1, 2, 3…).
- Provide the question text.
- Add the shortcode “[SR]” at the end to mark it as an Ordering question.
- If your question has some description, you can provide it in the next line after the “Question Description:” text to indicate that the text after it is the question’s description. This step is optional.
- In the last step, you have to write your options in an ordered list format using alphabetical order.
- If the options have a picture as well, then provide the picture right after the option’s text. This step is optional.
DOCX Answer File – Answer Formatting Rules
- Answer Formatting
- Each answer must be listed using 1. format only to match the corresponding question number.
- Do not type the number 1 to start the answer manually. You must use Word’s automatic numbering feature.
- Correct Option Labeling
- Each answer must start with the correct option letter, written manually, like:
A.
B.
C.
D. etc - In the answer DOCX file, when listing quiz answers, do not use automatic formatting because if your question has B. option correct, an automatic list will always start with A., not B., so you must type the option manually. This applies to all 8 question types.
- Each answer must start with the correct option letter, written manually, like:
Note: Not all formatting options are supported during the importing and exporting of the question’s description (optional) and the answer’s explanation fields.
Answer Docx File
By following these steps, you can create an answer DOCX file:
1- Use a numbered list “1)”, “2)” to align each answer with its corresponding question. The numbering in the answer document should match the question numbers in the quiz.
2- You can optionally include images in your answers by navigating to
Insert → Image → Upload from Computer.
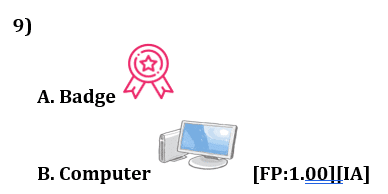
3- After writing each answer for the respective question type, use the “[FP:1.00]” shortcode to define the points assigned to that respective question.
4- Include the appropriate shortcode to indicate the question type:
- [TF] – Single Choice
- [SC]/[MC] – Multiple Choice
- [OE] – Open Ended/Essay
- [FB] – Fill in the Blanks
- [SA] – Short Answer
- [MX]/[IM] – Matching
- [IA] – Image Answering
- [SR] – Ordering
5- After the question’s shortcode, you can provide the question’s Answer Explanation by writing “Answer Explanation:” text in the next line. This will indicate the upcoming text is the question’s “Answer Explanation” field’s content.
1.True/False ([TF])
To provide a True/False question’s answer, the steps are as follows:
- Number your answer. Use Word’s numbering system [ 1) , 2), 3) ].
- List the correct option alphabetically (A. or B.) with the text.
- Add the “[FP:1.00]” shortcode to assign points.
- Use the “[TF]” shortcode to mark the question type.
- Use the “Answer Explanation:” text in the next line to indicate that the text after it in the next line is the content for the question’s “Answer Explanation” field.

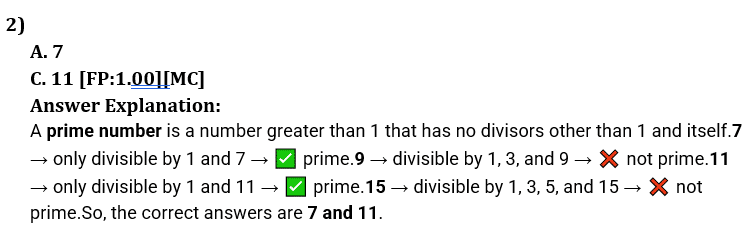
2. Multiple Choice ( [SC] / [MC] )
To create a multiple-choice question’s answer, the steps are as follows:
- Number your answer. Use Word’s numbering system [ 1) , 2), 3) ].
- List the correct options in alphabetical order (A., B., C., etc.) as shown in the question DOCX file in separate lines with the text.
- If each answer option has an image, then add the image right after the option’s text. This step is optional.
- Add the “[FP:1.00]” shortcode to assign points.
- Use the “[SC]” or “[MC]” shortcode to mark the question type.
- Use the “Answer Explanation:” text in the next line to indicate that the text after it in the next line is the content for the question’s “Answer Explanation” field.
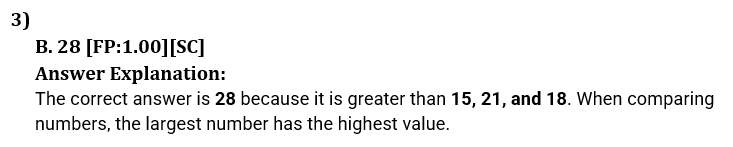
3.Open Ended/Essay ([OE]):
To provide an Open Ended/Essay question’s answer, the steps are as follows:
- Number your answer. Use Word’s numbering system [ 1) , 2), 3) ].
- Add the “[FP:1.00]” shortcode to assign points.
- Use the “[OE]” shortcode to mark the question type.
- Use the “Answer Explanation:” text in the next line to indicate that the text coming after it in the next line is the content for the question’s “Answer Explanation” field.

4. Fill in the Blanks ([FB])
To provide a Fill in the Blanks question’s answer, the steps are as follows:
- Number your answer. Use Word’s numbering system [ 1) , 2), 3) ].
- Provide the correct answers for the blank(s).
- Add the “[FP:1.00]” shortcode to assign points.
- Use the “[FB]” shortcode to mark the question type.
- Use the “Answer Explanation:” text in the next line to indicate that the text after it is the content for the question’s “Answer Explanation” field.
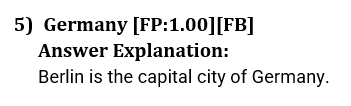
5. Short Answer (SA)
To provide a Short Answer question’s answer, the steps are as follows:
- Number your answer. Use Word’s numbering system [ 1) , 2), 3) ].
- Add the “[FP:1.00]” shortcode to assign points.
- Use the “[SA]” shortcode to mark the question type.
- Use the “Answer Explanation:” text in the next line to indicate that the text after it is the content for the question’s “Answer Explanation” field.
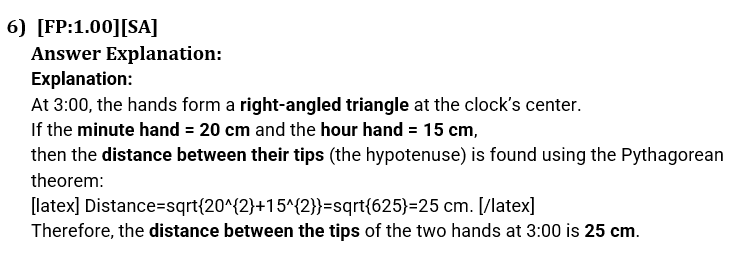
6. Matching ([MX])
To create a Matching question’s answer, the steps are as follows:
- Number your answer. Use Word’s numbering system [ 1) , 2), 3) ].
- List the correct options in alphabetical order (A., B., C., etc.) as shown in the question DOCX file in separate lines with the text.
- If each answer option has an image, then add the image right after the option’s text. This step is optional.
- Add the “[FP:1.00]” shortcode to assign points.
- Use the “[IM]” or “[MX]” shortcode to mark the question type.
- Use the “Answer Explanation:” text in the next line to indicate that the text after it is the content for the question’s “Answer Explanation” field.
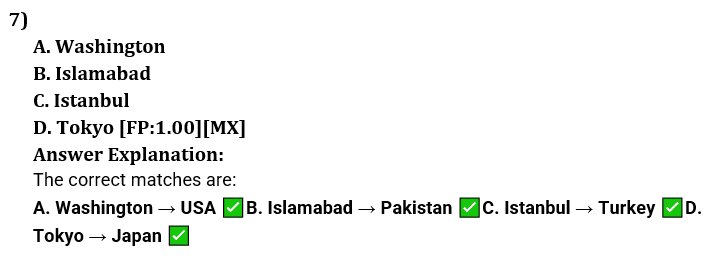
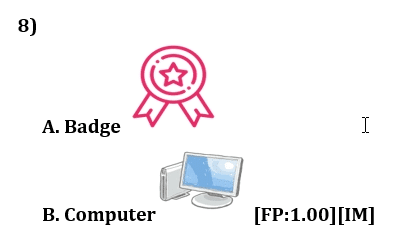
7. Image Answering ([IA])
To create an Image Answering question’s answer, the steps are as follows:
- Number your answer. Use Word’s numbering system [ 1) , 2), 3) ].
- List the correct options in alphabetical order (A., B., C., etc.) as shown in the question DOCX file in separate lines along with text.
- If each answer’s option has an image then add the image right after the option’s text. This step is optional.
- Add the “[FP:1.00]” shortcode to assign points.
- Use the “[IA]” shortcode to mark the question type.
- Use the “Answer Explanation:” text in the next line to indicate that the text after it is the content for the question’s “Answer Explanation” field.
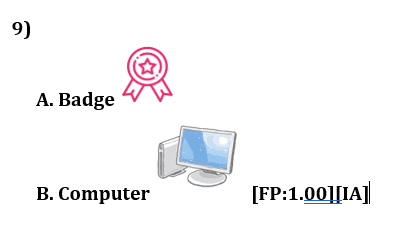
8. Ordering ([SR])
To create an Ordering question’s answer, the steps are as follows:
- Number your answer. Use Word’s numbering system [ 1) , 2), 3) ].
- List the correct options in alphabetical order (A., B., C., etc.) as shown in the question DOCX file in separate lines with the text.
- If each answer option has an image, add the image right after the option’s text. This step is optional.
- Add the “[FP:1.00]” shortcode to assign points.
- Use the “[SR]” shortcode to mark the question type.
- Use the “Answer Explanation:” text in the next line to indicate that the text after it is the content for the question’s “Answer Explanation” field.
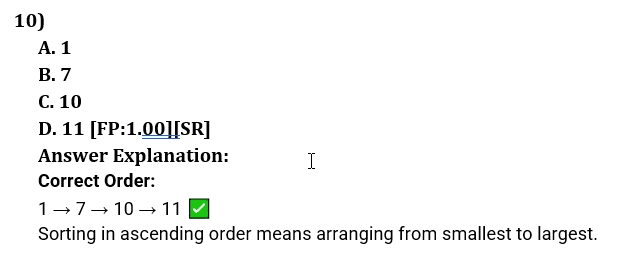
FAQ’s
Does the Add-On support all question types present in TutorLMS?
Yes. The add-on supports all question types present in TutorLMS.
Which excel extension does this add-on support?
This add-on supports the .xls and .xlsx file extensions.
Can I import or export multiple quizzes at a time?
Yes, you can import and export multiple quizzes at a time using this add-on.
Where can I find the standard XLS template?
The plugin zip file includes a standard XLS template for import, located at > tutorlms-quiz-import-export > sample-import-files.
Can I add both, images and text, in the sheet for an answer?
Yes, images and text both can be added to the answer.
Can we also import/export Courses Topics and Lessons with this addon?
This add-on is specifically for import export of Quizzes. For importing and exporting Courses, Topics, and Lessons, we recommend using our TutorLMS Course Import/Export add-on.
Changelogs
1.4.1
- Fix: Resolved security and performance issues.
1.4.0
- New: Added JSON export button to export quiz in JSON.
- New: Added bulk JSON export to export multiple quizzes in JSON.
- New: Added JSON import tab to import quizzes in json file.
- New: Added Google Docs import compatibility to import quizzes automatically on selected schedule.
- Fix: Fixed minor css issues.
1.3.0
- New: Added a frontend DOCX quiz export button through a shortcode and Gutenberg block, with role restrictions, custom labels, and custom CSS classes.
- New: Added shortcode usage documentation to the plugin settings page.
- Fix: Updated DOCX export to use the bundled quiz template filenames and report missing templates clearly.
1.2.0
- New: Added DOCX quiz import and export using separate question and answer documents.
- New: Added DOCX support for all Tutor LMS question types, embedded images, equations, answer explanations, hints, and per-question points.
- New: Added a downloadable DOCX template and searchable quiz selection for imports.
- Fix: Prevented escaped slashes from appearing in spreadsheet-imported quiz content.
1.1.5
- Fix: Change the link for the google doc.
1.1.4
- Fix: Fixed Minor issues.
1.1.3
- Fix: Improved Licensing Module.
1.1.2
- Fix: Fixed google sheet not copying issue.
1.1.1
- Fix – Fixed sheet name not showing after selecting file for import.
- Fix – Resolved security and performance issues.
1.1.0
- New – Added Google Sheet import compatibility.
- Fix – Resolved quiz import answers issue.
1.0.13
- Fix – Resolved license URL issue.
1.0.12
- Fix – Resolved security and performance issues.
1.0.11
- Fix – Resolved an issue where imported quizzes were placed at the beginning of lessons instead of their original positions.
- Tweak – Improved consistency of quiz sorting order during import.
1.0.10
- Fix – Resolved an issue where imported quiz questions were not distributed to their respective quizzes.
1.0.9
- Fix – Resolved a compatibility issue between Php Spreadsheet and PHP 7.4.
1.0.8
- Fix – Resolved import/export functionality for the “Answer Explanation” option.
1.0.7
- Fix – Resolved “Multiple Correct Answer” option is correctly imported and exported.
1.0.6
- New – Added compatibility with the latest TutorLMS course builder feature.
1.0.5
- Fix – Resolved export quiz issue.
1.0.4
- Fix – Quiz Import URL parameters issue.
1.0.3
- Fix – Resolved questions answers visibility issues.
- Fix – Resolved minor issues related to quiz import functionality.
1.0.2
- Fix – Resolved minor issues related to quiz import/export functionality.
- New – Introduced a feature to eliminate duplicate answers from the website.
- New – Implemented a selection feature in the manage export tab for associating quizzes to courses and topics.
1.0.1
- Fix – Resolved problems related to quiz import/export functionality.
- New – Updated the plugin’s user interface for a better user experience.
- New – Implemented a logging system to track activities within the addon.
1.0.0
- Initial Release.
